| MIATA BUILD |
|
|
 | |
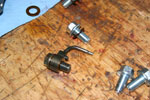 | April 10, 2007 - One trick for a little more naturally aspirated power is to remove the oil squirters.
They spray oil on the bottom of the pistons to keep them cool - excellent for forced induction, but in the case of naturally aspirated engines they rob some power by making the atmosphere in the crankcase denser. So the sprayers have been replaced with straight bolts.
entry 123 - tags: engine |
| |
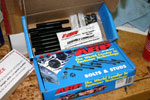 | April 10, 2007 - While the cams are designed for a good torque spread, we will have the ability to wind out the engine to about 9000 rpm if it proves worthwhile.
These ARP fasteners - developed with the help of Flyin' Miata - will help keep the bottom end together. Overkill perhaps, but at least we know the strength of the engine won't be questioned.
entry 124 - tags: engine |
| |
 | April 10, 2007 - Even though the crank is a brand new one made for this application, it's still a good plan to check bearing clearances.
Right on target.
I hope the guy who invented Plastigauge retired rich. It's such a great tool - nothing more than a carefully produced strip of plasticine that is squashed and measured using the grid on the package. Cheap, easy to use and effective. Anyone can come up with a complicated and expensive solution to a problem, it's the simple ones like this that take a real brainstorm.
entry 125 - tags: engine |
| |
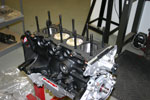
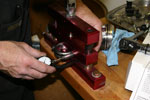 | April 12, 2007 - With the rings all set and everything assembled, it's time to put the piston and rods in the block.
First, we need to determine the required torque on the crank bolts. This is done by measuring the unstressed length of the bolt and then tightening it up until it's 0.005" longer. The rod is being held in a vice designed exactly for this purpose.
entry 126 - tags: engine |
| |
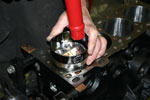 | April 12, 2007 - Tap tap tap goes the piston into the block.
The black cylinder is a ring compressor. Once the piston is in place, the bearing clearances are checked on the big ends of the rods, then everything is lubricated with red assembly lube and torqued up.
It's not fast work. It's a long time since I last built an engine and I'm working methodically with a lot of help from Bill Cardell. Things should go more quickly from this point, as things only need to be assembled once instead of twice. By the end of the weekend I want the shortblock done, ready for the tardy head to arrive.
entry 127 - tags: engine |
| |
 | April 16, 2007 - The oil pump was disassembled and filled with Redline assembly lubrication.
Some Miata engine builders say this isn't necessary, but I feel more comfortable with an oil pump that's primed and ready to go.
entry 128 - tags: engine |
| |
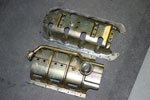 | April 16, 2007 - In 2001, Mazda added a Main Bearing Support Plate to the Miata engine (top).
It's basically a super windage tray that bolts on to four of the main caps. The 1994-00 version is below. It needs a bit of modification to clear the ARP studs - the larger outer holes in each little "valley" are ones I added for this purpose.
Right, there's that done - but I don't seem to have a 2001 oil pan! Whoops. So maybe I'll have to go with the earlier design after all this.
entry 129 - tags: engine, interchange |
| |
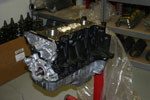 | April 17, 2007 - The engine comes together.
It's been a really slow process, mostly because I've been hunting down all the fasteners and miscellaneous bits and pieces that are scattered all over Flyin' Miata. I didn't strip the engine down, and in the long time it's been apart many of the components were liberated for other uses. This even includes the piston rings! So it's a minor victory when even one part is installed.
Several parts are installed, however. I investigated modifying a pre-2001 oil pan to work with the bearing support plate, but no luck. So it's the earlier design that got installed. Once the pan was on, I flipped the engine over to keep working on the water pump. Hmm, those pistons don't look right...
entry 130 - tags: engine |
| |
 | April 17, 2007 - The engine is going to have to come apart again.
I'm still trying to sort out why, but the pistons are standing proud of the block. Not good. Usually I'd do a quick check of this after installing the first piston, but this was the third engine built with pistons from this batch so I was pretty confident everything was good.
Well, it was supposed to have been built with known pistons. A check of the paperwork indicates that an experimental set of pistons intended for use with a stock crank may have ended up in the motor. I need to do some more checking on this.
Whatever the reason, it appears I'll be tearing it all apart again. At least I know the clearances are good now. Sigh.
entry 131 - tags: engine |
| |
April 18, 2007 - Much rejoicing!
The engine still has to come apart, but the correct pistons have surfaced. After combing through old paperwork to ensure they did in fact exist, the pistons were found in a dusty box inside another dusty box in the back corner of the FM shop. How they got there is a bit of a mystery, but the end result is that I just need to pull the oil pan off (yuk, lots of silicone sealant involved), pop the rods and pistons out then swap the pistons over. The bore is the same and Wiseco is very accurate on boring. The rings are the same as well, so all the difficult and tedious work does not need to be repeated.
Phew! This is a relief. The pistons that are currently in the block are a unique set, intended to combine the long stroker rods with a stock crank in order to obtain a very good rod ratio. The pistons that I'm supposed to have use the same rods but with a different crank. There's only one set of those in existence as well - so it would have been a long wait if I'd had to have another set made.
entry 132 - tags: engine |
| |
April 18, 2007 - A request for the RSS readers.
I know there are a few people out there using the RSS feed to watch the site. I'm doing a bit of an experiment - please check out an updated feed at http://targamiata.com/rssplus.php and let me know what you think. I'm new at this RSS stuff.
entry 133 - tags: announcements |
| |
 | April 19, 2007 - Time to change out the pistons.
The new ones have a much shorter crown on them for some reason. They were supposed to be the same compression ratio, I'm not sure why there's such a difference.
entry 134 - tags: engine |
| |
 | April 19, 2007 - One good side effect of the piston swap (other than the fact that the new ones won't slam into the head) is that while the pan was off, Bill found a 2001 version ready to install.
Just in time, too - I already had the sealant on the windage tray. So the main bearing support plate went on. Woohoo!
entry 135 - tags: engine, interchange |
| |
 | April 19, 2007 - The oil pan is sealed with a big bead of black silicone.
It's a little unnerving, because if you don't get it all sealed then you get the pleasure of pulling the engine out again. Yuk.
This silicone is "The Right Stuff", the favorite at Flyin' Miata. The black color also looks more professional than orange or grey, as it unavoidably squeezes out of the seams.
entry 136 - tags: engine |
| |
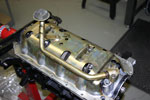
 | April 19, 2007 - The head is here and ready to install.
The machine shop did the usual excellent work on the combustion chambers, unshrouding the oversize valves and polishing everything.
entry 137 - tags: engine |
| |
 | April 19, 2007 - Both the intake and exhaust ports have been massaged for extra flow.
This should be about as good as a Miata head gets.
entry 138 - tags: engine |
| |
 | April 19, 2007 - With the short block all done, it's time to put a head on.
We're using ARP studs to keep everything together.
entry 139 - tags: engine |
| |
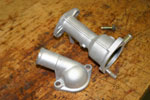
 | April 19, 2007 - A little gotcha built into the Miata engine.
This is the oil feed for the head. If you put the head gasket on upside down, everything works just fine - other than the fact that you cover up the oil feed. Then you starve your head of oil and it's time to take it all apart again. I've talked to two people recently who have done this. It's an easy mistake to make with expensive consequences - a bad combination.
entry 140 - tags: engine, tips |
| |
 | April 19, 2007 - If you really want to make an engine look beautiful, you need a bead blasting cabinet.
These are well-experienced parts, but a minute in the blaster and they look as good as new. It's great for cleaning old gasket goo off as well.
entry 141 - tags: engine, tips |
| |
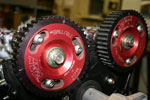 | April 19, 2007 - I'm going to run adjustable cam gears so I can dial in the cams.
These particular cams were designed by a friend who works at Integral Powertrain after also working at Cosworth. I have high hopes for them.
Those who know the Flyin' Miata catalog will notice that these are not FM cam gears. Why not? Because these AEMs were kicking around the shop and needed a new home, and this way we don't need new parts. Besides, these particular cam gears have a long history of competition. They were part of the monstrous Track Dog race car I built a few years back, and also visited Car and Driver as part of the original Superfour Challenge. So it's time they had another outing.
The downside is that they're not marked correctly - the gears are actually in the stock positions now, even though the intake cam appears to be retarded by 5 degrees and the exhaust by 4.
entry 142 - tags: engine |
| |

 THE DIARY