| MIATA BUILD |
|
|
 | | 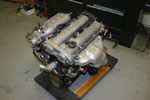 | March 19, 2006 - The engine has been obtained.
It will be torn apart for rebuilding with the new internals. It's from a 1999 Miata, equipped with a better cylinder head than the one originally used on our 1994.
entry 5 - tags: engine | | | 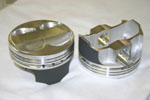 | March 15, 2006 - Sexy pistons.
Only 260 grams each, 11.5:1 compression and with a ridiculously small compression height. This engine is going to sing.
entry 6 - tags: engine | | |  | March 7, 2007 - The Hydra Nemesis computer that will control the car is going to be wired in.
It's available as a plug-in installation, but we can get rid of a whole bunch of wire by splicing these plugs right into the harness. The stock ECU is mounted behind the passenger's seat, ours will be under the dashboard.
entry 88 - tags: wiring, engine | | | 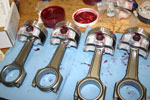 | April 10, 2007 - Time to stop playing with wires.
It's time to put the engine together. It's a fairly exotic piece, running high compression, a bore increased by 2mm and a stroke lengthened by 4mm. The rods are 6mm longer than stock to allow a good rod ratio for better revs. Flyin' Miata is using our car as a testbed for a high-end naturally aspirated powerplant, a change from the usual turbocharged beasts.
Due to the low compression height on the pistons, the wristpin is actually inside the oil rings. This means the rods have to be installed before the rings.
entry 121 - tags: engine | | |  | April 10, 2007 - Bill Cardell from Flyin' Miata helps out by setting the ring gaps.
entry 122 - tags: engine | | | 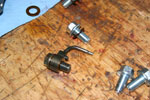 | April 10, 2007 - One trick for a little more naturally aspirated power is to remove the oil squirters.
They spray oil on the bottom of the pistons to keep them cool - excellent for forced induction, but in the case of naturally aspirated engines they rob some power by making the atmosphere in the crankcase denser. So the sprayers have been replaced with straight bolts.
entry 123 - tags: engine | | |  | April 10, 2007 - While the cams are designed for a good torque spread, we will have the ability to wind out the engine to about 9000 rpm if it proves worthwhile.
These ARP fasteners - developed with the help of Flyin' Miata - will help keep the bottom end together. Overkill perhaps, but at least we know the strength of the engine won't be questioned.
entry 124 - tags: engine | | |  | April 10, 2007 - Even though the crank is a brand new one made for this application, it's still a good plan to check bearing clearances.
Right on target.
I hope the guy who invented Plastigauge retired rich. It's such a great tool - nothing more than a carefully produced strip of plasticine that is squashed and measured using the grid on the package. Cheap, easy to use and effective. Anyone can come up with a complicated and expensive solution to a problem, it's the simple ones like this that take a real brainstorm.
entry 125 - tags: engine | | | 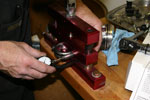 | April 12, 2007 - With the rings all set and everything assembled, it's time to put the piston and rods in the block.
First, we need to determine the required torque on the crank bolts. This is done by measuring the unstressed length of the bolt and then tightening it up until it's 0.005" longer. The rod is being held in a vice designed exactly for this purpose.
entry 126 - tags: engine | | | 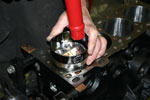 | April 12, 2007 - Tap tap tap goes the piston into the block.
The black cylinder is a ring compressor. Once the piston is in place, the bearing clearances are checked on the big ends of the rods, then everything is lubricated with red assembly lube and torqued up.
It's not fast work. It's a long time since I last built an engine and I'm working methodically with a lot of help from Bill Cardell. Things should go more quickly from this point, as things only need to be assembled once instead of twice. By the end of the weekend I want the shortblock done, ready for the tardy head to arrive.
entry 127 - tags: engine | | |  | April 16, 2007 - The oil pump was disassembled and filled with Redline assembly lubrication.
Some Miata engine builders say this isn't necessary, but I feel more comfortable with an oil pump that's primed and ready to go.
entry 128 - tags: engine | | | 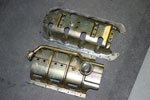 | April 16, 2007 - In 2001, Mazda added a Main Bearing Support Plate to the Miata engine (top).
It's basically a super windage tray that bolts on to four of the main caps. The 1994-00 version is below. It needs a bit of modification to clear the ARP studs - the larger outer holes in each little "valley" are ones I added for this purpose.
Right, there's that done - but I don't seem to have a 2001 oil pan! Whoops. So maybe I'll have to go with the earlier design after all this.
entry 129 - tags: engine, interchange | | | 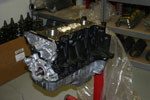 | April 17, 2007 - The engine comes together.
It's been a really slow process, mostly because I've been hunting down all the fasteners and miscellaneous bits and pieces that are scattered all over Flyin' Miata. I didn't strip the engine down, and in the long time it's been apart many of the components were liberated for other uses. This even includes the piston rings! So it's a minor victory when even one part is installed.
Several parts are installed, however. I investigated modifying a pre-2001 oil pan to work with the bearing support plate, but no luck. So it's the earlier design that got installed. Once the pan was on, I flipped the engine over to keep working on the water pump. Hmm, those pistons don't look right...
entry 130 - tags: engine | | |  | April 17, 2007 - The engine is going to have to come apart again.
I'm still trying to sort out why, but the pistons are standing proud of the block. Not good. Usually I'd do a quick check of this after installing the first piston, but this was the third engine built with pistons from this batch so I was pretty confident everything was good.
Well, it was supposed to have been built with known pistons. A check of the paperwork indicates that an experimental set of pistons intended for use with a stock crank may have ended up in the motor. I need to do some more checking on this.
Whatever the reason, it appears I'll be tearing it all apart again. At least I know the clearances are good now. Sigh.
entry 131 - tags: engine | | | April 18, 2007 - Much rejoicing!
The engine still has to come apart, but the correct pistons have surfaced. After combing through old paperwork to ensure they did in fact exist, the pistons were found in a dusty box inside another dusty box in the back corner of the FM shop. How they got there is a bit of a mystery, but the end result is that I just need to pull the oil pan off (yuk, lots of silicone sealant involved), pop the rods and pistons out then swap the pistons over. The bore is the same and Wiseco is very accurate on boring. The rings are the same as well, so all the difficult and tedious work does not need to be repeated.
Phew! This is a relief. The pistons that are currently in the block are a unique set, intended to combine the long stroker rods with a stock crank in order to obtain a very good rod ratio. The pistons that I'm supposed to have use the same rods but with a different crank. There's only one set of those in existence as well - so it would have been a long wait if I'd had to have another set made.
entry 132 - tags: engine | | |  | April 19, 2007 - Time to change out the pistons.
The new ones have a much shorter crown on them for some reason. They were supposed to be the same compression ratio, I'm not sure why there's such a difference.
entry 134 - tags: engine | | | 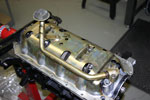 | April 19, 2007 - One good side effect of the piston swap (other than the fact that the new ones won't slam into the head) is that while the pan was off, Bill found a 2001 version ready to install.
Just in time, too - I already had the sealant on the windage tray. So the main bearing support plate went on. Woohoo!
entry 135 - tags: engine, interchange | | | 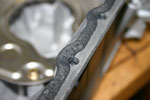 | April 19, 2007 - The oil pan is sealed with a big bead of black silicone.
It's a little unnerving, because if you don't get it all sealed then you get the pleasure of pulling the engine out again. Yuk.
This silicone is "The Right Stuff", the favorite at Flyin' Miata. The black color also looks more professional than orange or grey, as it unavoidably squeezes out of the seams.
entry 136 - tags: engine | | |  | April 19, 2007 - The head is here and ready to install.
The machine shop did the usual excellent work on the combustion chambers, unshrouding the oversize valves and polishing everything.
entry 137 - tags: engine | | |  | April 19, 2007 - Both the intake and exhaust ports have been massaged for extra flow.
This should be about as good as a Miata head gets.
entry 138 - tags: engine | | | 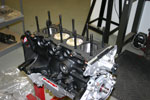 | April 19, 2007 - With the short block all done, it's time to put a head on.
We're using ARP studs to keep everything together.
entry 139 - tags: engine | | |  | April 19, 2007 - A little gotcha built into the Miata engine.
This is the oil feed for the head. If you put the head gasket on upside down, everything works just fine - other than the fact that you cover up the oil feed. Then you starve your head of oil and it's time to take it all apart again. I've talked to two people recently who have done this. It's an easy mistake to make with expensive consequences - a bad combination.
entry 140 - tags: engine, tips | | | 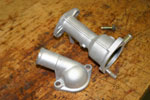 | April 19, 2007 - If you really want to make an engine look beautiful, you need a bead blasting cabinet.
These are well-experienced parts, but a minute in the blaster and they look as good as new. It's great for cleaning old gasket goo off as well.
entry 141 - tags: engine, tips | | | 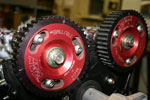 | April 19, 2007 - I'm going to run adjustable cam gears so I can dial in the cams.
These particular cams were designed by a friend who works at Integral Powertrain after also working at Cosworth. I have high hopes for them.
Those who know the Flyin' Miata catalog will notice that these are not FM cam gears. Why not? Because these AEMs were kicking around the shop and needed a new home, and this way we don't need new parts. Besides, these particular cam gears have a long history of competition. They were part of the monstrous Track Dog race car I built a few years back, and also visited Car and Driver as part of the original Superfour Challenge. So it's time they had another outing.
The downside is that they're not marked correctly - the gears are actually in the stock positions now, even though the intake cam appears to be retarded by 5 degrees and the exhaust by 4.
entry 142 - tags: engine | | | 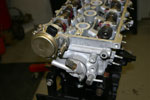 | April 19, 2007 - A cam angle sensor?
Yes indeed. This engine is going to have an interesting mix of components. For the engine management, I'm using a Hydra Nemesis. It's going to use a crank trigger wheel as the primary sensor for engine position. But in order to run sequential injection, it needs a second sensor on the camshaft in order to determine which cylinder is ready to fire. On a stock 1999-05 Miata, this sensor is on the front of the intake cam gear. But then I wouldn't be able to run my adjustable gears. So the venerable cam angle sensor from an early car (a 1990 in this case) will be attached to the back of the exhaust cam.
So the engine has a 2001-05 MBSP and oil pan, a 1999-00 block and head, 1990-93 cam angle sensor, hydraulic lifters from a 1990-97, valve keepers from a 1999-05, oil pressure senders from both a 1990 and a 1995, cams originally designed for a 1994-97, a 1994-97 valve cover, 1994 coils, a 1999-05 starter, 1994-97 alternator...thank you Mazda for leaving us this many options!
entry 143 - tags: interchange, engine | | | 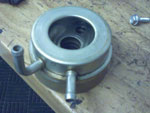 | April 22, 2007 - This odd little doodad is an oil cooler.
It sits under the oil filter and coolant runs through it. I don't really see how effective it can be given the relative temperatures of oil and coolant - unless it's intended to get the oil up to temperature more quickly. Regardless, I'll install it if only to act as a spacer. If I install a real oil cooler running through a thermostat, I need this thing to make sure all the fittings clear various protrusions on the block.
My apologies for the picture quality. I forgot the real camera so this is from a camera phone.
entry 144 - tags: engine, interchange | | | 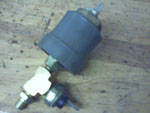 | April 22, 2007 - The 1995-05 Miatas had a "fake" oil pressure gauge that basically just showed that there was at least 7 psi of pressure - that's the little sender here.
The 1990-94 Miatas had a more traditional oil pressure gauge that showed actual oil pressure - that's the big grey sender. I want to run both. A real pressure gauge to tell me how things are going, and a big bright turn the engine off NOW! light.
Another camera phone picture, sorry.
entry 145 - tags: engine, interchange, wiring | | |  | April 22, 2007 - I may not have been busy taking pictures, but I have been busy assembling.
The engine is about 97% complete in this picture, and is even closer in real life. It's not as pretty as in earlier shots, partly because of the camera phone and also because I've been taking shortcuts. Shortcuts, you gasp! Ah, but there is method to my madness.
See, the final engine will have a special valve cover. It's off being powdercoated right now, so I stuck a fairly ugly valve cover in place to protect things. I'm also planning to use individual throttle bodies, so again a junkyard intake manifold was pressed into service. It'll look sexier when I'm done, honest.
Meanwhile, I'm getting close to being able to install the engine. I want to make sure I'm not blocking access to something important first, and I'll spend an evening ensuring the chassis is ready. But it's almost time!
entry 146 - tags: engine | | |  | April 24, 2007 - Time to take the engine from the Flyin' Miata shop to my garage, where the car is being built.
Putting this in the back of my old pickup increases the value of the truck by a factor of 5 at least.
The chassis is almost ready for the engine. I need to plug a few extraneous holes (such as the heater and AC pass-throughs) and then it's time to drop the engine in.
entry 147 - tags: engine, other cars | | | 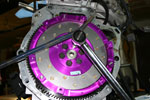 | April 25, 2007 - Time to bolt up the flywheel.
Lots of people have questions about how to keep the crank from turning when tightening the front crank bolt or the flywheel bolts. A well-placed prybar does the trick.
But really, the reason I took this picture was to show off the very cool purple flywheel from Flyin' Miata.
entry 149 - tags: engine | | | 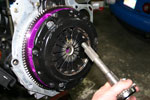 | April 25, 2007 - Most people use a plastic clutch alignment tool to ensure the clutch and pilot bearing are properly aligned.
Bah, that's for sissies. At Flyin' Miata, they use the input shaft from a transmission!
So, the clutch is bolted up and the engine is ready to install. That will hopefully happen tonight and then I'll start the process of firing it up. I want it to make noise this weekend.
entry 150 - tags: engine | | | 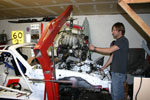 | April 25, 2007 - Brandon from FM dropped by to help me insert the engine.
About 2 minutes later, it was in. It really couldn't have gone any easier. Everything was clean, there's very little in the engine bay and two highly competent professionals were at work. Well, two out of three anyhow.
entry 151 - tags: engine | | |  | April 25, 2007 - And voila!
Engine in the car! Brandon hooked up the wiring while I messed about with fuel filters.
To plug up unused holes on the firewall, I used some foil tape that is apparently so waterproof that you can apply it underwater. I'll let you know if it sticks.
entry 152 - tags: engine | | | 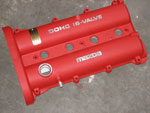 | April 30, 2007 - Testa rossa!
Or whatever the Japanese equivalent is. I decided that this engine deserved a pretty valve cover, so I had it powdercoated red. A few minutes with a scotchbrite pad mounted in a drill and the raised letters perked right up. This is the same sort of treatment Mazda gave to the 2004-05 Mazdaspeed MX-5 turbo car. The difference is that this engine will have more horsepower!
I had to hunt around for a bit for a 1994-97 valve cover to do this to - the 1999-05 covers have recessed letters. The front of the cover is cut for access to the cam gears.
entry 154 - tags: engine, interchange | | |  | April 30, 2007 - Like every engine that comes out of Flyin' Miata, this one has a plaque with the engine builder's name on it.
That's not usually me, but I figured the Targa Miata needed one anyhow. Besides, I'm proud of this.
entry 155 - tags: engine | | | 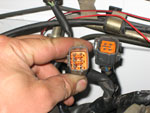 | April 30, 2007 - Enough playing around with pretty valve covers, it's time to get back to work.
The fuel lines are hooked up and the engine bay is gradually being repopulated with wires, hoses and tanks. I made one little error here - the fuel injector harness is for a 1995-97 model car with the "three-wire" coils. But the main wiring harness is from a 1994 model with "four-wire" coils. Not a problem, I can run that way - but first I need to change a plug. Whoops.
Meanwhile, Jeremy at Flyin' Miata has prepared the base map for the ECU. It's pretty impressive, really. I told him I needed a base map for a high-compression 2.0 with 1999-00 injectors, the 1999 intake manifold with VICS, a front crank trigger from a 1996-05 with a cam angle sensor for TDC...and his question was "do you need A/C?"
entry 156 - tags: engine, interchange, tuning | | |  | June 13, 2007 - A temporary intake.
I'd like to run individual throttle bodies eventually, but that's a project for a bit later. With the Hydra Nemesis, the intake doesn't need a whole lot of complication! The sensor is an intake air temperature sensor stuffed in a grommet in the silicone. The filter will end up right behind the radiator, a poor choice for temperature. It's just temporary, remember.
entry 204 - tags: engine | | | 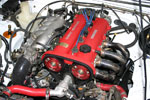 | August 9, 2007 - A lot of little jobs got done on the car tonight.
The most obvious underhood is the installation of the red valve cover - that's an instant 15 hp gain for sure, although I need to get a filter for that cam cover breather. I installed an interior rear view mirror, the plastic cowl at the base of the windshield, cleaned up a bit of wiring, changed the throttle cable bracket and generally did a few small things on the car.
The Mazdaspeed MX-5 turbo muffler sounded terrible, so it's been replaced by a Flyin' Miata part instead. That sounds a lot better and also drops a few pounds. I also determined that my recent addition of a no-slip patch was a total failure, as it started to creep around the footwell and announced itself to be a hazard. So it's gone now although the bits on the pedals remain.
The car's heading for the alignment shop tomorrow morning and then on to the dyno to get the engine into shape. It's part of the push for the track debut at the Flyin' Miata open house.
entry 281 - tags: ergonomics, exhaust, alignment, engine | | | September 12, 2007 - Whoops.
The instrument lights haven't been working in the car and I've been driving it at night more than I ever expected. So I pulled the instrument cover off to see if someone might have cut the wires - and the 16-year-old plastic snapped. It's a common problem, the cover is held in place with three very strong clips. But all three of them went at once. I just threw out another one with the same problem. I guess I'll have to spring for a functioning cover, or find another fastening technique. Hmm.
I also started working on the VICS system. This controls a quartet of butterflies in the intake manifold, changing the volume of the manifold to improve low-end torque. It works amazingly well. But of course, the VICS actuator has a broken vacuum fitting. I could either try to glue it in, or modify a later VTCS actuator by shortening the shaft. And that's what I'm going to do, because I'd rather use a welder than glue!
entry 310 - tags: engine | | |  | September 15, 2007 - Whoops!
The last time I was at the track, the car was pinging above 6500 rpm. We pulled out some timing, but it persisted. I think I might have found out why. Two of the bolts holding the cam gear in alignment slipped, and the intake was at full retard.
A walk down to the hardware store at the end of the street yielded some replacement bolts and the problem was fixed for just a few cents. The car should hit the dyno soon so I can get an idea of the correct timing (they were set at the equivalent of stock to start), and then I'll loctite them in place. These particular gears have spent a lot of time spinning fast on several cars and this is the first time we've lost a bolt, so hopefully it's an isolated incident. It's a good thing I have the cam cover cut, or this would have been hard to spot.
entry 313 - tags: engine | | |  | October 7, 2007 - Miscellaneous work this weekend.
I installed the Revlight tachometer to the top of the instrument cluster. I really like these little guys, it's a shame they're out of production. A bright LED was added to the front of the cluster cover as well for a low oil indication. Yes, I have a proper gauge, but in the heat of competition a bright red TURN THE ENGINE OFF NOW! light is good. I have video of a driver on the track with all the unwatched gauges screaming danger as the engine destroyed itself. A big red light would have saved us a lot of work in the pits the next day as we had to install the new engine...
Anyhow, in the process of installing the oil light, I managed to crack the 16-year-old plastic of the instrument cover. This was after gluing the mounting brackets back on. Maybe it's time for a new one.
Meanwhile, Brandon did a bit of work on the driver's footrest. I also managed to get most of the parts for the VICS (a variable intake setup) fixed up and ready to install. This will add a bit of top-end power.
entry 322 - tags: ergonomics, engine, wiring | | |  | October 12, 2007 - Dyno time!
Now this was a frustrating day. Driving the car in to Flyin' Miata, I found I had a big vacuum leak. I'd folded the steel gasket between the two halves of the intake manifold while installing the VICS actuator. Thanks, Mazda, for making that one bolt so hard to access that I had to disassemble the intake! It's a good thing that FM keeps them in stock.
Once that was done, Jeremy at FM did a couple of pulls. He reported some pinging as the dyno was holding the car at 2000 rpm - a load situation that will never be seen in the real world, but still - and sorted that out, then blew coolant all over the shop. Turns out one of the fans had decided to stop working so the car got a bit hot and the radiator cap opened up. So, I spent some time fixing a remarkably recalcitrant wiring problem and also tracking down why the O2 sensor wasn't heating up properly.
It doesn't sound like much, but every time we had to stop it meant a couple of hours of delay before Jeremy was able to get back at the car. On top of that, it was obvious that the car needed a lot of dyno tuning, as the output was unspectacular. There's a big dip in the torque curve between 3000 and 4000 rpm, and the power tapers off dramatically just about 6000. Looking at a dyno chart of a similar engine, the bottom end is pretty good if you ignore a dip - but the top end prevents the big headline number from being very interesting. Because I needed the car to drive home, all the goofing around with other miscellaneous problems meant that we ran out of time. We established a baseline, that's all.
So what's wrong? Most likely the cam timing. This is an untested set of cams, and I'm not sure where they should be yet. The car will go back on the dyno shortly, and I'll do a lot of experimenting. I expect to pick up a fair bit of top end, hopefully without losing that nice spread of torque. I might also try another set of cams, the Webcam 505s that I'm running in my little 1.6 are quite impressive. Then it'll be time for a new, bigger header.
So, not the best day. But it's a start. I took the car for a spirited drive home last night, and it sure is fun to drive and seems awfully quick without any other cars around. Is it effective enough to keep up with some of the other cars at at the Targa? I don't know, that's why I need more from the engine, to give me a better tool to use!
entry 323 - tags: tuning, engine | | |  | March 4, 2008 - The moment of truth for the header.
Did all that work actually get me anything? In short, yes! I saw a gain of 15 lb-ft at 3500 rpm and around 10 hp at 5200 rpm. Cue the happy dance.
The car sure sounded different, as you could hear some strong resonances and beats coming from underhood. That's good, the header is all about resonant frequencies.
On the dyno run, you can see the Racing Beat header in blue and the new one in red. Other than a minor loss between 4000-4500 rpm, the new one is a winner right across the board. It didn't unplug the engine above 6000 rpm as I'd hoped, but a big slug of torque across the range is a lot more useful on the Targa.
Dyno chart
Now, the engine still isn't anywhere near its potential. Keep that in mind when looking at the dyno chart. I don't know if my 200 hp at the wheels goal is attainable, but 170 should be possible. The cams are under suspicion, as sister engines to this one have held power a bit longer without giving up the bottom end. I have another couple of options to try and there hasn't been any experimentation with the cam gears yet. Since they typically trade off low end for high end and vice versa, I don't think they're going to solve things overall. Still, it's worth trying.
Jeremy Ferber from Flyin' Miata was the tuning meister, working in temporary conditions as FM is in the middle of a move.
It wasn't all good news, though. It turns out the car has a problem with the wideband O2 sensor, so we couldn't do a whole lot with tuning. Normally, Jeremy has enough experience to tune via injector pulse width against horsepower, but the 2001 injectors I'm using aren't in his mental program. So I'll be doing a little diagnosis to sort that out - we suspect the heater circuit isn't working. The car was also running hotter than it should, so I'll take a look to make sure the thermostat is working properly.
entry 426 - tags: header, engine, dyno | | | 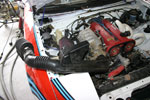 | March 4, 2008 - Despite the problems, we did get a chance for some comparative testing on the dyno.
My temporary intake pulled hot air from behind the radiator. That's one reason it was temporary, and why it was mounted upside down in the previous picture of the car on the dyno.
For interest's sake, we pulled out a stock 1994 intake tract that includes a resonating Heimholtz chamber. It's not perfectly sized for my engine - I believe the theory says it should be equivalent to 1.5 cylinders worth of displacement - but it was worth trying. And whaddya know, it did something! Nothing major, but 4 lb-ft at 4000 rpm for free is nothing to complain about. The red graph is the stock setup.
Dyno chart
Using the stock crossover tube will also let me put the filter in a cooler place than right behind the rad, which will reap benefits in the real world where having a filter sticking through the hood is awkward to arrange.
In the picture, you can see the filter from my original intake resting inside the engine bay. Don't be fooled, we don't have some sort of bizarre dual-filter setup going here.
entry 427 - tags: engine, dyno, intake | | | March 5, 2008 - As expected, some people have been focusing in on the peak horsepower of the engine and scoffing.
Sure, that's understandable. It would be an expensive engine to buy and it's not making the headline horsepower numbers that people expect to see. But it's also not finished development yet, and it's doing well in the range I need for the Targa. I'll get those headline numbers eventually, although the driver and suspension are more important at this point.
In the meantime, here's a comparison between a fully built CSP-legal 1.8 with 10.5:1 compression. It's a pretty nice engine and the car feels quick. Which of these would be faster on the road?
2.0 vs 1.8 dyno chart
entry 428 - tags: engine | | | 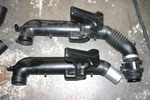 | March 6, 2008 - The stock intake needed to be modified to fit my car.
The biggest problem was the big loop in the #1 runner in the header. The stock setup basically drove directly into that. Not good. So, a little bit of trimming and a chunk of pipe later, and voila! The tube is made of hard rubber, so it fit around the pipe really nicely. A clamp ensures nothing comes free.
On the left side of the picture, you can see how my air temperature sensor fits in the bung originally used for the idle speed control valve intake on this 1994 part. On my 1999 throttle body, that intake is inside the throttle body so the fitting is unused. The air temperature sensor screwed right in there tightly as if it was meant to be installed in this location.
entry 429 - tags: intake, engine | | | 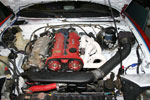 | March 6, 2008 - The intake in place.
Okay, that black plastic/rubber crossover tube isn't really very sexy. But it works, and that's what counts here.
There's a bracket supporting the crossover tube at the short piece of pipe, then another supporting the air filter. It's not an ideal spot for the filter, really, but I'll make a heat shield to protect it - and the brake lines - from the header heat before too long. That flexible hose isn't as tightly stretched as it appears in this picture, by the way.
Speaking of the header, note what happens when you forget to degrease the pipes before painting with high-temp paint. Whoops.
I also sorted out the wideband oxygen sensor problem. It appears to have been a bad heater in the sensor. I popped in another to check it out, and on a test drive I saw a good range of numbers. The old sensor would work fine until exhaust flow got high, then it would just sit at 14.7:1. The new one showed numbers as rich at 10:1 under wide open throttle. Obviously not good for power, but at least I know the sensor's working! I'll let the car autotune itself at the track this weekend. I don't think I'll have time to dyno the car tomorrow.
entry 430 - tags: intake, header, engine | | | March 12, 2008 - Back on the dyno.
I took the long (loooong) way in to work this morning to make sure the wideband was working well. Other than a really slow warm-up time, it seemed to be. But when we strapped the car to the dyno, it was misbehaving by the third run. This is really frustrating. Time to do some more diagnosis - the guys at Hydra want me to try a different ECU.
I didn't do any cam testing as I'd hoped, so instead we basically just repeated what we'd done before - but we pulled out a bit of the excess fuel and put in a degree of timing. Nothing to make any difference to the curves.
Instead, I'll probably end up swapping cams at home, then using the autotune feature of the ECU to see if it wants to add fuel. Crude, but it'll give me a rough idea of what's happening. Then it'll go back on the dyno in a few weeks.
entry 434 - tags: engine, dyno | | | 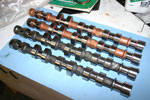 | June 10, 2008 - With a nice long list of things to do on the whiteboard in the garage, I decided to do something else.
I've had a box full of cams sitting in the garage for a couple of months now. It's time to give them a shot.
The golden ones are just gorgeous in person. They're stage 1 cams from Integral Camshafts. The others are stage 2 from the same company, but ground on a set of stock cams - a set of 1999-05 ones, interestingly. They're both designed for hydraulic lifters which is good, because that's what I have. One big advantage to the hydraulics is that I can simply bung these in without having to mess around with shims.
How do they work? Well, the car fires up and runs fine. It has a very lumpy idle. I'll check the timing tomorrow night and then take the car on a run on Thursday. No track time, just a burn down the highway to see if it wants more fuel or less. That's a really crude way to tell if it's making more power - a thirsty engine is a powerful engine.
entry 474 - tags: engine | | | August 27, 2008 - Dyno run!
The car spent some time on the dyno yesterday, making sure that it was safe and ready to go. Jeremy at Flyin' Miata managed to pick up a bit of top-end power but more importantly he was able to confirm that everything was in good shape and ready to go.
The chart is interesting. There's a big dip in the curve at around 4000 rpm. I don't feel it when driving, but the car would be faster without it of course! Jeremy spent some time trying to tune it out but didn't have much luck. If I was building the car now, I'd probably use a VVT head from a 2001-05 Miata instead of the 1999-00 one I used. They have much better torque curves down low. But if you don't learn something over the course of a project, you're not trying hard enough.
I waffled a little bit about whether I should put this chart online as it will invariably get held up on various forums for ridicule and taken out of context, but what the heck. Here goes.
This is Janel's little blue car vs the race car. She has a Flyin' Miata Voodoo II turbo installed on a stock 110,000 mile 1.6 engine. The turbocharger itself is the smaller 2554 unit, chosen for response instead of ultimate power. Since her power level is limited by the injectors in the car regardless of altitude, I used an uncorrected chart for her. Since I'll be able to make more power at sea level (close to 20% more), I used the SAE standard correction. This chart should be accurate for the relative behaviors of the two cars at sea level. The biggest change will be that the turbo will spool up a bit quicker.
What's interesting about the chart is how similar the power curves are, once you hit 3700 rpm. Two very different ways of making power but with surprisingly consistent results. Below 3700, the big displacement of the naturally aspirated car really helps. It's no wonder people comment on how quickly it squirts out of corners, with almost full torque available at 3200 rpm. That's more important than some sort of headline horsepower number. The dip that bothers me (intellectually, I've never noticed it driving) in the race car is there in the turbo car as well, but it's not as noticeable because it doesn't have the big torque swell earlier in the range.
I've always known that I chose a more difficult way of making power. If I was using that little turbo 1.6 in the Targa, I'd be running in the Unlimited class and would have to drive much faster to avoid penalties. But really, it was an excuse to build a cool engine. I love the response of a good naturally aspirated motor. I'll do more development on the engine when I return from the race, trying to open up the breathing on the intake side and maybe swapping a VVT head on. For the race, reliability and tractability are more important and I didn't want to have to babysit a fussy mill. Focusing on the handling and suspension of the car will pay greater dividends, so that's why I spent my time there.
I'm looking forward to feeling how the race engine feels at sea level with a 20% power boost. I think it's going to be a very good tool for the job at hand - dealing with unknown roads as expeditiously as possible.
Dyno chart
entry 520 - tags: engine, dyno | | | September 11, 2008 - Testing today went smoothly.
It wasn't a major test, simply a run down the road to make sure the car was happy at sea level. And yes, it is. My biggest concern was knock, as the higher ambient air pressure at sea level means higher cylinder pressures than before. The tuning is good, though. Nothing showed up on the knock sensor at all. The 20% increase in horsepower is quite obvious, especially when the car gets on cam. The first time I ran it through the gears, I burst out with "Yeah! THAT'S my engine! Woohoo!" Followed by a lot of laughter. Yes, I'm a complete professional.
It's good to drive the car again too. The suspension feels nice and supple and the throttle response is very sharp. This is going to be fun.
So the car's good. My parents arrived this afternoon - and if I'd known to check the ferry schedules, I'd have realized that leaving today wasn't an option anyhow. Tomorrow, we get on the ferry for the long trip over and when we land, everything shifts into high gear as we go straight into scrutineering upon arriving in St. John's. Janel will be flying in and will beat us there by about 10 hours. There are at least two other racers on the ferry with us and I expect to see a number of others tomorrow.
So that's it for the pre-race. The next reports will all be on the race page. Here we go!
entry 533 - tags: engine, preparation | | | September 22, 2008 - The drivetrain worked out well.
The engine was flexible enough that even when I lost the top 2500 rpm of the rev range, I was still able to make good time. It used almost no oil over 2200 km of driving including 500+ km of full-throttle stages. More power would have been nice, but I think that's the lament of every driver.
I launched the car with smoking tires every single time and there were no problems. I did misjudge the start a couple of times and left the line with lots of clutch slip instead of tire smoke, but the clutch took it without complaint.
The misfire? Well, I'll figure out what it was shortly. I did discover yesterday that one of the wires to the intake air temperature sensor is broken. There was about 8" of unsupported wire leading up to the sensor, and the vibration and pounding made this about 6" too much. I'll fix it when I get a chance and see if that solves the problem.
entry 606 - tags: post-race, engine | | | September 26, 2008 - I think I solved the misfire issue that appeared near the end of the race.
As I discovered right after the race, a wire to the air intake temperature sensor had broken. I patched that up today - a very temporary fix, but one that was good enough for testing - and the car seems healed. It'll pull hard to redline in at least three gears, which is something it would not do on the last stages. So we'll call that a success then.
It's a real testament to the flexibility of the engine that losing 2500 rpm of my rev range wasn't a crippling blow. Yes, the car was a bit slower getting up to speed. But I was able to drive around it, and we zeroed one stage and took a 2 second penalty on another like this. Compared to the penalties on day 3, that's nothing.
entry 612 - tags: engine, post-race | | | 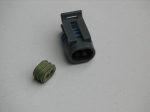 | September 28, 2008 - The culprit.
The broken wire in this connector - which quickly became two broken wires when I poked at it - appears to be the cause of the misfire.
entry 614 - tags: engine, post-race | | | September 3, 2009 - A very interesting car was at Flyin' Miata yesterday.
It's a national-level autocross car, and it had some fascinating tweaks in it. I was given a guided tour by the owner before the car went on the dyno. His weight-savings techniques extended as far as grinding off unused bosses on the intake manifold.
The car also spent some time on the FM dyno. This car already has a lot of dyno time on it, testing every change made from intake pipe length to various intake manifolds. It did extremely well. It's time for me to dig into the engine on the Targa car and see what I can do for the output.
Or at least, it will be as soon as I'm done with the current book. Six more week and I'm free!
entry 696 - tags: engine | | | 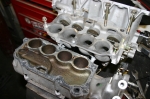 | November 4, 2009 - Time for some intake manifold testing.
Since the big torque dip wasn't affected at all by the cam change or the fuel pressure change, I'm thinking it's something with the intake manifold.
The 1999-00 intake manifold I'm using has VICS, which stands for something like Variable Intake Control System. It doesn't change the length of the intake runners as you might expect, but opens and closes a resonance chamber in the manifold that's placed about halfway down the runners. It's been proven to be fairly effective on the dyno, and the butterflies flip at around 5200 rpm.
The manifold is in two pieces. The lower contains the butterflies and the upper has the chamber - you can see it here with a nice tan color. The passage inside the chamber is for the EGR gases, which are routed from the back of the manifold to be injected just behind the throttle body.
entry 718 - tags: intake, engine | | | 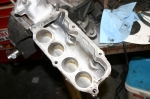 | November 4, 2009 - Based on some things I've read, I've cut out the wall between the plenum and the resonance chamber.
With this setup, the plenum is effectively much larger - but more importantly I now have variable length intake runners. With the butterflies closed, the air will follow the same route as before. But when they open, a short intake path will become available which should benefit high-rpm operation. I also removed the EGR ducting because I don't run an EGR system, and this cleans up the flow near the throttle body. While cutting out the EGR ducting, I did manage to break through into one of the bolt holes, but that was patched up with some good two-part epoxy (ie, not JB Weld). I also modified the gasket that sits between the two halves to match my modified manifold.
There are nice bellmouths on the long runners and ideally I should shape some on the new short runners, but not until I've done a preliminary test to see if the modifications have any effect. It's quick and easy to change the upper half of the manifold. If the testing looks good, I'll go a bit further with cleaning everything up inside both the top and the bottom halves.
Gary at Track Dog Racing has tried removing the bellmouths for the long runners as well as bellmouthing the short runners. He reports power gains on cars with forced induction, but not much without boost. It's worth a shot though.
entry 719 - tags: intake, engine | | | 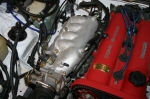 | November 17, 2009 - Ta daaaah!
Okay, it doesn't look like anything. But that's the hollowed out intake manifold. I'll take the car to work tomorrow and hopefully get the chance to put it on the dyno and see what difference it makes, if any.
I've got two other options sitting on the workbench, both a bit more radical. This is going to be interesting.
entry 721 - tags: intake manifold, engine | | | 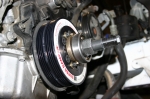 | March 16, 2010 - I started the day planning to do some dyno testing on some intake variations.
But first, I had a couple of parts to install. First was a couple of springs for the rear, so I could get the ride height into a reasonable range. That was quick and easy.
After that, I decided to put on an ATi damper. Since the car's seeing a lot of constant high rpm use on track, I figured I'd like a bit of extra margin of safety for the oil pump. Besides, it makes the engine feel smoother and the guys at Flyin' Miata suspect there might be a bit of power in it. We'll see.
Unfortunately, the install of the damper and a few other jobs ate up my spare time so the dyno didn't happen. Soon, though.
I did take the car out on the road for a bit of a test drive with the new intake setup. The Hydra was able to autotune itself into a happier place - I suspect I never set up the part-throttle tuning after the fuel pressure change, and so it's running really rich at anything but wide open. Before the changes to the fuel system, the fuel pressure was tied to manifold pressure so I'd see a drop in pressure under vacuum. Anyhow, a half hour drive later and the car's much happier. And pretty fun, once you get used to the heavier throttle pedal. The dual spring suspension is working pretty well - it's quite comfortable on the highway and on smaller bumps as the softer spring takes the hit, but you can tell there's some real stiffness behind it. I think, on track, it's going to have an initial bit of lean and then the car will take a very solid set. Would it be a good Targa setup? I don't know. I need some more seat time.
I did think of one potential problem, however. The Laguna Seca weekend that's coming up in a month or so has a very high 102 dB sound limit - almost unheard of at Laguna. Janel's also going to be driving on Friday with another group to get some private instruction from our friend Rick Weldon. Well, that group probably has a 92 dB limit, and with the current intake setup I suspect the car isn't going to meet that limit.
entry 731 - tags: suspension, intake, damper, engine, sound, laguna | | | 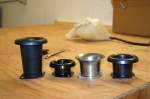 | March 28, 2010 - Here are the air horns I have to work with.
The silver one is what came with the throttle bodies, the others are some Titan units that I found in the shop. At least, I think that's where they're from. I have some TWM units around as well.
The first dyno runs were with the silver, "stock" horns. I followed that up with the longest of the black ones, just to see if they'd actually fit. The answer is yes, but the filters I was using won't fit over the end of them.
Dyno chart - the red trace is the medium-length silver horn, the black is the long one.
Overall, it looks like a big win for the long tube, with a solid gain from 4200 to redline and no real loss anywhere else. Unfortunately, it's not an apples-to-apples result. The biggest change is that the long tubes had no filters. Now, these are some pretty open filters with a large surface area, so I don't expect they have much effect. But I do need to test them back-to-back to confirm.
There's also a difference in the design of the bell mouth on the air horns. Note how the silver one has a simple horn shape, while the black ones have a more complete radius. This entry is fairly important, and it could be that the black ones have a better design.
The internal diameter of the horns is also a bit different. The black ones actually match the diameter of the throttles, while the silver one is a bit oversize. Interesting, given that it's the one supplied with the kit. The lip of the throttle bodies has a small chamfer in it that steps the diameter down, but basically there's a step change in the size.
Luckily, I have a black air horn that's almost exactly the same length as the silver one, so I can do comparative unfiltered tests between them to see which is the better design.
I only had the chance to do two different runner lengths today. I'll spend more time on the dyno this week and test all four options in the same session. Hopefully.
entry 737 - tags: dyno, IRTB, intake, engine, air horn | | | 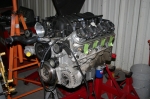 | January 13, 2011 - Plans for the car are coming together.
There's been a change in the engine specification. There's a proposed Spec V8 series in the making, called V8R Spec. V8Roadsters and V8R Spec has offered to not only provide the hardware for the V8 conversion, but also a built-up L33 engine. In exchange, we'll send off the old LS1 from Elvis that has a few of the parts needed, such as the improved LS6 heads and intake. The support from V8 Roadsters and V8R Spec is fantastic. That's Elvis' old engine in the picture, looking rather forlorn after being booted out for a 480 hp LS3. In case you don't know Elvis, that's Flyin' Miata's first V8 car, the blue car I've been playing with at various autocrosses and at Laguna Seca over the past couple of years. It'll be the sister car on the 2011 Targa team, running in Touring.
So what is this L33? It's a runt in the LS engine family. The big boys run as big as 7.0 litres, but the L33 is only 5.3. It's also known as the Vortec 5300 and is found in trucks. Specifically, the 2005–2007 Chevrolet Silverado 1500 4WD and GMC Sierra 1500 4WD extended cab trucks. What makes it interesting? Well, it's the only one of the truck engines with an aluminum block, making it lighter than most. It's actually a fairly popular one to use for various swaps, as they're generally less sought-after than the bigger variants but still able to make good power.
It will be modified, however. The LS6 intake and heads make a big difference, as does the V8R Spec camshaft. Basically, the engine will be set up for a nice power increase but without sacrificing behavior. Expected power levels are 410 hp and 350 ft-lbs. Steve at V8Roadsters thinks it's the best of the various LS engines. So we'll have approximately double the power and torque of our 2008 car with a weight penalty of around 200 lbs. Seems like a good trade.
entry 772 - tags: engine, ls1, l33 | | | 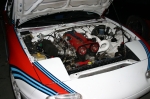 | January 13, 2011 - There is a sad side to the big plans.
That sweet little 2.0 is going to have to come out. It's been a rock-solid engine, giving very little trouble despite what we've asked of it. Ever since Janel discovered how much fun the Targa Miata is to drive, the car's had to do double duty at trackdays. It just goes and goes and goes. I'm going to be truly sorry to see the engine go, but it's for sale to support the transformation. The header is also going to be available along with the rest of the exhaust.
It's a bit like selling a child, but I'm hoping it'll go to a good home where it can roam free and play on fun roads or tracks. Contact me if you're interested in any of the driveline, engine computer or exhaust.
entry 773 - tags: for sale, engine, header | | |  | January 25, 2011 - Goodbye, faithful 2.0.
This engine has been rock solid, the perfect companion to a rally/track Miata.
entry 779 - tags: engine | | |  | January 28, 2011 - The first step in modifying the engine bay is to strip off all the paint and seam sealer.
This is not a fun job at all.
entry 786 - tags: engine bay | | |  | March 28, 2011 - Cue the happy dance!
The freshly built engine has arrived from V8R Spec. I really want to unwrap it and get fingerprints all over, but I know it'll just look like every other V8 and it's well protected at the moment. I can't wait to fire this puppy up.
entry 797 - tags: engine, v8 | | |  | May 27, 2011 - I found these while unpacking some of the conversion parts.
They're not needed yet (or at all, really) but I couldn't resist sticking them on for a few minutes.
entry 841 - tags: engine | | | 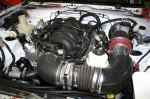 | May 31, 2011 - The engine bay is looking a bit better!
I was able to sort out an intake system that allows the use of both the hood and the driver's headlight - hopefully. It's not ideal, but it'll do for a start. I've also cleaned up and anchored the wiring. Other than a lack of a hood prop, this is pretty much ready to go.
entry 847 - tags: engine bay, conversion | | | 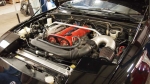 | June 1, 2012 - Ever wonder what happened to the original Targa engine?
It was sold to a Miata enthusiast named Nate. Then it sat around the FM shop for some time as we waited for Nate to get the chance to drop his car off and for FM to have the time to work on it. And finally, after all this time, it's ready to head off to a new home in Michigan. And yes, there's still a brass plate on the cover that states that it was built for the Targa Miata.
It's been detuned a bit for street use. The cams have been changed out for stock ones, the intake is the modified stock one that was used during the race and the header is a standard Racing Beat unit. It did drop a bit of power but it's much better mannered in day-to-day driving. The car got a number of other upgrades at the same time, such as a V-Maxx suspension and seam welding.
Before installing the engine, FM gave it a once-over. There was a small fluid leak from the head gasket in one corner so that was fixed, and the bearings were checked out. They all looked good with the exception of the rod bearings. Those ones were hammered! The bearings were simply failing. Not due to starvation (this engine has always had very high oil pressure), but just due to stress. We swapped in some new ones to take care of that, as all the clearances were good. This is an engine that has about 6000 really hard miles on it, by my estimation. Not just the Targa itself, but lots of track days with multiple drivers and a redline set at about 8000 rpm. About the only time it wasn't being driven flat-out was during the transits during the race. Otherwise, it was getting caned. To put it into perspective - the very successful Miatas I worked on at the 25 Hours of Thunderhill did about 1900 miles during that race. This engine has gone around three times that distance. What a trooper.
One or two people asked about buying it because of the value of the parts inside - it was cheaper than buying a stroker kit and the head. No sale! I wanted to see this engine stay together.
entry 1041 - tags: engine | | | 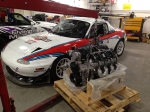 | August 23, 2013 - Time for a big upgrade.
When the car was converted to V8 power, it got a modified L33 engine. The L33 is a 5.3L truck engine with an aluminum block, but really the only things that stayed were the block, crank and rods. This is the recipe for the V8RSpec race series engines. It's a good track engine with a powerband that just keeps delivering more and more up to about 375hp at the rear wheels - but it's never had the bottom end torque I wanted. This is particularly a problem on the rally stage, where you don't always know exactly what a corner exit is going to look like. Driving the car back-to-back with my 5.7 LS1-powered MGB on the street really showed me what I was missing. So I've been eying the newer, larger LS3 engines for a while. I think I'm the only person who's ever felt the car was lacking for torque, though!
A few weeks ago, I got a call from a friend who had an LS3 for sale. It's a crate LS376/480, the same 480 hp engine that we use for a lot of conversions at Flyin' Miata. It had been installed and run just long enough to seat the rings before being pulled. He offered it to me at a killer price, so I jumped on it.
So the Targa Miata is going to get a makeover. Along with the new engine, I'll drop in the matching wiring and controller. No more modified 2002 Firebird parts, I'll be running a GM Performance Parts wiring harness, PCM and fusebox. This will, amongst other things, take the main relay out. Yes, that main relay.
I've got a few other changes planned, but this is the big one. It's going to be fun. Good thing I upgraded those axles.
entry 1091 - tags: engine, power, LS3, L33 | | |  | September 11, 2013 - Want to know what the difference between the standard 430 hp LS3 and the 525 hp version is?
You're looking at it. That's an ASA cam from GM Performance Parts along with the appropriate valve springs. We have a car at Flyin' Miata right now with this cam, and it's ridiculously fun. Not just the obvious power, but the throttle response. It's one rorty engine, entertaining in a way that the other versions aren't.
So, while my new engine is out of the car, dropping these parts in was a bit of a no-brainer.
entry 1094 - tags: power, engine, ps3 | | | 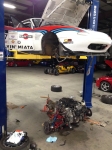 | October 8, 2013 - And out it comes.
The L33-based 5.3 has done excellent work in this car, but it's done. A 6.2 LS3 with a big cam is going to be in charge now. There's nothing wrong with the 5.3, it just doesn't have the low-end grunt of the big motor. I'm going to take this down time to sort out a bunch of other little things on the car. You know, while I'm in there...
entry 1099 - tags: engine, 6.2 | | | 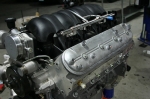 | October 17, 2013 - Did you know the LS engines have really nice valve covers underneath all those coils?
I was thinking of relocating the coils to where they wouldn't see so much heat and vibration, and the look of these is only reinforcing that.
The old engine has been stripped of all (or most) of the parts that I need, and the new LS3 is partially torn down in preparation to receive them. I'll be doing a cam swap in this next week, which is why the coils are off.
entry 1101 - tags: engine, 6.2 | | | 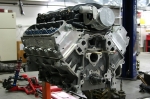 | October 24, 2013 - Cam swap time!
Working on this engine is almost like unwrapping a Christmas present - I'm discovering all sorts of new things. It's fun seeing how all the parts work together. You can look at diagrams and read about how the valvetrain works, but it's something else to actually peer down the cam bore and see the lifters tucked away. After so many years of Miata, Miata, Miata, seeing different solutions is interesting. It's also been a long time since I personally built an engine, I miss it.
The new "ASA" cam is now in place, with the timing chain back on and the front of the motor all buttoned up. All that remains is to flip the fuel rail over so the inlet is on the Miata-friendly side, change out the valve springs and install the new oil pan. Then I can start looking at putting everything back in the car.
By the way, the two dowels were supposed to help hold the lifters in place. I can't see how, I think that was a poor tech tip I found online. But they didn't do any harm.
entry 1102 - tags: engine, 6.2, cam | | | 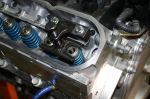 | October 28, 2013 - Time to upgrade the valve springs.
As you may recall, I'm converting an LS376/480 crate engine into an LS376/525. According to GM Performance, the differences are the ASA cam and "higher rate" valve springs. So I called GMPP and got the part number for the new springs: 12586484.
Looking for these springs, I've found they've been superseded by spring 12625033. Fair enough, JEGS even sells the cam and springs as a kit so I picked one up. This handy little Comp Cams tool lets me swap out the springs easily without pulling the heads off.
entry 1103 - tags: engine, 6.2, cam | | | 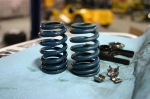 | October 28, 2013 - Curious.
The new valve springs look exactly like the old ones. I checked further, and the 12625033 is the standard spring on an LS3. So I was swapping these out for nothing.
The older 12586484 part number was an LS6 spring, and they were typically yellow. Interestingly, they also have the exact same spring rates as the current LS3 spring, with the only difference being a max lift of 0.570" instead of 0.550".
Just for fun, I peeked under the valve covers of a true LS367/525 engine and what did I see? Blue springs.
Busted! GM doesn't actually change the springs on these engines anymore. Even if they did, the rates aren't any different. The max lift isn't an issue, as the 0.525" max lift is the same as that found on the 480 hp "hot cam".
So I wasted some time and money, but I learned something. Isn't that how it always goes?
entry 1104 - tags: engine, 6.2, cam, valve springs | | | 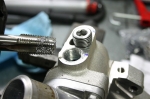 | November 6, 2013 - More preparation of the new engine.
The water pump has a couple of fittings for the heater. That's not needed here. When I installed the previous engine, I'd just installed rubber caps. These had a tendency to degrade over time, unfortunately. I never had one fail, but it was only a matter of time.
This time, I pulled off the fittings, tapped the holes and installed steel plugs. No failures here! If I ever decide to retrofit a heater, I can just screw in some brass nipples.
entry 1105 - tags: engine, 6.2 | | | 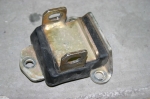 | November 6, 2013 - More preventative maintenance.
These motor mounts see a lot of abuse, both from a rambunctious engine and heat. Mine were in pretty good shape, but I figured it was much easier to change them now than later. I'm taking other steps to help them last longer - you'll see more of that later.
entry 1106 - tags: engine, 6.2 | | | 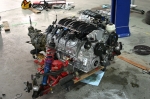 | November 6, 2013 - After a bunch of little individual jobs, adventures and solved problems, the engine is almost ready to install.
There's a new LS7 clutch and flywheel inside the transmission bellhousing. The oil pan came off again to check some clearances for another installation, then went back on. The new motor mounts are in, plus of course the cam and valve springs. I found a little squeak from where the rear cover had been just barely touching the crankshaft, and that's been sorted. The intake manifold insulation has been removed for hood clearance, and the fuel rail is flipped around to put the inlet where I want it. My dual oil pressure sensors are in place. A little bit of interference between the steering rack and the oil pan has been clearanced. We're almost there.
The only thing left is to reinstall the balancer, and for that I needed a special tool. The LS engines have been made by the millions over the last 16 years, but it's still a new and exotic engine according to most parts stores and tool manufacturers. It's almost impossible to find a balancer installation tool that is compatible. I had to build my own out of materials from McMaster Carr!
entry 1108 - tags: engine, 6.2 | | | 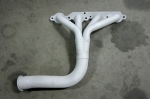 | November 11, 2013 - This should take care of the heat problems I've been experiencing.
The headers and the first part of the exhaust system have been given a Swain "White Lightning" ceramic coating. It's a big step up from the locally applied "ceramic" I had done years ago. That particular coat lasted about as well as my high-temp paint job did. This is much thicker and stronger.
entry 1109 - tags: engine, 6.2, ceramic, exhaust | | |  | November 11, 2013 - Future failure avoidance.
Prior to installing the engine, I spent a fair bit of time going over the wiring harness and ensuring it was well restrained but accessible. In a couple of spots, I was unable to avoid wires making contact with the block. In those places, I made sure the wires were protected. They're not quite in contact, but with all the vibration to come they need something.
entry 1110 - tags: engine, 6.2, wiring | | |  | November 13, 2013 - And the engine is in!
This makes it sound a lot quicker than it really was, but after a bunch of fiddling about and checking I have it installed. And now comes the fun part - the wiring.
entry 1111 - tags: engine, 6.2 | | | 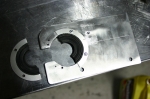 | November 13, 2013 - Because the Targa Miata has a stripped out interior and no HVAC system, I've got some space that's not usually available on the street cars.
I've decided to mount the engine computer to the interior side of the firewall so it'll stay a bit cooler than being underhood. This means I have to pass some significant cables and connectors through the firewall. I don't have any wire grommets that size.
This panel is the answer. It has a clip on the backside to lock the bottom into place and the top is bolted down - it's upside down here. The wires are all centered in the grommet before the second half is riveted in place.
entry 1112 - tags: engine, 6.2, wiring | | | 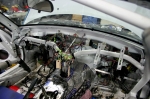 | November 13, 2013 - Wiring fun!
This poor car has been through a lot. I stripped out the harness when I built it, and modified it for my purposes. When the original V8 conversion was done, the engine wiring came from a 2002 Firebird - but had already been installed in another Miata. Then I kept modifying and tweaking things, changing the harness around further. Wires for electric windows, cameras, dataloggers, extra sensors, goofy rear wings and the like. It's a bit of a mess.
With the new engine, I'm installing a standalone engine computer and wiring harness. I'm taking this opportunity to revisit all the wiring in the car, removing the leftover bits from the four cylinder build and that junkyard GM stuff. This under-dash harness will be greatly simplified, and the whole thing should be much more robust when I'm done.
It sure looks horrific when it's unwrapped and spread out! The junkyard GM parts are still wired in, and the new GM wires are also looped around like snakes in this shot. Fun stuff.
entry 1113 - tags: engine, 6.2, wiring | | | 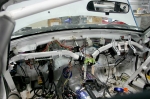 | November 25, 2013 - Progress!
After hours of tracing wires, the harness is getting slimmer and more robust. It's pretty entertaining seeing the convoluted path taken by some of these. I've removed several big connectors and just streamlined the harness overall. The Coralba rally computer and Peltor intercom wiring is better now. It'll be a lot easier to maintain this setup. It still looks a bit frightening because the harness is unwrapped, but it will be all tied up and secured before the dash cover goes back on.
entry 1114 - tags: engine, 6.2, wiring | | | 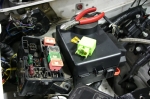 | November 25, 2013 - Here's the real progress.
That's the Miata fusebox in stripped-down mode. What's missing? The main relay! Yes, the relay that failed and cost us the win at Targa Newfoundland. It gives me much glee to pull this little sucker out.
It's been replaced by the new GM Performance Parts wiring harness, with wiring that's built to run a big hefty V8 with eight hungry high-energy coils. The Miata relay was designed to handle a quarter of that.
As you can see, a number of other fuses and relays are also missing from the stock fuse box as they're simply not needed any more.
entry 1115 - tags: engine, 6.2, wiring | | |  | February 5, 2014 - Drive time!
Between snow storms, I took the car out for a quick spin down the road to see how the new engine feels and to make sure everything was healthy. The result? It feels very healthy indeed. The engine is a gem, it's got a wickedly sharp throttle response that just begs to be played with. It's reminiscent of the old high compression 2.0, but it's got some serious power and torque behind it. The car has the potential to be very hard on your neck. I didn't drive far, but it was a real promise of what to expect on future drives. The new 6.2 is a lot more potent than the old 5.3 was.
As for the keychain, it was a present from my friend Adam at Revlimiter.net. He does custom gauges and just started doing keychains, so he sent me a Martini one for the racer. I like it a lot. Thanks!
entry 1119 - tags: engine, 6.2, test, martini | | | 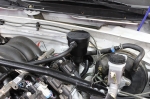 | August 13, 2014 - An interesting upgrade.
I'm seeing a bit of oil in the intake from the PCV system, and came across this factory part for the Camaro ZL1. It's an oil separator, designed to pull oil out of the air being recirculated. Installation is easy, it just replaces the filler cap.
Well, it would be easy on a giant Camaro. It wasn't even close to fitting under the hood. After a bit of head scratching, I tried swapping the valve covers around and it tucks in nicely by the firewall. Let's hear it for symmetrical heads! We'll see how this works out.
entry 1127 - tags: engine, ls3 | | |
|

 THE DIARY