| MIATA BUILD |
|
|
 | | 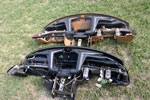 | July 5, 2006 - The 1991 dash (tan) is significantly lighter than the 1994 dash.
It's difficult to say why. The only big difference between the two appears to be the thickness of the plastic.
entry 7 - tags: weight loss, interchange | | | 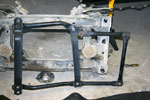 | July 18, 2006 - Many of the braces from the 2003 will be added to our car.
It will make things heavier, but we want the car to be as strong as possible - particularly since we expect to make more horsepower than even the turbocharged 2004 Mazdaspeed special edition. We're going to make the bracing do double duty as impact protection. This is a rear subframe brace.
entry 11 - tags: interchange, stiffening | | | 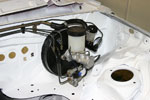 | February 20, 2007 - Assembly continues.
And here's where things start to get interesting. The brake booster and master cylinder are from a Miata with the larger "Sport" brakes. They should give a firmer pedal and are well suited to our big brake setup. The proportioning valve is obviously mounted in a different place on our 1995 as opposed to the 2005 that donated the master so we'll have to deal with that. Actually, it's not a proportioning valve at all as this particular car used the ABS instead. This sort of interchange is fun.
We'll have our own cockpit-adjustable proportioning valve which will involve bending and running some new brake lines anyhow.
entry 71 - tags: interchange, brakes | | | 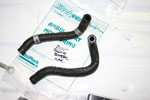 | February 20, 2007 - Another bit of interchange information - one we weren't expecting.
It turns out that when the brake booster was changed in 2001, so was the vacuum nipple. And possibly the location of the brake fluid reservoir. So there are two different shapes of hose to join the hard vacuum line that runs across the firewall (visible in the previous picture) to the booster. It's possible to make the early one (top) fit, but the later one is much happier and gives more clearance.
Upon inspection, it appears the new design has less restriction in the hard pipe going into the booster. It's not drastic, but the Mazda engineers felt it was important.
entry 72 - tags: interchange, brakes | | | 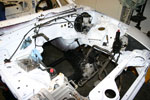 | February 21, 2007 - A few more things are bolted on.
The front subframe (from a 2003) and steering rack are in, along with the headlights and some of the mechanism for the wipers. It would be really nice to drop some weight off those headlights as they're really beefy. I think the steel covers for the lights are the heaviest body panels in the whole car! Maybe later.
entry 77 - tags: weight loss, interchange | | | 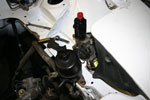 | February 21, 2007 - Another interchange discovery.
The power steering reservoir from the 2003 sits in a different place than the 1994, and interferes with the headlight. Not a problem, I'll grab a 1994 reservoir tomorrow.
There's some irony in this. Our car was originally an R package. One of the defining features of the R was the manual steering, and we're installing power. There's no way I'm driving the Targa with manual steering. The later steering rack that we're using is a better setup anyhow with a much more solid mount.
entry 78 - tags: interchange | | |  | February 25, 2007 - The 6' (180 cm) length of new line wasn't long enough to reach from the valve to the master cylinder, and it's quite difficult to find brake line on a roll in this town.
So a short extension was used. Just to keep things interesting, the female fitting is from an old Land Rover. I had to use at least one part from that car!
entry 82 - tags: brakes, interchange | | | 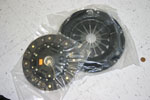 | March 7, 2007 - We were originally going to run a clutch from a Mazdaspeed MX-5 turbo car.
It's a great setup, with a smooth take-up and a light pedal. But our clutch got sold to a Flyin' Miata customer.
This particular clutch is a prototype unit of a model that will be available from Flyin' Miata in about six months. I had a chance to test its twin in a car earlier this week and it's a beauty. It will have no difficulty handling the power we need, but more importantly it's a real sweetheart to drive with a light pedal. Excellent.
entry 89 - tags: interchange, drivetrain | | | 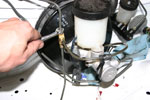 | March 27, 2007 - A mystery solved.
For some reason, the brake master cylinder only had two outlets instead of the usual three - one for the rear and one for each front. It was driving me crazy until a coworker remembered the donor car had ABS. The ABS module took care of the distribution between each side, of course!
Now that's sorted out, I needed a junction to feed both front wheels. Voila! This picture sure makes that lower line look crinkly - I'll smooth that out for aesthetics. The ziptie is to help anchor the lines and cut down on vibration.
It's possible to see what a little dribble of brake fluid, left to sit for a couple of days, did to my fresh white paint. Oh well...
entry 104 - tags: brakes, interchange | | | 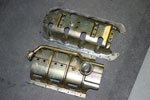 | April 16, 2007 - In 2001, Mazda added a Main Bearing Support Plate to the Miata engine (top).
It's basically a super windage tray that bolts on to four of the main caps. The 1994-00 version is below. It needs a bit of modification to clear the ARP studs - the larger outer holes in each little "valley" are ones I added for this purpose.
Right, there's that done - but I don't seem to have a 2001 oil pan! Whoops. So maybe I'll have to go with the earlier design after all this.
entry 129 - tags: engine, interchange | | | 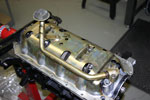 | April 19, 2007 - One good side effect of the piston swap (other than the fact that the new ones won't slam into the head) is that while the pan was off, Bill found a 2001 version ready to install.
Just in time, too - I already had the sealant on the windage tray. So the main bearing support plate went on. Woohoo!
entry 135 - tags: engine, interchange | | |  | April 19, 2007 - A cam angle sensor?
Yes indeed. This engine is going to have an interesting mix of components. For the engine management, I'm using a Hydra Nemesis. It's going to use a crank trigger wheel as the primary sensor for engine position. But in order to run sequential injection, it needs a second sensor on the camshaft in order to determine which cylinder is ready to fire. On a stock 1999-05 Miata, this sensor is on the front of the intake cam gear. But then I wouldn't be able to run my adjustable gears. So the venerable cam angle sensor from an early car (a 1990 in this case) will be attached to the back of the exhaust cam.
So the engine has a 2001-05 MBSP and oil pan, a 1999-00 block and head, 1990-93 cam angle sensor, hydraulic lifters from a 1990-97, valve keepers from a 1999-05, oil pressure senders from both a 1990 and a 1995, cams originally designed for a 1994-97, a 1994-97 valve cover, 1994 coils, a 1999-05 starter, 1994-97 alternator...thank you Mazda for leaving us this many options!
entry 143 - tags: interchange, engine | | |  | April 22, 2007 - This odd little doodad is an oil cooler.
It sits under the oil filter and coolant runs through it. I don't really see how effective it can be given the relative temperatures of oil and coolant - unless it's intended to get the oil up to temperature more quickly. Regardless, I'll install it if only to act as a spacer. If I install a real oil cooler running through a thermostat, I need this thing to make sure all the fittings clear various protrusions on the block.
My apologies for the picture quality. I forgot the real camera so this is from a camera phone.
entry 144 - tags: engine, interchange | | | 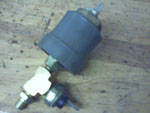 | April 22, 2007 - The 1995-05 Miatas had a "fake" oil pressure gauge that basically just showed that there was at least 7 psi of pressure - that's the little sender here.
The 1990-94 Miatas had a more traditional oil pressure gauge that showed actual oil pressure - that's the big grey sender. I want to run both. A real pressure gauge to tell me how things are going, and a big bright turn the engine off NOW! light.
Another camera phone picture, sorry.
entry 145 - tags: engine, interchange, wiring | | | 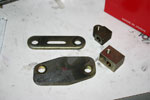 | April 25, 2007 - More evolution of the Miata.
These are two examples of the bracket for the power steering pump. The smaller, lighter version is actually the original. The large, thick version is the "upgraded" later design. What prompted that? I'm really curious about why Mazda decided to double the weight of this part - was there a rash of failures from excessive belt tension?
The two threaded blocks are also from different applications. They're dimensionally the same and interchangeable, but the lower one is significantly heavier. Ahh, Miata trivia.
entry 153 - tags: interchange | | | 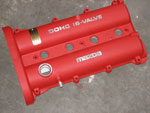 | April 30, 2007 - Testa rossa!
Or whatever the Japanese equivalent is. I decided that this engine deserved a pretty valve cover, so I had it powdercoated red. A few minutes with a scotchbrite pad mounted in a drill and the raised letters perked right up. This is the same sort of treatment Mazda gave to the 2004-05 Mazdaspeed MX-5 turbo car. The difference is that this engine will have more horsepower!
I had to hunt around for a bit for a 1994-97 valve cover to do this to - the 1999-05 covers have recessed letters. The front of the cover is cut for access to the cam gears.
entry 154 - tags: engine, interchange | | | 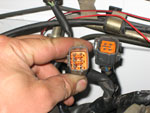 | April 30, 2007 - Enough playing around with pretty valve covers, it's time to get back to work.
The fuel lines are hooked up and the engine bay is gradually being repopulated with wires, hoses and tanks. I made one little error here - the fuel injector harness is for a 1995-97 model car with the "three-wire" coils. But the main wiring harness is from a 1994 model with "four-wire" coils. Not a problem, I can run that way - but first I need to change a plug. Whoops.
Meanwhile, Jeremy at Flyin' Miata has prepared the base map for the ECU. It's pretty impressive, really. I told him I needed a base map for a high-compression 2.0 with 1999-00 injectors, the 1999 intake manifold with VICS, a front crank trigger from a 1996-05 with a cam angle sensor for TDC...and his question was "do you need A/C?"
entry 156 - tags: engine, interchange, tuning | | | 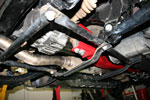 | May 6, 2007 - The subframe brace here is from a 2003 model.
Not only does it stiffen up the rear suspension, but it also protects the differential. It doesn't protect against rocks as well as a legit skid plate would, but I'm more concerned about bottoming out the car on pavement and it should help out there. It also wouldn't be difficult to add a plate or two to this solid frame.
The little skid plate on the red PPF is visible here as well, and the brace does make it rather obsolete when I look at it now. Oh well.
It's also possible to see in this picture that the exhaust system is in place. The main power line running from the battery to the engine bay has been cut and modified so it goes through the cut-off switch, then the wiring was properly secured. The driveshaft is on - and all of a sudden, I have a complete drivetrain!
entry 162 - tags: exhaust, wiring, drivetrain, interchange | | | 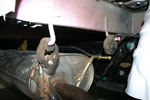 | May 6, 2007 - Because the header I'm using is from a 1999 model (simply because that's what I was able to scrounge up), I have to use a 1999-05 exhaust system.
The hangers are in slightly different places. No problem for most of the exhaust as I cunningly used a 2003 subframe in the rear (no, really, I did consider this!) but one of the rear mounts just isn't going to work. No worries, I have a welder...
This muffler is actually a stock unit from a 2005 Mazdaspeed. I'll probably replace it with something else later, but it was handy so it got bolted on. The midpipe is an old Flyin' Miata unit with a bad catalytic converter.
entry 164 - tags: interchange, exhaust | | | 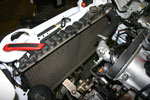 | May 6, 2007 - I dropped the radiator in to check some clearances.
It's from an automatic car so it has a dual core instead of the truly weedy single core used on the manual cars. It has steel tanks on it instead of the crack-prone plastic ones found on factory rads as well. It is better than an aluminum race radiator? Well, no. But I am trying to build this car out of available parts for a reasonable cost. It's easy to forget that with the recent engine build.
It's close to engine start time. I need to hook up the crank angle sensor and get a lower radiator hose on the car. And then it's a matter of taking a deep breath and putting some electricity through the car. I'm a little nervous about that actually - I don't have as high a level of familiarity with this particular ECU as I'd like, and there are a lot of changes to the wiring. Maybe I'll see if Jeremy from Flyin' Miata wants to drop by for an evening.
entry 165 - tags: interchange, wiring | | | 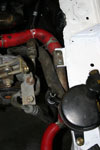 | May 8, 2007 - The red silicone hoses were also donated by the previous incarnation of the Targa Miata.
But the real work in this picture was on the power steering lines. The 2003 steering rack has a loop of hard line that's intended to help cool the fluid. The 1994 rack doesn't have this loop and ours was kinked from the accident, so it was removed. A bit of trimming to the hoses and careful routing around the coolant lines finished the job. I may still hook up a cooler of some sort.
So it's almost time for the big startup. I've wired up everything but the oxygen sensors and almost all the vacuum lines and fluid lines are complete. Now all I have to do is load the new program into the ECU and see if I can find a battery that's fully charged.
entry 167 - tags: interchange | | | 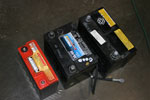 | May 15, 2007 - In order to exorcise my battery woes, I brought home a collection.
The largest is an original equipment Panasonic AGM, much sought-after by many Miata enthusiasts. The middle size is the standard Mazda "High Performance" replacement. The small one is the killer Odyssey PC680. Similar power to the others, but half the size and weight. The latter is what I use in the Seven and this particular new one was stolen from my boss' Westfield "to be installed" pile. I wouldn't mind running a PC680 if only due to the weight, but today it was the mid-size Mazda replacement that was put to work.
entry 174 - tags: wiring, interchange, weight loss | | | 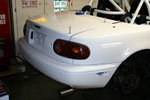 | June 8, 2007 - Naturally, as soon as the paint was dry enough I had to put some panels on the car.
They're not bolted in place yet, but it's a start!
You can see the 2005 Mazdaspeed MX-5 turbo exhaust protruding beyond the bumper. Those cars have a deeper rear bumper. I'll cut the pipe down a bit, it's goofy looking.
I never thought I'd get so excited about seeing a white Miata.
entry 193 - tags: paint, exhaust, interchange | | | 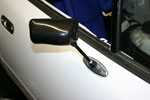 | June 10, 2007 - Sexy, lightweight carbon and aluminum mirrors.
Those aren't plastic made to look like carbon, they are carbon. Oooh. I've been waiting for a while to bolt these on!
Did you know that Mazda used the same door for power and manual window cars, but the outer door skin is different for cars with power mirrors? Go figure. Naturally, these mirrors need the power mirror door and one of my doors was a manual mirror type. That meant I got to do some cutting on my nice new paint.
entry 197 - tags: weight loss, interchange | | | 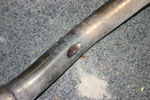 | October 30, 2007 - Time to get ready for a big test.
There's a track day in Pueblo on Friday. This will be the first time I've taken the car on a "big" track, instead of the tight kart track I've been using. It's going to be interesting to see how it does.
One of the jobs to be done before heading to the track 200 miles away is to swap out of the differential. Howard Booster is building a Westfield, and graciously allowed me to borrow his differential for the weekend so I could test with a Torsen and not have to disassemble the Seven. Thanks Howard!
While pulling the diff, I discovered the source of a banging noise under hard cornering. I'd figured it was the exhaust hitting the differential. Close,but not quite. It was the exhaust hitting the flange on the two-piece halfshafts! You can see the evidence in the picture. The two piece halfshaft was never used from the factory with the 1999-05 exhaust system I'm running. I'd used two piece units because it makes it a bit easier to pull the differential, but after dropping the open diff out of the car today I've realized that it doesn't really make all that much difference! Substituting one-piece halfshafts gave me the clearance I need.
So, almost ready to go. I'm going to tow the car over so Janel can come with me. I'll pile a bunch of swaybars in the back of the tow vehicle so I can play with handling, and I'm going to try a couple of different alignment setups. Oh yes, and I have to receive and install the new suspension! Little stuff, you know.
entry 330 - tags: exhaust, drivetrain, interchange | | | 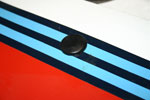 | January 26, 2008 - A really slick plug.
When I removed the stock antenna from the car, there was a hole left in the rear fender. Not being a fan of bodywork, I didn't fill it before the big paint extravaganza. I altered the base of an antenna to sort of fill the hole, but it was ugly.
A coworker found this trick on one of the Miata forums, and it's brilliant. This plug is from the Miata windshield wipers. It hides the nut that attaches the wiper arms to the shaft. And it is the perfect size to plug the antenna hole. Very slick!
Update! Tom Smith informed me that Mazda provided a similar plug on the early base model Miatas that didn't come with a radio. Mazda Competition can provide them if you want the real thing.
Update #2! "Wreckerboy" found a similar plug at his local hardware store for around 18 cents.
entry 391 - tags: interchange | | | 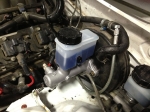 | October 2, 2013 - The master cylinder failed at the last track day.
It was an old salvage part that had been pushed hard - but I took it as an opportunity to upgrade. The previous setup used a 15/16" master cylinder from a Mazdaspeed. The Mazda 929 used a 1" master, and it bolts right on. Well, once you've reshaped the brake lines it does.
The result is a bit more braking effort and a firmer pedal. I figured I'd give it a try, so I installed a brand new 1" part. I took the opportunity to clean up the routing a little bit as well. The pedal is definitely firm, we'll see how it works at the track this weekend.
entry 1098 - tags: brakes, interchange | | |
|

 THE DIARY