| MIATA BUILD |
|
|
 | |  | March 27, 2007 - More driver development.
I've been autocrossing my little Seven for the past few years. But it's time to start concentrating on Miatas again for a while, so I bolted some race tires and a race seat into my girlfriend's supercharged Miata and went hunting.
The event was a Corvette autocross, always a fun group to run with. My coworker Brandon - driving a turbocharged Miata with another 60-80 hp over mine - and I were the only two non-Corvettes at the race.
It took me a few runs to get used to the slower reflexes and lower grip levels of the Miata instead of the Seven, but it started to come back. Lower grip levels not just because of the different car, but also due to cold weather and a dusty parking lot - a good indication of what we can expect in Newfoundland.
It was a good battle between Brandon, myself and a supercharged 2006 Z-06 running on massive V710s. On my last run, I left the braking a millisecond too late on the last corner and understeered badly to the finish line. Brandon didn't make any mistakes and took the fastest time of the day, while the Z-06 ended up just ahead of me.
Lessons for the Targa? The adjustable brake proportioning will be quite useful and of course I'll have to leave some extra room to stop in adverse conditions. I don't have any trouble controlling the car in big slides (after the first run, I did most of my steering with the rear wheels) but sliding off the outside of a corner in the Targa with locked-up brakes is something to avoid.
entry 103 - tags: testing, other cars | | | 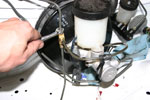 | March 27, 2007 - A mystery solved.
For some reason, the brake master cylinder only had two outlets instead of the usual three - one for the rear and one for each front. It was driving me crazy until a coworker remembered the donor car had ABS. The ABS module took care of the distribution between each side, of course!
Now that's sorted out, I needed a junction to feed both front wheels. Voila! This picture sure makes that lower line look crinkly - I'll smooth that out for aesthetics. The ziptie is to help anchor the lines and cut down on vibration.
It's possible to see what a little dribble of brake fluid, left to sit for a couple of days, did to my fresh white paint. Oh well...
entry 104 - tags: brakes, interchange | | | 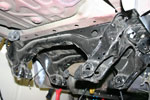 | March 27, 2007 - It's time to install the suspension.
Why? Mostly because I keep tripping over the parts in the garage! But also because that lets me install the uprights and brakes, giving me the chance to bleed the brake system and check for leaks in the new joints.
I considered seam-welding the subframes, but no.
entry 105 - tags: suspension | | | 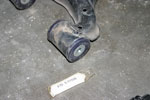 | March 27, 2007 - The control arms are fitted with polyurethane bushings.
This gives finer control over wheel movement than the stock rubber bushings. They need to be well lubricated though, so I'm using this really disgusting sticky grease.
entry 106 - tags: suspension | | | 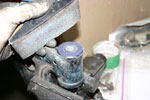 | March 31, 2007 - After assembling one corner of the car, I found there was far more friction in the suspension than I wanted.
Closer inspection showed that the crush tubes in the bushings were not as long as the bushings themselves - not a low-friction situation. Measuring the bushing with the crush tube removed was fine, but the deformation of the polyurethane with the sleeve inserted was enough to cause a problem. So I shaved down the bushings slightly so they were flush with the tubes. I only did a couple by hand, the others were done much more rapidly on the belt sander at work. Why did I do two by hand? Because I forgot the control arm at home.
entry 107 - tags: suspension | | |  | March 31, 2007 - The really disgusting sticky grease had questionable lubrication properties but excellent gluing properties.
So I decided to use some marine grease instead. Much better!
entry 108 - tags: suspension | | | 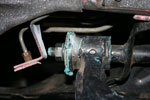 | March 31, 2007 - Some people make fun of me for using a lot of grease.
I don't know why. But I do know this thing is well lubricated!
entry 109 | | | 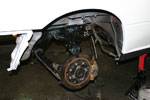 | March 31, 2007 - The rear suspension together, minus the spring/shock assembly.
Because there's no preload in the polyurethane bushings, the suspension is free to droop as far as it wants. This isn't great for the brake line that's currently limiting travel, but it sure makes it easy to work on the suspension.
The rear brakes use 2-piece rotors measuring 11" across, part of a big brake kit from Flyin' Miata. They're lighter than the stock brakes.
entry 110 - tags: suspension, brakes | | | 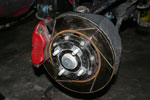 | March 31, 2007 - A similar big brake kit is used on the front.
There's a significant weight advantage and the Wilwood calipers make it really easy to change pads.
Hidden behind the rotor is the 44-tooth sensor for the ABS. If we can find enough technical information, we'll use this as a sensor for the Coralba rally computer. Coralba is not being helpful at all - we know exactly what the ABS signal looks like, but they won't tell us the required signal for the computer. Instead, we're told to buy expensive peripherals and patch them into the car instead of using the sensors that Mazda spent a lot of money developing. I want to just plug this one in, figuring that there's not a lot of variation in hall-effect sensors. Eric's not so sure, probably because he's the one who gets to use the computer! If anyone out there knows what sort of voltage range is acceptable as an input for a C-Giant rally computer, let us know!
entry 111 - tags: brakes, wiring, computer | | | 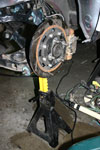 | April 2, 2007 - The suspension is so eager to droop that it was putting stress on the brake lines - so an extra set of jackstands was needed in the rear.
All four corners now have full suspension and brakes. The brakes have been bled, resulting in just two leaks where I had simply screwed fittings in by hand (just 15 minutes before in one case). The pedal feels really good, a promising sign.
Now that there's steering, a seat, brakes and suspension (without shocks), I have a soapbox derby car.
entry 112 - tags: suspension, brakes | | |  | April 2, 2007 - Time to pop the diff in.
The stub axles are lubricated with a bit of grease to make sure they'll slide in nicely (which they did). Funny, that green grease is showing up all over the place now.
entry 113 - tags: drivetrain | | | 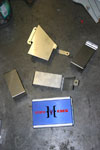 | April 2, 2007 - The Hydra Nemesis ECU (engine control unit) along with a selection of brackets.
These brackets are all sold by Flyin' Miata to mount the Hydra in various models of Miata. None of them suit our particular needs. Brandon from FM reworked the top one to fit the ECU to the firewall. I threatened to cut lightening holes in it, he called me a nut. Regardless, the ECU is nicely and firmly mounted out of harm's way.
entry 114 - tags: wiring | | | 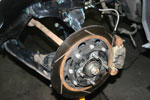 | April 6, 2007 - The halfshafts are in.
These particular ones have me a little concerned - they're from a very high mileage car. I may have to change them later. They'll be well tested before the race.
Another problem has appeared with the parking brake - one caliper appears to be misbehaving. I'll have to pull it off and see if something is seized. The history of the calipers is also a bit of an unknown. At least it's not difficult to find a replacement.
entry 115 - tags: drivetrain, brakes | | | 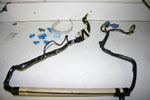 | April 6, 2007 - Time to start the big wiring job.
A 1994-97 Miata puts the engine computer behind the passenger's seat. This snake of wires is a dedicated harness for the ECU. Since I don't want the ECU back there, nor do I want the weight of the wires, I'm going to modify this harness extensively so that it has the correct plugs on the end for the Hydra Nemesis and also to shorten it for the firewall mounting location.
The original plan was to splice the Nemesis wiring directly into the main harness, but this is a more flexible arrangement if I ever decide to change to a different ECU. I can just unplug my adapter harness and pop in a stock one - or another adapter. It'll also be easier to test the wiring when it's removed from the car like this.
entry 116 - tags: wiring | | | 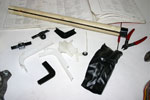 | April 8, 2007 - The wiring harness in the previous picture looked fairly simple, but these little guides and mounting brackets were all taped in to make sure it went where it was supposed to and it was protected.
It's always interesting seeing how a manufacturer deals with something like this. Despite the fact that it's been 13 years since the car was built, the wiring looks almost new.
entry 117 - tags: wiring | | | 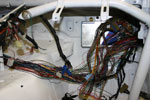 | April 8, 2007 - Despite the nice clean workbench in the last picture, here's where the work is really getting done.
Why? Because I want to get the wiring lengths right. The three plugs that supply my various signals are in different places, and the three plugs on the ECU are also arranged side by side. So the ideal length of every wire is different. It's not exciting, but it is engrossing work.
So much for my theory that it would be easier to test the harness on the bench.
entry 118 - tags: wiring | | | 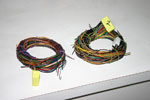 | April 8, 2007 - This is the wiring saved by moving the ECU to the firewall instead of the rear bulkhead.
It's shockingly heavy, especially when rolled up like this.
Race cars don't need as much wiring as street cars. There's no need for air conditioning or heaters, for example. Our aftermarket ECU also uses some onboard sensors or alternate sensors that use different wiring than the factory unit. Once it was wired in, I traced back all the unused wires from the stock plugs, confirmed that I didn't need them and then cut them out. Yes, it saves a few ounces but that's not the main purpose. The fewer wires there are in the harness, the easier it is to debug any potential problems in the future. Today I pulled out the wiring for the power windows (big fat wires - that was significant), the optional foglights (I'll probably wire in some lights myself in the future, but they'll need better wiring than the factory stuff), the mass air flow sensor (our ECU uses a MAP sensor instead), the diagnosis connector underhood (we can talk directly to the ECU) and a few other bits and pieces that aren't needed. The harness is getting simpler and simpler.
entry 119 - tags: wiring, weight loss | | | 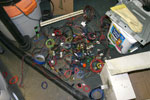 | April 9, 2007 - The great wiring exodus continues.
This pile may not look like all that much, but there's probably more wire out of the car now than in. The harness is getting much thinner and easier to work on.
It's amazing how much of a modern car's (assuming a 1994 Miata is considered "modern") wiring is due to the audio system. Between headrest speakers, door speakers and power antennas there's a lot of it snaked around the car. Imagine a car with a premium sound system!
entry 120 - tags: wiring, weight loss | | | 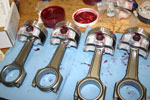 | April 10, 2007 - Time to stop playing with wires.
It's time to put the engine together. It's a fairly exotic piece, running high compression, a bore increased by 2mm and a stroke lengthened by 4mm. The rods are 6mm longer than stock to allow a good rod ratio for better revs. Flyin' Miata is using our car as a testbed for a high-end naturally aspirated powerplant, a change from the usual turbocharged beasts.
Due to the low compression height on the pistons, the wristpin is actually inside the oil rings. This means the rods have to be installed before the rings.
entry 121 - tags: engine | | |  | April 10, 2007 - Bill Cardell from Flyin' Miata helps out by setting the ring gaps.
entry 122 - tags: engine | | |
|

 THE DIARY