| MIATA BUILD |
|
|
 | | 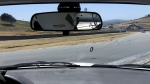 | April 29, 2013 - This is not something you want to see out the windshield.
That's my rear brake rotor. I came down the Corkscrew, hit 4th gear and turned into the fast turn 9. Just before I reached the apex, I heard a bang and the car snapped into a spin at somewhere around 80 mph. My first clue as to what had happened was seeing my right rear wheel rolling along the pavement as we rotated the first time, then we went into the dirt after the second spin. On the dirt, the car lifted a little bit like it was trying to roll, but stayed happy side up as we scrubbed off speed.
A big thumbs up to the track designers - we finished our ride safe and sound without hitting anything but a small drainage ditch. Then it was just a matter of sitting in the car with our helmets on and watching the other cars come around the corner, seemingly aimed directly at us. Finally, all the traffic was cleared and the flatbed showed up.
entry 1083 - tags: crash, failure, laguna seca | | | 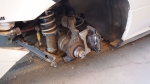 | April 29, 2013 - So, what caused the accident?
Looks as if the rear hub failed, leaving only the brake rotor to hold the wheel in place. Obviously, that's not what it's designed to do so it simply ripped apart. This was an upgraded but used rear hub - taken from Elvis, remember - but I'm going to be taking a very close look at the bearing and specifications to see if it's possible to build something stronger.
This also reinforces my belief that I need to step up my maintenance. Talking to Emilio at 949Racing about his enduro experience, I'm learning more about the difference between a track day car and a racer. Yes, I only use this car for track days but it's highly stressed and those track days stack up. I'll start flushing and cleaning all the hydraulics on a regular schedule instead of just the brakes. Wheel bearings are going to start getting treated like consumables. Although I'm not sure I would have identified this one as a problem, as I had it off the car on Wednesday and it felt fine. The hub's previous history was as a street car that has seen a few track days, but at a much lower stress level than the Targa Miata runs.
entry 1084 - tags: failure, hub | | | 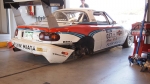 | April 29, 2013 - This is the least amount of damage you can do if you lose a wheel in Turn 9 at Laguna Seca.
The bumper is just out of place. The exhaust got pulled out of shape and took some of the brackets on the body with it so the trunk floor is probably messed up. The skid plate under the diff is deformed and I want to check the subframe carefully. The front wheel is dented and the rear is all scarred up. But it's almost all bolt-on parts. There's one small dent in front of the missing wheel but otherwise is looks like the tub is untouched. Amazing. I got very, very lucky.
The car's back in the trailer (thanks to the help of Emilio and a number of other onlookers) and heading home to Colorado. I'll drag it out there and take a close look at everything underneath.
entry 1085 - tags: failure, crash, laguna seca | | |  | May 1, 2013 - Crash video.
How quickly did the failure happen? Pretty much instantly. Why did it fail? See the next post. http://youtu.be/3k2u2zaIA3c
entry 1086 - tags: video, crash, laguna | | | 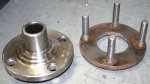 | May 1, 2013 - So, what caused the accident?
The hub came apart, leaving only the brake rotor to hold the wheel on. Of course, that ripped apart almost instantly and the car snapped into a spin.
It turns out that this was a known problem with the V8Roadsters hubs, which led to a redesign several years ago. The new one is 1/2" thick instead of the 3/8" found in the older design. In the fallout from my broken axle last month and some problems found with new parts, I ended up borrowing the hubs from FM's shop car, Elvis. For some reason, Elvis never got the upgraded parts. I'm going to try to figure out how that fell through the cracks. We're also going to contact all of Flyin' Miata's V8 customers and ask them to check their rear hub thickness to make sure there aren't any more out there.
The good news is that we now have proof that the rear caliper brackets on the new FM brake setup are stronger than the rotors!
entry 1087 - tags: failure, hubs | | | 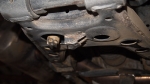 | May 3, 2013 - Let's hear it for rally cars.
Nearly five years ago, I added some small ramps to the bottom of the control arms to protect the lower AFCO adjuster. Last weekend, they did their job. In fact, all of the skid protection worked as designed. The plates just behind the front wheels took a beating, as did the engine skid plate. The differential protection really shows a lot of scarring, but the differential itself is untouched. Almost nothing touched the ground that wasn't designed to touch the ground. The car was built to fail well, and it did.
entry 1088 - tags: damage, crash | | |  | August 22, 2013 - It's been a long time between updates.
Mostly because it's been a long, long wait for parts. The replacement axles took forever. I took the opportunity to upgrade from the standard axles to the G2 version, which have stronger CV joints and come with the new, beefier hubs. Good thing, too - you'll see why soon.
Elsewhere on the car, I replaced the bent-up muffler, fixed an alignment problem up front and went over a few other things. One bent wheel and one questionable wheel were replaced as well. Since the muffler had burned the rear bumper cover during a dyno run, and then it got all scarred up in the crash, I decided to cut it out further than before. I liked the look better before, but not all the damage.
The car is now back on the ground and self-propelled for the first time in forever.
entry 1089 - tags: repair, crash, axles, exhaust | | | 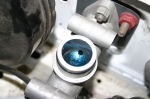 | August 22, 2013 - Remember my clutch problem at Laguna Seca?
Yes, it was way back in April. Well, here's the culprit. There was gunk in the system, clogging up little tiny passages. Since this was a brand new system when it was installed, it's amazing how much has accumulated. So this will become a regular maintenance item on the car in the future.
I cleaned out the reservoir and flushed the system out with brake cleaner. Nice and clean now.
entry 1090 - tags: clutch | | | 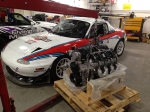 | August 23, 2013 - Time for a big upgrade.
When the car was converted to V8 power, it got a modified L33 engine. The L33 is a 5.3L truck engine with an aluminum block, but really the only things that stayed were the block, crank and rods. This is the recipe for the V8RSpec race series engines. It's a good track engine with a powerband that just keeps delivering more and more up to about 375hp at the rear wheels - but it's never had the bottom end torque I wanted. This is particularly a problem on the rally stage, where you don't always know exactly what a corner exit is going to look like. Driving the car back-to-back with my 5.7 LS1-powered MGB on the street really showed me what I was missing. So I've been eying the newer, larger LS3 engines for a while. I think I'm the only person who's ever felt the car was lacking for torque, though!
A few weeks ago, I got a call from a friend who had an LS3 for sale. It's a crate LS376/480, the same 480 hp engine that we use for a lot of conversions at Flyin' Miata. It had been installed and run just long enough to seat the rings before being pulled. He offered it to me at a killer price, so I jumped on it.
So the Targa Miata is going to get a makeover. Along with the new engine, I'll drop in the matching wiring and controller. No more modified 2002 Firebird parts, I'll be running a GM Performance Parts wiring harness, PCM and fusebox. This will, amongst other things, take the main relay out. Yes, that main relay.
I've got a few other changes planned, but this is the big one. It's going to be fun. Good thing I upgraded those axles.
entry 1091 - tags: engine, power, LS3, L33 | | | 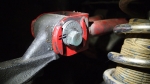 | August 30, 2013 - Prep time.
I've got a track day coming up in a couple of weeks, the last one with the current drivetrain. I'm going through the car to make sure it's in good shape. After the little three wheeled off-road excursion at Mazda Raceway Laguna Seca, I had the alignment checked. Every time that's done, I go over all the alignment cams and make sure they're torqued good and tights. I also mark them so it's easy to reset the alignment should one slip. Easy to do, but saves a bunch of potential hassle.
That tan Monterey sand is EVERYWHERE.
entry 1092 - tags: prep, alignment, suspension | | |  | August 30, 2013 - I've been using a different bleeding technique for the brakes for a while: gravity bleeding.
It's about as simple as it gets, but I've found it to be really effective. It's something I learned from the old Land Rover, as it's got a particularly recalcitrant hydraulic system.
Basically, you just open up the bleeders. In my case, I just let them drool but you can attach a hose. You could open them all up at the same time, but I like to do one at a time so I can watch what's going on. Big bubbles are obvious, but there are a surprising number of little teeny tiny ones that you'd never be able to see if you were using a hose.
It's the same basic idea as pressure bleeding, but without the extra hardware. Some pressure bleeders can actually aerate the fluid slightly which is counterproductive. I've found that I get a much firmer pedal with this technique, which might be the result of that aeration or the fact that I'm getting rid of those miniature invisible bubbles. The brake pedal is like a rock. Plus the only thing I need is a wrench and a few rags to clean up. It's also fairly quick, especially since you don't have to mess around with the pressure bleeder.
It wouldn't be a quick way to flush the system, as you actually end up using very little fluid. But if you're changing out calipers (as I have been doing regularly recently), it's perfect. Just like with any other technique, I finish by starting the car and trying to push the brake pedal through the firewall. You develop a lot more pressure in the system that way, and it's a good way to find leaks that would evade detection during bleeding.
entry 1093 - tags: brakes | | |  | September 11, 2013 - Want to know what the difference between the standard 430 hp LS3 and the 525 hp version is?
You're looking at it. That's an ASA cam from GM Performance Parts along with the appropriate valve springs. We have a car at Flyin' Miata right now with this cam, and it's ridiculously fun. Not just the obvious power, but the throttle response. It's one rorty engine, entertaining in a way that the other versions aren't.
So, while my new engine is out of the car, dropping these parts in was a bit of a no-brainer.
entry 1094 - tags: power, engine, ps3 | | | 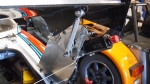 | September 11, 2013 - The latest mad scientist project on the car: active aero.
I've been reading far too many Can-Am books. The rear wing is flipped up under braking by a pair of Miata headlight motors. It's triggered by the brake lights and takes 0.6 seconds to change position.
I'd originally planned to make this work with an expensive Spal linear actuator with a clever three-position controller that gave me a low drag position as well as the air brake, but it was far too slow - 0.5"/sec. The Miata motors are six times faster. I mounted them where I did mostly for simplicity, I didn't want to make any permanent changes to the car for these tests. They're not in an ideal place from an airflow perspective.
It's been suggested that I add a timer circuit to delay the return once I get off the brakes, and I might give that a try. This is just the proof of concept. I've got a track day this weekend, I'm going to bring this with me to see if it works.
Video!
entry 1095 - tags: aero | | |  | September 16, 2013 - Track time!
I was back at High Plains Raceway. I've come to enjoy this track more than I did initially, it's actually pretty fun. The best corner is a long uphill sweeper that has a fairly quick entry. If you do it right, you can keep full throttle most of the way through as you climb to a blind exit with nothing but sky to see.
The car went pretty well. It took me a couple of sessions to work out some little bugs and dial in the handling for the track, then it all came together. I spent some time playing with two CMC-class cars, Camaro/Firebirds with V8 engines. For the first session, I was about the same speed. Then I got faster and started hunting down the Viper that was sharing the track with us. Overall, a pretty good day at the track.
For fun, I attached the GoPro to the front splitter to get some super-low camera angles. A bonus was the sound - it's directly below the intake. This is fun to watch with the sound turned way up. You'll meet the CMC cars in the second lap.
entry 1096 - tags: track, hpr, video | | | 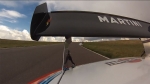 | September 16, 2013 - Track test for the active wing!
Once I had the car dialed in, I bolted on the active wing mounts. After some fiddling around, I got it set where I needed it and headed for the track. I did warn the chief steward that I was going to be testing a moving wing, so please don't black-flag me for a mechanical problem! I headed out for a couple of laps with a slow group so I could build my way up to full speed without getting rear-ended by a RUF turbo Porsche.
The wing looked stable enough under load, so I started to ramp up the speeds. It all looked good, and I was greeted with a big thumbs-up and grin from the steward when I exited the track. I then went out again with my fast group for the real test.
It works!
And it works really nicely. The car felt rock-solid under braking, with lots of stability. The various transient behaviors predicted by web forums failed to materialize, the car just felt as if it had upgraded brakes. It felt well planted on turn-in and it decelerated hard from 120+ mph. Unfortunately, the datalogger failed to record data for the test session so I don't have any comparative numbers. I'll be back on our small track in a few weeks, so we'll see how it does at 70 mph or so.
Video!
entry 1097 - tags: aero, testing, wing, active | | | 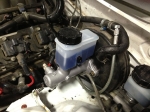 | October 2, 2013 - The master cylinder failed at the last track day.
It was an old salvage part that had been pushed hard - but I took it as an opportunity to upgrade. The previous setup used a 15/16" master cylinder from a Mazdaspeed. The Mazda 929 used a 1" master, and it bolts right on. Well, once you've reshaped the brake lines it does.
The result is a bit more braking effort and a firmer pedal. I figured I'd give it a try, so I installed a brand new 1" part. I took the opportunity to clean up the routing a little bit as well. The pedal is definitely firm, we'll see how it works at the track this weekend.
entry 1098 - tags: brakes, interchange | | | 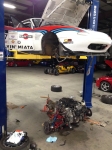 | October 8, 2013 - And out it comes.
The L33-based 5.3 has done excellent work in this car, but it's done. A 6.2 LS3 with a big cam is going to be in charge now. There's nothing wrong with the 5.3, it just doesn't have the low-end grunt of the big motor. I'm going to take this down time to sort out a bunch of other little things on the car. You know, while I'm in there...
entry 1099 - tags: engine, 6.2 | | | 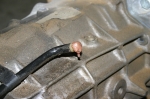 | October 10, 2013 - How hot did the transmission tunnel get?
Hot enough to melt this plastic check valve. This valve is supposed to prevent the buildup of pressure inside the trans with heat. It's obviously not able to do the job anymore, which would explain why the transmission had a tendency to leak from various seals. This will obviously get replaced.
In completely unrelated news, the exhaust system was sent off to Swain for ceramic coating today.
entry 1100 - tags: transmission, heat | | | 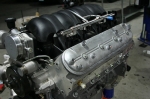 | October 17, 2013 - Did you know the LS engines have really nice valve covers underneath all those coils?
I was thinking of relocating the coils to where they wouldn't see so much heat and vibration, and the look of these is only reinforcing that.
The old engine has been stripped of all (or most) of the parts that I need, and the new LS3 is partially torn down in preparation to receive them. I'll be doing a cam swap in this next week, which is why the coils are off.
entry 1101 - tags: engine, 6.2 | | | 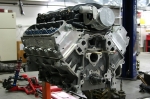 | October 24, 2013 - Cam swap time!
Working on this engine is almost like unwrapping a Christmas present - I'm discovering all sorts of new things. It's fun seeing how all the parts work together. You can look at diagrams and read about how the valvetrain works, but it's something else to actually peer down the cam bore and see the lifters tucked away. After so many years of Miata, Miata, Miata, seeing different solutions is interesting. It's also been a long time since I personally built an engine, I miss it.
The new "ASA" cam is now in place, with the timing chain back on and the front of the motor all buttoned up. All that remains is to flip the fuel rail over so the inlet is on the Miata-friendly side, change out the valve springs and install the new oil pan. Then I can start looking at putting everything back in the car.
By the way, the two dowels were supposed to help hold the lifters in place. I can't see how, I think that was a poor tech tip I found online. But they didn't do any harm.
entry 1102 - tags: engine, 6.2, cam | | |
|

 THE DIARY