| MIATA BUILD |
|
|
 | |  | May 31, 2011 - Aero!
The car will be spending more time at high speed than before, so I'm going to do a bit of work to stick it to the ground. I'll be doing a spoiler on the trunk lid, and this air dam will help balance it out. The relatively high ride height of the car will make the air dam less effective than it would be on a track car, but you work with what you have. The part is made of flexible polyurethane so it'll deal well with impacts.
Due to that higher ride height, it will probably be difficult to balance the downforce of a wing. Still, if I can get time, I'd like to test that.
entry 849 - tags: aerodynamics | | | 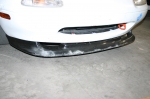 | June 29, 2011 - Good news!
The engine computer is back from being reflashed, and it's working far, far better than before. Many more horses now live under the hood. It's not yet perfect, but it's now running in closed loop and with long term trim so it'll get better. Best yet, I can now get in to the computer to tune it. So we're well on the way.
I also discovered an advantage to flexible air dams. There's a piece of road nearby that was torn up for construction and hasn't been repaved. There's a slight drop down to the gravel/dirt level. Well, when I (purposefully) took this at a high rate of knots, the air dam bottomed out and became a snowplow. A truly impressive cloud of debris was raised. Back in the garage, there's no damage to the dam and a few screws that have pulled out. I was going to replace those with bolts anyhow, so no harm done. And yes, I do need to lift the car up. I'm pushing it right now to find out where the weak areas are.
entry 865 - tags: power, V8, air dam, aero | | | 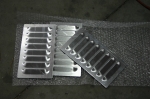 | August 22, 2011 - A bit of extra airflow management thanks to Mark Rivera at Paco Motorsports.
The NACA duct and the turn signal intake helped, but the air pressure underhood is just too high for them to really make a big difference. So these louvered panels will pull hot high pressure air out and make room for the cold stuff. As an added bonus, they'll keep the hood from lifting above 100 mph.
There are some larger ones available on the market, but I wanted a small set for a few reasons: they fit better around the underhood bracing and they'll fit with the Martini livery! Yes, perhaps that last reason is a bit shallow. But I don't care. The panels were punched out by Mark to my dimensions - thanks Mark!
entry 919 - tags: aerodynamics | | | 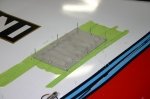 | August 23, 2011 - Time to install those new louver panels.
The first step was to figure out where they should go. Ideally, they'll go at the point of lowest pressure so they do the best job of pulling hot air out of the engine bay. On this 1994, that's roughly where the hood starts to flatten out when viewed from the side. But there are other factors, such as the underhood bracing. It's hard on airflow, and if you cut too much of it your hood gets all floppy.
Plus there are aesthetic considerations. In my case, that means "no vents in the Martini logo".
entry 922 - tags: aerodynamics | | | 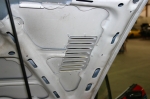 | August 23, 2011 - Here's the location of the vents viewed from underneath.
You can see how they're tucked into the bracing. I also used the rivets to firmly attach the bracing to the bottom of the hood, to retain as much strength as possible. One of the cross bars had to be cut, but it's riveted to the hood on each side (one of those rivets hasn't been installed yet, but you can see the hole) and the louvers actually add strength in this direction.
entry 923 - tags: aerodynamics | | | 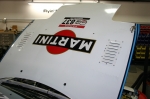 | August 23, 2011 - The view from on top.
For those who are curious, the outermost forward rivet is 210mm from the headlight cutout and 100mm from the side of the hood. It's a bit further forward than is ideal, but any further back and I'd be into the big brace. I could have also placed them in a more central location on the other side of that big brace, which would have let me move them further back. But then they'd be into the Martini logo! Oh, what we do to look good. I think they're still going to be quite effective, and it's possible the more central location would have been too far back.
You'll also notice a couple of rivets below the Martini logo. There's also a black on right by the R. Those attach the big brace to the bottom of the hood, replacing some factory adhesive that had failed. The amount of extra rigidity this adds to the hood is significant. You may also notice an extra oddly-spaced rivet on each of the louver panels, that is anchoring the stump of the brace I had to cut.
In the first "install" picture, you can see a matte finish I got from bead-blasting the raw aluminum. Now they've been sprayed with white paint to match the hood, and they actually blend in very well. I considered making them black or leaving them matte, but I'm happy with this.
entry 924 - tags: aerodynamics | | | 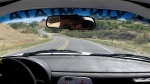 | August 24, 2011 - The tune for the engine computer is coming together pretty quickly.
Changing tacks and concentrating on the MAP-based tables did the trick. It's close enough now that the computer's effective short- and long-term trims will keep everything in line, although I'll do a little extra tweaking once I get down to sea level. I'm also going to keep working on it before I leave to fine-tune as much as possible.
I did discover a vibration from the rear at high speeds. I'll see what I can find. It's not massive, but it's enough to make me look for it.
With exterior temperatures being a solid 100F outside, this was some pretty hot work. It's hard to say exactly how much the intake temperatures have dropped thanks to the louvers, but they're far better than they were when I started. I did confirm that the hood doesn't bulge or flutter at high speed the way it used to, even in 4-cylinder configuration before I had to start altering the underhood bracing. So that's good, and hopefully an indication of the lower underhood pressures.
The screenshot is from the video camera I'll use during the race. I fitted a 0.5x wide angle lens to the camera to get a wider view and I'm pretty happy with the result. Between having the camera wired to car power and the ability to use removable 32GB cards that store over 4 hours of HD video, I should be able to get coverage of every stage without having to worry about space or power.
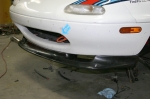
entry 926 - tags: testing, video, aerodynamics, | | | 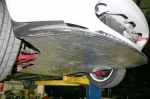 | March 2, 2012 - With the car off the dyno, I took advantage of the fact that I was at the FM shop to hijack a lift.
Step one was to clean up the front aerodynamics a bit. Previously, there was nothing between the air dam and the skid plate. I did have ducting around the radiator so that air was well used, but otherwise it was just plain messy from an airflow point of view. Not anymore!
The plate can easily be removed if I need to get in there - it's held in with a few machine screws around the bottom of the air dam and four bolts at the back. You can just see some rivets in this picture for one of three stiffening ribs that keep it from flexing, and I also did a bit of work at that corner by the wheel to add a lip for more strength. Since it's made of thin aluminum, it weighs very little. But it should do a lot to clean up the airflow.
One downside is that the airdam is no longer flexible - and the car is also much lower than it was at the Targa. So it's going to be more prone to damage. I'll have to behave myself over drops from now on.
entry 1022 - tags: aero, air dam | | | 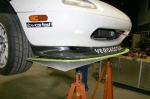 | March 2, 2012 - I'm also looking at adding a splitter up front.
Made of 0.090" aluminum, I'll probably make it adjustable so I can fine-tune the amount of front downforce on the car at speed. The green tape shows the approximate outline.
I've been doing a lot of aero reading and picking of various people's brains. Jeff at Slick Auto (who donated the carbon fiber headlight lids to the car) has been particularly helpful. His suggestion was for a full belly pan to smooth out the airflow under the car from axle to axle. I'm not sure I can pull that off due to my exhaust, but I'm going to spend some time looking and thinking. The front undertray was really the low hanging fruit. I've got some ideas that will be fun to play with, too.
entry 1023 - tags: aero, splitter, air dam | | |  | March 8, 2012 - Hopefully the front splitter will see some high loads - that means it's working.
So I gave it a bit of support with these turnbuckles from Longacre. The splitter is fairly solid without them, but since it's bolted to a flexible airdam and a fairly thin undertray it could be better. And now it is.
entry 1025 - tags: aero, splitter | | | 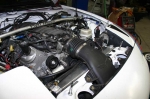 | March 11, 2012 - Here's the intake in place.
The filter is just above the mouth opening in the nose, visible if you get down to squirrel level. It will have no shortage of cold air there! I'm missing one piece of bodywork in the nose here, the one that seals around the front of the rad. I'll cut it to clear the intake next.
This should provide a comfortable power gain under hard use. The GM engine computer pulls timing starting at 80F intake temperature. And I was well, well above that. All of my ductwork on the driver's side won't be needed anymore, so it's possible I'll pull the NACA duct headlight cover off again and reinstall the turn indicator in place of my mesh unit. There's no advantage to ramming air in behind the radiator.
entry 1028 - tags: intake, aero | | | 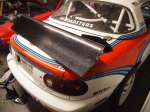 | July 11, 2012 - A new toy showed up.
I've been thinking about doing some more aero investigation. There are a number of things that could be addressed, such as a smoother underbody. I've already made a few steps in that direction of course. But I've also been toying with the idea of a wing. There's no question that they work.
I've been working with a metal fabricator around the idea of building my own wing from scratch. I also have an HPM wing that was previously used in World Challenge racing. But there's a particular option that's available right now that kept drawing me back.
Back when NASCAR introduced the Car of Tomorrow, the cars had a wing on the back. This was fine (well, not according to the traditionalists, but let's ignore them) until it was discovered that they'd generate lift when the cars starting going backwards at high speed, which is something that NASCARs do. So all the Car of Tomorrow wings were torn off and replaced with spoilers. Where did they go? Where old race parts go, into the used market. You can buy a nicely designed carbon fiber wing with interchangeable end plates for under $500. New, they were over $3000.
It's a big boy. Not something for a car that's low on power. But it should be fairly effective. The biggest challenge is going to be figuring out how to mount it - the hood pins on the trunk are in just the wrong place. But I'll think of something. I've got a few ideas. I'm also going to do some research to figure out where the best place to put it will be.
The wing investigation won't happen right away, though. The Flyin' Miata Summer Camp is coming up in three weeks, and I'm going to revert the car back to Targa specification for the Racing The Rock premiere. I also have three days to give joy rides at the local track, that should help burn up the R1R tires! Once that's all done, I'll go back to track spec.
entry 1045 - tags: aero, wing, summer camp | | | 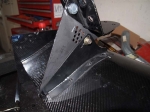 | August 16, 2012 - Time to start playing with the big wing I picked up a few months ago.
The method of adjustment is actually pretty cool - by choosing your combination of holes, you can get surprisingly fine adjustments yet they are perfectly repeatable. Once you know what a certain hole is, you don't need to measure the angle of the wing. Much easier than turnbuckles.
entry 1054 - tags: aero, wing | | | 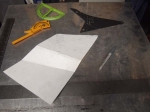 | August 16, 2012 - The mounts are going to be interesting to build.
I'm patterning them (partially) after the ones used on Porsche GT3 cars, as my wing mounting points are 1.75" closer together than my chosen mounting spots on the body. To make things even more interesting, they need to twist about 9 mm from front to back.
First, some cardboard templates before I commit to aluminum.
entry 1055 - tags: aero, wing | | | 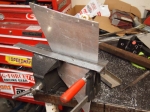 | August 18, 2012 - Some of the high-dollar equipment I used to make the uprights.
I don't have a sheet metal brake at home, so I had to improvise. Two short pieces of angle iron, a vise and a C-clamp combined with some muscle did the job. My workbench is made of heavy steel and bolted to the concrete floor of the garage - people ask why. It's so I can romp on it when doing things like this!
entry 1056 - tags: aero, wing | | | 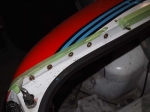 | August 18, 2012 - The uprights are attached to the car with rivnuts.
I chose this location for the mounting points for several reasons. The usual trunk lid mounted setup wasn't compatible with my stripped-out trunk lid, and I'm not completely convinced that this is the ideal place to put 100+ lbs of load anyhow. I also couldn't attach to the trunk lid even if I wanted to because of the pins.
This vertical lip is a great option. It's very strong, and my 1/8" thick aluminum uprights fit nicely in between the trunk lid and the body. They're also more watertight than having holes in the trunk lid, and if I remove the uprights there's no visible sign of the wing. I'm pretty happy with it.
entry 1057 - tags: aero, wing | | | 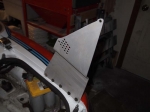 | August 18, 2012 - Here's one of the finished uprights in place.
I'll put up some more pictures of them in the daylight later. You can see all the holes for the adjustment system as well as the double bend that moves the mounting points inboard and also twists the upright. Did you ever notice that the trunk opening for the Miata doesn't have parallel sides? I hadn't.
You can see the specific shape of the mount between the holes - that's copied right off the steel NASCAR mount, and is needed to allow the maximum angle position. It appears there's about 16 degrees of adjustment in this wing, by the way.
Once I was done with all the shaping, I threw the uprights in the bead blaster to give them a nice finish.
entry 1058 - tags: aero, wing | | | 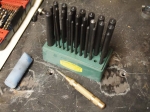 | August 18, 2012 - I didn't use any special tools to build these uprights.
Well, other than the bead blaster at the end. The aluminum was cut with a battery-powered jig saw and final shaping was done with a hand file and a belt sander. Holes were all hand-drilled, and you've already seen the exotic brake setup. Three of the most useful tools are shown here.
The transfer punches allow you to transfer the center point of a hole to a new piece of metal. You simply put the appropriately sized punch in the hole and whack it with a hammer. Voila. I got these from Harbor Freight, although you can spend a lot of money elsewhere if you want.
The gold punch is spring loaded. I used it to emphasize the dimples from the transfer punches. There were something like 60 holes involved in this project, and every single one of them lined up. Also Harbor Freight.
The blue stick is wax. Spreading this on the blade of the jig saw kept it from loading up with aluminum and helped it cut smoothly. I'd read about this somewhere, but never tried it. It works really well. I used ski wax because that's what I have in my garage.
entry 1059 - tags: aero, wing, tools | | | 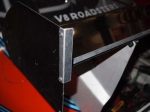 | August 18, 2012 - An interesting touch on the wing.
The left end plate had this cute little Gurney flap on it. The NASCAR cars are always turning left, of course. I suspect the airflow was a bit sideways in the middle of those long corners, and the flap made everything just a tiny bit more efficient with a bit of side force. Some of the end plates available for these wings are actually little aerofoils.
The flap along the back of the wing wasn't there when I got the wing. There was a slot for it, though, and a piece of Home Depot aluminum angle slipped right in. It's locked in to place with the end plates.
entry 1060 - tags: aero, wing | | | 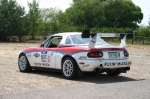 | August 21, 2012 - First road test with the wing.
Not really much of a test, but I can confirm that the wing is properly anchored and stable at 80 mph with no movement of the assembly. That's about all I can do on the road, really. But this is also the first time I've seen the car out of the garage with the wing on it. With the front splitter, it looks as if it was supposed to be this way from the start. What a mean looking car.
entry 1061 - tags: wing, aero | | | 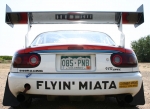 | August 21, 2012 - Gratuitously dramatic wing photo.
I'm really happy with how the mounts turned out. They won't work with a normally hinged trunk, but otherwise they're just what I wanted. The placement of the wing is not based on lots of aero testing, but is simply hung up in the air. I'll do some further testing later to check air turbulence and direction. The mounts will make that easier.
entry 1062 - tags: aero, wing | | | 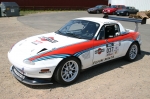 | August 22, 2012 - A view of the wing and splitter together.
The splitter used to look big, now it's a bit subtle! It's 3" at the moment. I'll test it out at the next track day in a few weeks and see what the balance of the car is like in a 70 mph sweeper. I suspect it'll start to understeer, but I have to admit that light understeer in a quick sweeper sounds like a reasonable idea. I'll play around a bit with the wing settings to see how it feels.
entry 1063 - tags: aero, wing | | | 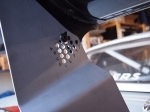 | September 8, 2012 - Time to test the wing!
Other than add the wing and splitter, I hadn't touched any other settings on the car since the Summer Camp a month ago. This was to give me a reasonable before/after picture of the effects of the wing. The short version? My first timed session popped out a 1:01.344. My previous best time in the car was 1:03.388. Yes, that's almost exactly two seconds faster. Two seconds! It may also be the lap record for cars with doors, although I need to do some digging around to be sure. It's certainly the fastest Miata time. Now, conditions were pretty much perfect and everyone was going quickly, but that's still a pretty spectacular difference. Not long ago, that would have been the overall record for cars.
I could feel the difference in the balance of the car as well. Where I'd previously had a bit of oversteer down the fast sweeper, I now had a bit of understeer. According to the rally computer, my peak speed was also something like 6-7 kmh faster than I'd seen before. That peak speed occurs as you're balanced on the limit of grip on the fast sweeper, and is limited (in this car) by the amount of lateral acceleration you can produce. So it's a quick and easy way to get a feel for actual grip. On that fast lap, it translates to sustained cornering of 1.1g or so, with a peak of 1.3.
I then proceeded to spend some time experimenting with wing angles. The next two sessions I cranked the wing down to a fairly steep angle. My fastest time dropped to 1:01.5, but the peak speed went up by 1 kmh. The understeer on the straight got stronger, and it actually became a bit more difficult to drive the car as the balance was changing so much based on speed. I continued to play with various angles, but it became apparent that the rising temperatures were affecting everyone's grip level and times gradually went up as the day went on. Still, it wasn't until the very last (hot!) session of the day that my times finally slipped above my previous best. So that's a big, big thumbs up to the wing, even on our fairly slow track - the average speed on my fastest lap was just a hair over 50 mph. It's also obvious that I need to do more to balance the front out. A lower ride height would help there, but I was leaving everything other than wing angle alone in my experiments today. I'm going to put on the stiff track springs and drop the car down a bit to get ready for an upcoming trip to Willow Springs.
As you can see from the picture, I added some labels to the holes so I can easily keep notes. For those who are interested, I tried C4, A1, B2, C1 and A3 today. It wasn't all perfect, though. It feels as if I lost a coil. I'm still letting the car cool down, but based on a quick test of header tube temperatures, it's the same #1 that has failed twice before.
Brandon also had a good day in his bike-engined Locost. After I was faster than him on the first session, he put his fast pants on and turned a 1:00.355. I believe that's the overall lap record for cars on this track, and so close to the elusive one minute mark!
entry 1065 - tags: aero, testing, personal best | | | 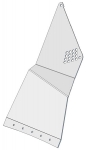 | November 30, 2012 - There's been a bit of interest in copies of the wing mounts for the COT wing.
Brandon made a 3D model of them, and Mark at Paco Motorsports will see what it might cost. Drop me a line at keith@flyinmiata.com if you're interested.
entry 1066 - tags: aero, wing | | | 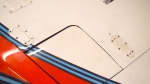 | January 15, 2013 - I finally replaced the hood pins with Aerocatches.
Much nicer - it's easier to open and close the hood, more aerodynamic and easier to tell if they've been left open. This involved drilling and cutting my poor hood even more - it's been pretty heavily worked over by this point! I've also learned that white Aerocatches get dirty really quickly.
entry 1069 - tags: hood, aero | | | 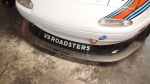 | March 27, 2013 - There's a track day coming up this weekend (weather permitting) so I've been doing a bit of work on the car.
It was pretty obvious at the last test that the wing was increasing grip at the rear more than my little splitter was doing at the front. So I picked up some more aluminum and extended it by about 1.5". Easy enough. I also swapped the rigid turnbuckles for cables, allowing the splitter to move up a bit if it scuffs the ground when I'm loading into the trailer.
entry 1073 - tags: aero | | | 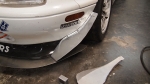 | March 27, 2013 - One of the dirty areas of the car, aerodynamically speaking, is the front tires.
That exposed rubber, spinning at high speed, generates a lot of drag. So I thought I'd be clever and build some canards that would cover them up in front view.
Well, that didn't work out. Somehow I came up with a pretty cool design, but crouching down and looking at the car head-on showed that they only covered about half the tire. Oops. The canards evolved from the original design as I made them.
entry 1074 - tags: aero | | | 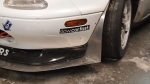 | March 27, 2013 - That's a much better way to cover up the wheels.
It seems a bit goofy, but it works. Some computational fluid dynamics run by "plucas", a member of the Miataturbo forum, shows that this setup increases front end grip and cuts down on overall drag fairly impressively. The expected hp to maintain 100 mph drops from 44 to 34 hp, and the car goes from generating lift to generating downforce. Hard to argue with Science, and definitely worth trying out.
I'm going to bring the canards along and give them a try to see if I can feel a difference.
entry 1075 - tags: aero | | | 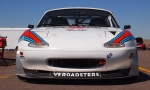 | April 1, 2013 - Track day test!
I headed over the mountains to High Plains Raceway for an open lapping day. This was a chance to check out the aero at high speed and sharpen up my high-speed skills in preparation for a couple of days at Mazda Raceway Laguna Seca in a few weeks.
It was a nice day with a wide variety of cars in attendance. I was sharing the track with everything from Formula B cars (one step down from Formula Atlantic!) to a McLaren MP4-12c that was still on temporary tags. Cool.
During the first session, I was mostly feeling my way around. The car was understeering, particularly on long lefts. I pulled into the pits and checked tire pressures - oops. Heading back out with about an extra 4 psi, the car felt better but was still pushing more than I liked. I'm on a new spring set that wasn't quite balanced right. I decided to keep the sway bars where they were and see if I could sort it out with other aspects.
Otherwise, the car felt good. Very strong, hitting 4th gear on the back straight pushed me back into my seat and I was topping out at around 126 mph before braking for the end of the straight. A couple of fast Porsches gave me someone to chase and - more importantly - learn from.
On my second session, I was dodging through the quick left-right-light chicane of the "Prairie Corkscrew" and felt a bang through the steering and the wheel went off-center. That's a front alignment cam slipping. So I headed back into the pits to sort that out.
entry 1076 - tags: aero, testing | | | 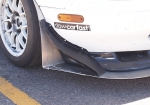 | April 1, 2013 - Canards!
After fixing the alignment problem, I decided to stick my canards on and see how much difference they made. The answer is: lots. All of a sudden the car had lots of turn-in grip, diving into the corner instead of feeling a bit soft. VERY nice. The front/rear grip was better balanced - in slow corners, the car still pushed a bit but above about 50 mph it was great.
There's one corner on this track that is a long, climbing right turn. I was taking it at full throttle in 4th, accelerating through the whole thing as the car just stuck and stuck and stuck and the track appeared over a crest at the top of the turn. So much fun, and the car showed great balance.
So, big thumbs up to the canards.
During the third session, I was starting to get a bit tired - it had been a hectic day already, with 30 minutes on and 30 minutes off the track, working on the car. Just as I started to think about cutting the session short, the McLaren caught up and I waved him by.
If you ever get the chance to follow an aggressively driven supercar on the track, I recommend it. We were well matched in the corners and I was hugely entertained by the antics of the rear spoiler and the car dancing at the limit. However, once we got on the back straight, the difference between a 400 hp Miata and a 616 hp supercar became quite apparent. The modified Porsche turbo that had been running with the McLaren also powered past me at this point, so I sat back to watch the two of them play. On every straight, they'd move off a bit more. But wow it was fun.
Unfortunately, as we can down through that chicane again, the engine revs suddenly spiked and I lost drive. I tried some other gears to no avail. I'd lost drive. There was no noise, so it wasn't a driveshaft. I was right by the pit entrance so I dove off the track with enough speed to coast through the hot pits, around the corner and back to the trailer.
Looking under the car, the outer CV boot on the driver's halfshaft and the inner CV boot on the passenger's halfshaft are ruptured and threw grease everywhere. So I'm assuming that one CV joint failed with the second one following immediately afterwards thanks to the diff transferring the entire power load over to it. I have a suspicion as to what the cause might be but I'll keep that to myself until I have a chance to confirm that this is exactly what failed. It was an unfortunate end to what was proving to be a very fun and productive day.
entry 1077 - tags: aero, halfshafts, damage, canards, testing | | | 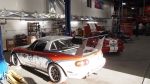 | April 12, 2013 - I've been working on the car a fair bit.
First, I refreshed the shocks by changing the fluid and putting in new seals. They didn't need it, but it's good preventative maintenance. I also fine-tuned the corner weights, did a nut and bolt under the car, changed the oil (7 quarts!) and reset the alignment after the disassembly for the axle change. There's also an obvious change - a new mount for the wing. It's about 5" taller. This location should give more downforce without an increase in drag (or less drag for a given amount of downforce). We'll see how it works out on the local track next weekend. No high speed work, but 75 mph in a sweeper does tell some tales.
I've realized that, with the big change in performance thanks to the engine, tires and aero, the car is becoming needier. I can't just beat on it the way I could when it had the old four cylinder, everything's under much higher stresses and needs more maintenance and more frequent checks. That's why I spent the whole day under the car checking over everything. It's also burning up consumables faster. Nothing like a Corvette, but my tires and brakes don't last the way they used to - never mind the fuel!
It's got two days of hard use at Laguna Seca coming up in a few weeks, and I have to make sure it can run hard the entire time. It failed last year through no fault of my own, but I don't want to give it any excuses!
entry 1080 - tags: aero, suspension | | |  | April 22, 2013 - Short test session.
The new tall wing mounts were wobblier than I liked. Pulling back hard on the wing also showed a bit of bowing in the lower section. I looked at a few ways to fix it and decided to try guy wires. Excellent result, it's stronger both laterally and longitudinally. The lower guy wire points are right where the greatest deformation was when I yanked on the wing, and the whole assembly is solid. The fact that the wing attaches to the uprights with a big plate helps as well.
On Saturday, I took the car out to Grand Junction Motor Speedway to test it out. And I only got in one session. The track was cold and the car was pushing around, but more importantly I could hear a thumping from the rear when accelerating out of left turns. It appears the new axles might have a bad CV joint, I'll dig into it later today. I have to get it fixed by tomorrow night!
entry 1081 - tags: testing, aero, axles | | | 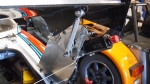 | September 11, 2013 - The latest mad scientist project on the car: active aero.
I've been reading far too many Can-Am books. The rear wing is flipped up under braking by a pair of Miata headlight motors. It's triggered by the brake lights and takes 0.6 seconds to change position.
I'd originally planned to make this work with an expensive Spal linear actuator with a clever three-position controller that gave me a low drag position as well as the air brake, but it was far too slow - 0.5"/sec. The Miata motors are six times faster. I mounted them where I did mostly for simplicity, I didn't want to make any permanent changes to the car for these tests. They're not in an ideal place from an airflow perspective.
It's been suggested that I add a timer circuit to delay the return once I get off the brakes, and I might give that a try. This is just the proof of concept. I've got a track day this weekend, I'm going to bring this with me to see if it works.
Video!
entry 1095 - tags: aero | | | 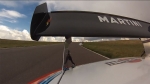 | September 16, 2013 - Track test for the active wing!
Once I had the car dialed in, I bolted on the active wing mounts. After some fiddling around, I got it set where I needed it and headed for the track. I did warn the chief steward that I was going to be testing a moving wing, so please don't black-flag me for a mechanical problem! I headed out for a couple of laps with a slow group so I could build my way up to full speed without getting rear-ended by a RUF turbo Porsche.
The wing looked stable enough under load, so I started to ramp up the speeds. It all looked good, and I was greeted with a big thumbs-up and grin from the steward when I exited the track. I then went out again with my fast group for the real test.
It works!
And it works really nicely. The car felt rock-solid under braking, with lots of stability. The various transient behaviors predicted by web forums failed to materialize, the car just felt as if it had upgraded brakes. It felt well planted on turn-in and it decelerated hard from 120+ mph. Unfortunately, the datalogger failed to record data for the test session so I don't have any comparative numbers. I'll be back on our small track in a few weeks, so we'll see how it does at 70 mph or so.
Video!
entry 1097 - tags: aero, testing, wing, active | | | 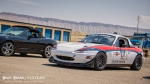 | July 21, 2014 - More track time at the Grand Junction Motor Speedway.
But first, some news from the last event. My maximum speed (into the wind) on the back straight at High Plains was either 215 or 217 km/h that day - I forget. At the previous event which was run with the old L33 engine, my top speed was 197. That's an 18-20 km/h (11-12 mph) speed difference. Huge! This new engine is a hero.
You can see the car's on new wheels. Those are Advanti Storm S1s in a 15x9 size. They're part of a new breed of light and strong flow formed wheels. Despite being the biggest wheels I've ever had on the car, they may also be the lightest at 12.1 lbs. Excellent.
I've also swapped back to the fixed wing so I can concentrate on other things. It's still working well at higher speeds, but I didn't think it would help as much on the slow little Grand Junction track. I also want to experiment with some aero balance, so it's being used as a control for now.
Inside the car, I added some reflective gold heat shielding inside the transmission tunnel to mellow out the interior.
And of course, after all that work, the fuel pump failed as I was driving the car home the day before the track event. A late night run to the Flyin' Miata shop and a pump swap, and it was in full health again. It's about the best place it could have failed.
After all the planned and unplanned prep work, how was the track? Pretty fun. We built a black V8 track car at FM that has a lot of parts in common with mine. I accidentally ran a 1:00.2 in it while heat-cycling some Hoosiers, so it's quick. The new owner was at the track, and we spent some time playing tag. Here's the noisy result. While he has an advantage with those big fat Hoosiers, I know the track far better and you can hear me backing off the throttle early on a number of spots as I try to judge his braking points and adjust to his speed. Those Hoosiers are great around the tightest corners, but he was leaving a lot of time on the table on the long sweeper. Fair enough, it takes some time to get comfortable there.
I spent a bit of time haring around as well. The brakes felt good, although I was being careful to avoid lockups. The track's developed some new bumps in a couple of critical braking zones, although it's also quite possible that I'm going faster in said zones. The car was understeering in the long sweeper, which seems to be the fastest setup based on my times. Despite scorching summer temperatures nearing 100F, I put down repeated laps in the 1:01 range with a best of 1:01.692. I was hoping there was more in it, but I think the driver is too slow and it was hot!
Fun setup note: my tires were showing signs of a good setup. 100% consistent pressures at the end of a session across all four wheels, and the temps were dead even across the front tires. The rears were a bit hotter as I went inwards, which looks like camber. Not dramatically, though, and I'm going to keep playing with aero for balance.
Overall, the car's good. It's ready for the big FM Summer Camp in a couple of weeks. Which will again be very hot.
entry 1125 - tags: testing, video, wheels, aero, setup | | |
|

 THE DIARY