| MIATA BUILD |
|
|
 | | 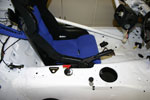 | May 2, 2007 - Part of the fun of building a car like this is deciding where to put all the knobs and switches.
The main cutoff is going to go inside the car somewhere. I was going to put it here on the transmission tunnel, but further experimentation (ie, I pretended to drive the car) showed me that it would be pretty easy to flip open with my elbow. Now that would be an unhappy moment! Now I'm looking at installing it in front of the gear shift. First I need to see if there's clearance underneath.
entry 157 - tags: ergonomics, wiring | | |  | May 2, 2007 - More wiring fun.
I have the fuel injector harness sorted out now. All the connections are crimped with a ratcheting tool for a good solid connection, then mechanically secured with heat-shrink. It's important to do this well, as bad connections can obviously cause a real problem in the heat of competition. The collection of crimp connectors is one I've assembled myself from Del City, with the exception of some less-than-stellar ring terminals. Those are mostly used for grounds so there's less concern about shorting out.
entry 158 - tags: wiring | | | 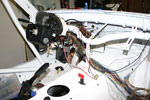 | May 3, 2007 - Ahh, more wiring.
It's the job that never really ends. But I feel as if I'm making some progress, as parts are being hooked up and large sections are being called finished.
The final location for the cut-off switch can be seen here. It should be within easy reach for both occupants, but also difficult to flip accidentally. The location works well for the wiring as well - the main line to the battery runs just underneath.
entry 159 - tags: ergonomics, wiring | | | May 3, 2007 - The transmission is in!
That's one step closer to firing up the beast. I've become used to installing transmissions on the lift with a nice transmission jack. I guess it was time to pay my dues, working alone under a car on jackstands. With a bit of muscle, a helpfully placed strap and a floor jack I managed to get it in without too much drama. Now all I need to do is find all of the various bolts to hold it in place.
I'm a little disappointed in myself. After I installed it, I figured it would have been fun to paint the power plant frame some bright and obvious color like red to draw attention to it. Why not? But I didn't. Maybe I'll pull it out tomorrow and give it a quick spray paint job...
entry 160 - tags: drivetrain | | | 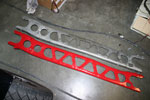 | May 6, 2007 - I couldn't resist.
I had a spare power plant frame, so I blasted it clean with the pressure washer and gave it a coat of nice red paint. For those who follow my various builds, it's the same paint I used on the interior of Basil. But there's a functional reason to change to the other PPF as well. Note the little "tooth" at one end of the painted PPF. That's to protect the bolt heads at the differential. Not a bad thing to have on a car that could easily bottom out! So there is a method to my madness, although the red PPF does make me giggle every time I see it under the car.
entry 161 - tags: drivetrain, other cars | | | 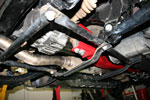 | May 6, 2007 - The subframe brace here is from a 2003 model.
Not only does it stiffen up the rear suspension, but it also protects the differential. It doesn't protect against rocks as well as a legit skid plate would, but I'm more concerned about bottoming out the car on pavement and it should help out there. It also wouldn't be difficult to add a plate or two to this solid frame.
The little skid plate on the red PPF is visible here as well, and the brace does make it rather obsolete when I look at it now. Oh well.
It's also possible to see in this picture that the exhaust system is in place. The main power line running from the battery to the engine bay has been cut and modified so it goes through the cut-off switch, then the wiring was properly secured. The driveshaft is on - and all of a sudden, I have a complete drivetrain!
entry 162 - tags: exhaust, wiring, drivetrain, interchange | | | 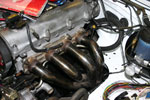 | May 6, 2007 - For the time being, the exhaust system starts with a Racing Beat 4-1 header.
I really like these, they have nicely designed and cast flanges that give a great transition from the oval exhaust ports to the round primaries. They're also beautiful to look at. But they're designed for a different sort of engine than mine, one that's mostly stock. I'm hoping to be considerably more than stock in terms of power so I'm thinking about building my own header eventually. I've done it before and I know it's a lot of work, but I think it might be part of the key to making good horsepower out of this engine.
entry 163 - tags: header | | | 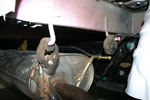 | May 6, 2007 - Because the header I'm using is from a 1999 model (simply because that's what I was able to scrounge up), I have to use a 1999-05 exhaust system.
The hangers are in slightly different places. No problem for most of the exhaust as I cunningly used a 2003 subframe in the rear (no, really, I did consider this!) but one of the rear mounts just isn't going to work. No worries, I have a welder...
This muffler is actually a stock unit from a 2005 Mazdaspeed. I'll probably replace it with something else later, but it was handy so it got bolted on. The midpipe is an old Flyin' Miata unit with a bad catalytic converter.
entry 164 - tags: interchange, exhaust | | | 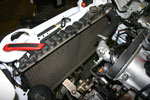 | May 6, 2007 - I dropped the radiator in to check some clearances.
It's from an automatic car so it has a dual core instead of the truly weedy single core used on the manual cars. It has steel tanks on it instead of the crack-prone plastic ones found on factory rads as well. It is better than an aluminum race radiator? Well, no. But I am trying to build this car out of available parts for a reasonable cost. It's easy to forget that with the recent engine build.
It's close to engine start time. I need to hook up the crank angle sensor and get a lower radiator hose on the car. And then it's a matter of taking a deep breath and putting some electricity through the car. I'm a little nervous about that actually - I don't have as high a level of familiarity with this particular ECU as I'd like, and there are a lot of changes to the wiring. Maybe I'll see if Jeremy from Flyin' Miata wants to drop by for an evening.
entry 165 - tags: interchange, wiring | | | 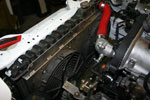 | May 8, 2007 - While rooting around the piles of parts in the salvage area of Flyin' Miata, I came across this fan and shroud setup.
They're two powerful Spal fans on a nicely fitted shroud to ensure maximum efficiency for the fans. The shroud was a prototype part from Flyin' Miata. This setup was actually originally installed on the red shell that has become the Targa Miata, so it seemed fitting to return it to its original home. Quite possibly overkill for the car, but it's not going to hurt anything and I didn't have fans yet anyhow.
entry 166 | | | 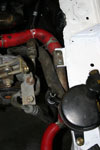 | May 8, 2007 - The red silicone hoses were also donated by the previous incarnation of the Targa Miata.
But the real work in this picture was on the power steering lines. The 2003 steering rack has a loop of hard line that's intended to help cool the fluid. The 1994 rack doesn't have this loop and ours was kinked from the accident, so it was removed. A bit of trimming to the hoses and careful routing around the coolant lines finished the job. I may still hook up a cooler of some sort.
So it's almost time for the big startup. I've wired up everything but the oxygen sensors and almost all the vacuum lines and fluid lines are complete. Now all I have to do is load the new program into the ECU and see if I can find a battery that's fully charged.
entry 167 - tags: interchange | | | May 11, 2007 - It's alive!
Well, only in an electrical sense. I ran current through the car last night and no smoke got out, so that's a bit of a success. My battery was pretty low on power so I put it on the charger. The low voltage was causing some odd behavior as various systems would wake up partway but not all the way - for example, the hazard lights kept trying to come on.
This morning, I checked again. Brake lights, good. Turn indicators, good. Functioning oil pressure gauge (tested by grounding out the signal wire), good. Headlights...well, I'll have to look at that one later. Power to the fuel pump and ECU, good. I didn't fire the car up because there's no oil in the engine, so those tests will come along in the next few days.
I'm a little nervous about it, to be honest. This car is such an odd collection of bits, and even the sensors on the engine are put together out of several model years and patched together with software. Will it work? Of course it will, eventually. But that doesn't prevent me from imagining terrible things.
entry 168 - tags: wiring | | |  | May 12, 2007 - As final prep before starting the car, I installed an air temperature sensor (seen carefully installed on the intake manifold here) and an intake of clever design.
Brandon filled the engine with oil. And then we discovered that my battery didn't actually have any juice in it other than enough to make some lights blink dimly. So that was enough for a while. I went out to buy a real battery charger and charge up my collection of Miata batteries.
entry 169 | | | 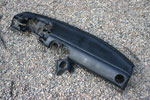 | May 12, 2007 - While waiting for the battery to charge, I busied myself with other things.
The tan and crusty dashboard had a date with the hose, then I sprayed it with flat black paint. It's only partially dry here, but even when dry it's hard to get a uniformly flat surface. There are pockets of gloss where there's a bit more paint buildup. I'll try a couple more coats and see if I can mist the paint on well enough.
entry 170 - tags: paint | | | 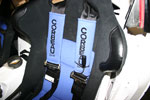 | May 12, 2007 - A little more ergonomic work.
I need to find a place to stash our intercom. The harness pads are a perfect place to run the wires.
Of course, I also spent some time in the driver's seat playing with the controls. The clutch pedal feels good with nice weighting, just like the twin to this unit that I've driven on the street. Given that it's a prototype unit that's no guarantee! My tall torso still puts my head awfully close to the roof of the car, but unless I build in some sort of Gurney GT-40-esque bump there's not much I can do about that. The Peltor helmets are pretty thick.
entry 171 - tags: ergonomics, intercom | | | 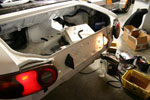 | May 12, 2007 - There's juice in the battery and the lights in the rear are working!
Okay, it's nothing like the sort of victory of finally firing up the engine, but it's still gratifying to have the car actually respond to a request. I'm hoping for first noise tomorrow, let's see if that happens!
entry 172 - tags: wiring | | | May 14, 2007 - More testing, and it's getting closer.
Brandon and I started firing up one system after another tonight, but when it came time to talk to the ECU we had difficulties. It was finally tracked down to a blown fuel injection fuse.
This particular fuse feeds a whole lot more than fuel injection. It's the one that supplies power to the main relay, and is the primary source of switched power in the car. So we started by disconnecting everything and powering up one system at a time to see if the fuse would go again. Nope. Everything came back online and we were able to communicate with the ECU - until Brandon unplugged the idle speed control solenoid and pop! the fuse went again. Playing with the intake tube seemed to cause a momentary problem once the fuse was replaced again.
We did a little more poking around and found a bare wire that had been grounding out at the block when the intake moved it slightly. Whoops! The wire was trimmed back and insulated and everything was good again. All sensors indicated reasonable numbers, so we decided to go for a start. We pulled the fuel injection fuse (the fourth one of the evening by this point) so we could crank the engine over to get the oil pressure up.
Except that the freshly charged battery didn't have the guts to turn over the 11.5:1 engine. Neither did any of the other freshly charged batteries scattered around the shop.
The moral? It's time to get rid of all those batteries I'm saving because they might still be good! They're not. It's time to go get a known good battery for this car and stop screwing around.
So that was it for the night. Tomorrow, I return with a fresh, powerful battery and we make this engine spin!
entry 173 - tags: wiring | | | 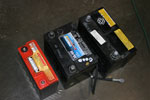 | May 15, 2007 - In order to exorcise my battery woes, I brought home a collection.
The largest is an original equipment Panasonic AGM, much sought-after by many Miata enthusiasts. The middle size is the standard Mazda "High Performance" replacement. The small one is the killer Odyssey PC680. Similar power to the others, but half the size and weight. The latter is what I use in the Seven and this particular new one was stolen from my boss' Westfield "to be installed" pile. I wouldn't mind running a PC680 if only due to the weight, but today it was the mid-size Mazda replacement that was put to work.
entry 174 - tags: wiring, interchange, weight loss | | | 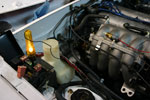 | May 15, 2007 - It's alive!
The car runs!
The trouble light shown here is being used as an oil pressure light to back up the gauge. The fuel injector fuse is removed so I can crank the engine (that poor little battery) and get pressure up. The test light went out at 7 psi and the analog gauge woke up shortly after.
Once oil pressure had been established, I powered up the ECU and connected the laptop to make sure all the sensors were sensing appropriately. A turn of the key and a bit of cranking as the fuel system filled - and then boom! The engine came to life. There's an exhaust leak somewhere (maybe I forgot to install something), but the engine revs sweetly. I only ran it for a few seconds before shutting down. I have a few other things to attend to right now (such as my wedding on Sunday), but a major milestone has been reached. There was much rejoicing!
entry 175 - tags: wiring, tuning | | | 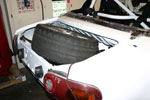 | May 15, 2007 - As part of a discussion on tools to carry on the Targa Newfoundland message board, it was recommended that we carry a spare tire.
I hadn't been planning on it because, well, that's an extra 30 lbs or so that I didn't want in the car. But it might be a very useful 30 lbs.
The first step, of course, is to see if we actually can carry a spare. Uhoh.
entry 176 - tags: tires | | |
|

 THE DIARY