| MIATA BUILD |
|
|
 | | 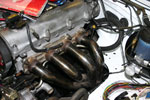 | May 6, 2007 - For the time being, the exhaust system starts with a Racing Beat 4-1 header.
I really like these, they have nicely designed and cast flanges that give a great transition from the oval exhaust ports to the round primaries. They're also beautiful to look at. But they're designed for a different sort of engine than mine, one that's mostly stock. I'm hoping to be considerably more than stock in terms of power so I'm thinking about building my own header eventually. I've done it before and I know it's a lot of work, but I think it might be part of the key to making good horsepower out of this engine.
entry 163 - tags: header | | | 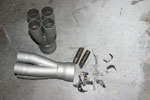 | December 19, 2007 - Time for a fun job.
The engine just isn't performing the way it should. At higher rpm, it's choking off. So it's time to replace the Racing Beat header (designed for a 110 hp car) with one a little more robust.
I had a very interesting conversation with an E Production racer, and he shared his header specifications with me. Yes, I know, they should be scientifically matched to my cams and port lengths and everything else. But an E Production Miata is the closest thing out there to my car, so I figured I'd take advantage of their knowledge base and see if uncorking the exhaust does anything at all. If so, I'll make another with a little more specificity.
31" primaries with a 1.75" tube size, right then. The first step is to get a collector. These are expensive - but a bit of searching turned up this beauty. Edelbrock makes merge collectors with 1.75" inlets for only $90 or so, street price. Sure, they're not as pretty as the $300+ units, but I can cope with that. Especially when it turns out the $90 price is for a pair!
Nice. Now all I need to do is figure out how to stuff all those big pipes underhood. The EP guys gave me some ideas there as well...
entry 350 - tags: header | | | 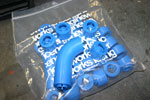 | December 19, 2007 - The last time I built a header was for my little Seven.
I used pool hose to work out the basic routing, then improved on that with some welding rod. It worked out well, but that car did have a lot of space available to work with. You can read the whole saga starting here, you'll have to skip over a few days worth of installing side panels and the like as I procrastinated.
This time, I have the advantage of a very cool tool. This "header Lego" from icengineworks is exactly what it sounds like - 1" pieces of tube that snap together into whatever shape I need. I have 2", 3" and 4" radius bends as well as short bits, and they're all beautifully marked up to make fabrication of the final product easy. Well, easier. This is going to be quite interesting to play with. I'm going to have some fun. Although I do think the pool hose might have to make a comeback to get me started on layout. Where did it go?
entry 351 - tags: header, other cars | | | 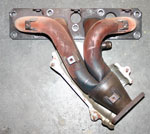 | December 20, 2007 - The starting point.
Except for a lapse in 1999-00, Mazda used a nice 4-1 header on the North American naturally aspirated cars. Overseas, some models got a long 4-2-1 design. It's actually a reasonable setup, much better than most stock exhaust manifolds.
I'll cut this up and use it for the flange, just as I did on the last header I made. The iceengineworks parts are designed to be fastened to a stub of round tube.
entry 352 - tags: header | | | 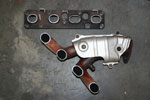 | December 22, 2007 - Step one complete!
A Sawzall made short work of the stock piece.
entry 353 - tags: header | | | 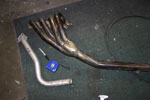 | December 22, 2007 - A couple of other Miata headers.
The complete one is the Racing Beat unit I pulled out of the car. It has 1.675" primaries - only 0.125" smaller than I'm planning to use - but they're much shorter. There's a bit of inconsistency in their length, but I'm coming up with about 15-16". Really, this header is tuned to work best at very high rpm according to the math.
The other pipe is from a Boig Motorsports header, one that had a great reputation in the Miata world for a while. It's for a 1.6. 1.75" primaries that are about 29" long. I'm going a little bit longer - about twice as long as the ones in that Racing Beat unit! Packaging is going to be a concern.
entry 354 - tags: header | | | 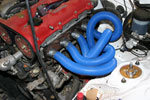 | December 22, 2007 - In order to sort out general packaging, I pulled out the blue pool hose again.
The collector is duct taped to the steering column as it fits well there. That means that I have about 10 feet of tubing to deal with, mostly in the engine bay.
The tubing is stuffed into the flange and duct taped into place. Since it slips into the collector, it's relatively easy for me to explore basic configurations - does the #4 runner go in front or behind of the #3? - and get an idea of how complex this will be. It seems that the first three tubes are simple enough, but that #4 is going to be a bit of a pain. Let's just hope I can make it a little bit artistic as well.
entry 355 - tags: header | | | 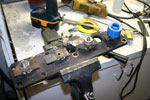 | December 26, 2007 - In order to attach the header design bits to the head, I attached some little expandable plugs to the header flange.
They're all set up so the base of the first piece of header is 1" from the port.
entry 356 - tags: header | | | 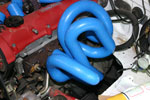 | December 26, 2007 - Because the #4 runner was the one that I was most worried about, I started there.
Here's the first version of the first three tubes - unfortunately I don't have enough of the right curves to finish off the #1 primary. While this configuration looks fairly simple, the tubes are more complex that you'd think. Plus they just don't look all that good and #1 is going to be a challenge.
entry 357 - tags: header | | |  | December 26, 2007 - All of the pieces of header Lego are marked not only with the radius of the bend, but with witness marks.
This makes it easy to make sure you're not cheating by twisting a bend to make it work for you. It also makes it easy to recreate the bends later.
I used these to document the current tubes so I could take another try.
entry 358 - tags: header | | | 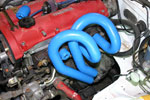 | December 26, 2007 - On the second try, the #3 and #4 runners worked out really well.
They're basically the same shape and stay nice and close to the block, but with enough clearance to get at the various header nuts. They're also a bit lower for more hood clearance.
The long straight sections at the bottom are not only easy to fabricate, they also make it easy for me to adjust the length of the tubes if desired. By putting a couple of slip joints in there, I could set it up so I could tune the header. Hmm.
entry 359 - tags: header | | | 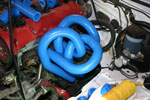 | December 26, 2007 - And now it starts to get crazy.
This #2 tube looks brutal to fabricate, but it will actually involve fewer pieces than the previous design did. I suspect I could also make that big loop with a single radius, but unfortunately the combination of being forced to work in 1" increments and a lack of remaining 3" radius pieces made things a bit awkward.
I've figured out how the #1 runner will go, I just don't have the parts to build it. The good thing is that I've managed to keep everything almost perfect in terms of matching lengths.
entry 360 - tags: header | | | 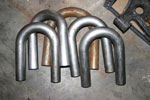 | December 29, 2007 - The header will be constructed out of mandrel-bent tubes - and lots of them.
I've been looking around online and pricing them out, then decided to stop by my local muffler shop. They had most of what I needed in stock, for the same price as the best online stores! I've said it before, but if you're ever looking for exhaust work in Grand Junction you want to stop by Scotty's Muffler.
I'll know on Wednesday (hopefully) if they can source 2" radius bends as well as the 3" and 4" I have now. If not, I'll order them in. Until I have 2", I can't build any of the pipes yet.
entry 362 - tags: header | | | January 2, 2008 - Well, my local shop can't source the 2" radius bends I need.
So it's off to Summit Racing for them.
I've also been chatting with the engineers at AFCO. The shocks are off getting a tweak to the valving, based on shock dyno tests of a few other options that did well on the comparison drives. I feel like such an amateur when talking to them, but every time I learn something and the shocks seem to come back a little bit better. This should be the last iteration.
entry 363 - tags: header, suspension | | | January 8, 2008 - A big box of pipes arrived yesterday.
Janel didn't seem to understand my excitement. Oh well. Now I just need to get up the nerve to start cutting and tacking tubes. It's a big step, but I know from last time that a solid day's work should show good progress. Last time I didn't have the cool design tools I do now...but I also had a much simpler header to build.
In other news, the shocks are revalved and should be heading back this way shortly. Not that I can drive it right now, the diff is gone and of course the engine bay is full of blue snakes.
I've also been talking to the new technical director for the Targa. As you may remember, the cage I'm using is an SCCA Spec Miata cage. I was given the okay to use this, but it doesn't meet the Targa rulebook. Well, apparently it does meet the approval of the new tech inspector with the exception of door bars. They're putting an emphasis on door bars for 2008. I'm going to have to find space to stick another one in there on top of the one I have now. I think I know how I'll fit it in place. Hopefully I won't have to disassemble the car too far to weld it.
entry 364 - tags: header, suspension, safety | | | 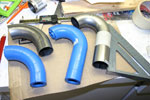 | January 10, 2008 - Okay, time to start building this header.
The first step is triple-checking the fitment of the #4 tube. I made sure all of the witness marks on the icengineworks "header lego" were marked so I didn't twist anything, then removed the #4 runner. I'm going to build this header from the back forward.
When designing the tubes, I was careful not to cheat and have every piece of lego twisted at a different angle. So it was easy to break the runner up into pieces that were chopped out of my pre-bent tubes. The hardest part is making sure the cut is straight across the tube and not at an angle.
entry 366 - tags: header | | | 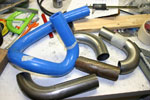 | January 10, 2008 - The #4 runner is broken down into four tubes.
I cut these by hand with a hacksaw. A good bandsaw would have been faster, of course, but I don't have one. I used a bench grinder to clean up the ends - again, a belt sander would have been better but I don't have one of those either.
There are three different radii across these four pieces of tube. I transferred the witness marks over from the plastic pieces and grabbed the welder.
entry 367 - tags: header | | |  | January 10, 2008 - And voila!
The first runner. They're almost a perfect match, with a very slight difference in one angle (not visible here) that I think comes from a cut that's not 100% straight across the tube. From this angle, they're identical. The reason they look a little different is because of the way they're sitting on the ground.
So far, so good. I have to admit I'm cheating a bit and doing the really rewarding, fast work first. But that's part of keeping motivated, isn't it?
entry 368 - tags: header | | | 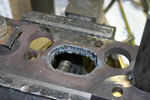 | January 13, 2008 - Back to the header.
Now that the #4 tube is stuck together, it's time to try it in the car. I started with a die grinder to cut the remaining stub of the original header out of the flange, and discovered that this was going to be both long and noisy. Especially with my poor bits. So I grabbed the plasma cutter and cut it out that way. Much more satisfying.
The hole was cut with a taper to make it easier to force the pipe in to place. This picture was taken before a bit of cleanup with the die grinder.
entry 371 - tags: header | | | 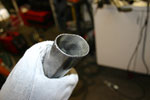 | January 13, 2008 - The pipe itself was carefully formed.
I put the end of a stub of tube in a vice and cranked it down. Voila.
entry 372 - tags: header | | | 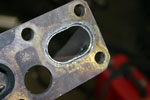 | January 13, 2008 - With the shape of the hole just right and a bit of hammer action, here's the fit of the pipe in the hole.
Not bad at all.
entry 373 - tags: header | | | 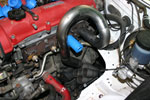 | January 13, 2008 - With the #4 runner tack-welded to the new stub, I was able to see how well the metal pipe coincided with the plastic prototype.
Almost perfectly. The only problem came when I slid the collector on the end and discovered that it was too close to the motor mount. Changing the last 2" long bend in the pipe from a 4" radius to a 3" radius did the trick.
The #3 runner was then checked again with the prototyping pieces and tweaked slightly to take the change into account. It ended up fitting better overall of course. So now it's time to cut that one up and stick it together. It's only going to get more difficult from here on in of course!
I have had one person ask me why I'm making my own header when there are commercially available ones. Well, it has to do with engine output. Mass-produced headers like the Racing Beat are designed for almost-stock engines. That means stock cams, 1.8 litres of displacement and about 110 hp at the wheels with a redline of 7000 rpm. My engine is a 2.0 with more aggressive cams, a redline that could go as high as 9000 rpm if required and a hopeful output of close to 200 hp at the wheels. So the dimensions will be different. There are some very expensive race headers that might be pretty close, but I don't have the budget for one of those. Besides, this is a fun learning experience.
entry 374 - tags: header | | | 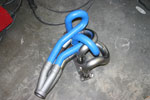 | January 16, 2008 - The #3 runner is together after a bit of a fight.
This freed up enough of the "lego" to let me prototype the last two tubes. Now, how easy will it be to turn this into metal?
entry 376 - tags: header | | |  | January 16, 2008 - The #2 runner took me most of the day to build.
I brought a belt sander home which helped a whole lot in making all the of tube ends square and flat - or it did, after I adjusted the platform to be at a right angle to the belt! A belt sander should really be considered a required tool for this sort of work. My boss did give me an odd look when I told him I wanted to borrow it, though. I should bring it back to work tomorrow, so I've been killing myself to get this done.
entry 377 - tags: header | | |  | January 16, 2008 - After a long day, the header's almost complete.
I just have to finish one part of the #1 runner, and that's just a matter of getting the motivation back up again after dinner. I stuck it on the engine just to make myself feel better about the amount of work I've done today.
The metal versions of the tubes weren't as cooperative as the plastic. Why? I think the biggest problem was that I didn't have any way to ensure that I was really cutting the tubes off perpendicularly. The belt sander helped on the straight sections, but in the middle of a curve it was mostly eyeball action. Icengineworks does sell a nice tool for this, but it's not cheap. The fact that I was using their 1.675 tool to work on 1.75" tubes might not have helped, I'm still trying to figure out if that's true or not. The biggest change I had to make was that little short straight section in the #2 runner.
A real challenge still awaits, though. I'm going to TIG weld this together. Not that I know how, of course! I'll be working with Bill at Flyin' Miata for that. I can MIG it, but it will look much better with the TIG. That's not the challenge though. It's going to have to be assembled and welded in a very particular order so I don't end up with inaccessible seams. It's going to have to come apart, that much is fairly obvious. A bit of thinking should prevent me from getting painted into a corner, so to speak. Hopefully.
entry 378 - tags: header | | | 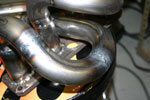 | January 19, 2008 - Time to weld the header together.
And learn how to TIG weld. Might as well pick something simple as a first project, right?
As I've mentioned before, the order of welding on this critter is going to be crucial. Luckily, the entire #4 runner can be welded together without causing problems for any others, which means I can use it to locate the collector. But since it was also the first runner I put together (without the help of a belt sander), the fitment of the tubes wasn't perfect. So I used the #3 runner to locate the collector, then reworked #4 to have a perfect fit. Naturally, this took a little time.
Then it was time to start working on my welding. It took surprisingly little time to come up to speed, although nobody's going to mistake my work for that of a professional. No matter, as long as it's airtight and strong I'll be happy.
Once the #4 runner was all welded up, I did a test fit of the header on the car. Whoops. The collector shifted, and my 1/4" of clearance to the block turned into about 1/4" of interference. That's not going to work. So the next step will be figuring out how to fix that. It'll involve at least one cut through the #4 runner along with a rotation, but the trick will be finding the magic place to do that without messing up the other three tubes. More fun to come, I'm sure.
In other news, Janel and I have signed up for the California Rally Series school in three weeks. We'll learn how to deal with the really tough part of rallying - the driver/codriver teamwork - and it'll help us get the necessary licenses for the race. Plus we get to spend a day in Las Vegas on the way!
entry 381 - tags: skills, header | | | January 21, 2008 - A single cut and twist on one of the tubes solved the interference problem with the collector.
Now, time to build the next runner. After some more grinding and massaging to make it fit with the final collector location, I welded it together. And almost screwed up in a big way!
After building the #3 runner, I tack-welded it to the flange - and was smart enough to test-fit the #2. Whoops! While welding the #3 runner, I removed a short spacer that I'd inserted. You can see it in the background of the last picture. I thought it had been put there to make the tube fit a bit better and my slightly reworked setup just improved the fit. But I'd forgotten it was also there to give enough room for the #2 tube to pass underneath! Also, if I kept going in the current order, I'd never be able to weld one of the #2 seams all the way around. So off came the tack weld and now I can assemble #2 without causing problems. That was close.
entry 382 - tags: header | | | January 21, 2008 - Welding welding welding.
Wow, there are a lot of seams in these pipes. And I'm going to have to add one more. It turns out there's no way I can attach #2 to the flange at the normal joint. So I'm going to have to cut it at a more convenient location so I can weld it back together again. The header's looking a little piecemeal up close, but from a distance it looks awesome. Lets hope it doesn't crack!
entry 383 - tags: header | | | 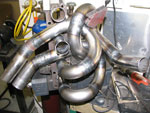 | January 22, 2008 - More welding.
And it's at the tricky stage now. In the picture I'm in the middle of welding the #3 runner to the flange, while the #2 runner is wrapped around it and held out of the way.
I have now finished all of the welds except one. But it's causing a problem. Not in terms of access, but a problem I didn't see coming. One of the tubes is stuck in the collector. Okay, that's not terribly serious. But I need to move it out about 1/8" so everything lines up perfectly. Without that I'm going to have to do some really ugly sectioning to make this work. I don't want to.
My TIG welding is definitely better, but conditions are getting more and more difficult as I go on so it's difficult to say just how well I'm doing. When I have nice access and a good joint, I can lay down a pretty bead. Most of them, however, are not.
entry 384 - tags: header | | | 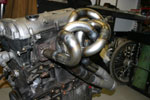 | January 24, 2008 - And voila!
The finished item. Well, not really finished. I still have to put the tubing on between the collector and the rest of the exhaust and the flange needs to be sanded flat. But the hard part is done.
The stuck tube was freed by the application of lots of heat, a prybar, a hammer, a pair of pliers and two people. Thanks to Bill at Flyin' Miata for helping me out there. Once I could move it, I lined up the last seam and prepared to do the prettiest weld of them all. After all, this is the seam right on the top of the front tube, the most visible place. I carefully set everything up, went to weld...and BLAM! Blew a 1/4" hole in the tube. I'd forgotten to turn on the gas. So I called myself a few names, turned the gas on and filled the hole. So there's a big ugly goober weld there, nicely visible in this shot. Sigh.
entry 385 - tags: header | | | 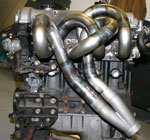 | January 24, 2008 - A side view of the finished setup.
This is going to be a little more difficult to see once it's all installed, of course. You can see on the lower welds on the #1 runner that I can actually lay down a decent bead sometimes. Most of the big goobers come from trying to hide the MIG tack welds. In hindsight, I should have ground them down once there was a bit of TIG bead. Why didn't I tack weld with the TIG? Because I can MIG with one hand and hold the pipes in place with the other.
entry 386 - tags: header | | |  | January 24, 2008 - The clearance between the engine block and the collector.
It's nicely placed in there.
I've been trying to figure out how to finish the header. A coworker suggested ceramic coating and that would be ideal, but I'm not sure it's in the budget. I'll probably end up with high-temperature paint instead - at least until I know that 1) the header works and 2) it's not full of leaks.
entry 387 - tags: header | | | January 26, 2008 - There's a discussion of the header on the German MX-5 forum.
It's quite a long one and they bring up some good points - although I suspect it would be easier to read in German than through online translation engines! Some of the comments are ones I expected, particularly those about the welding quality. There were also questions about my choice to build such a convoluted design instead of a more traditional one with the collector down by the bellhousing, and how to prevent cracking. Since it's possible that others will be thinking along the same lines, here's what I replied to them. It provides a bit of a summation to the project so far:
I know some of the welding is ugly. I'm learning how to TIG weld on
this project. It was not easy. In some cases, I tried to hide my tack
welds (the little ones you make to hold everything in place) by
melting them down and spreading the material around. This makes the
weld look ugly, but it will look nicer when it's painted.
The tube length is chosen on musical principles. Basically, the high
pressure pulses from each cylinder will travel down the tube and
reflect back. At the right engine speed, this means you can get a low
pressure right on the exhaust valve which increases the suction and
makes more power. The tube length is determined by the cam profile and
desired engine speed. Tube diameter is a different question, although
you can cheat a bit and use a larger diameter and a slightly shorter
length for the same effect.
The Racing Beat header is surprising in a couple of ways. The tube
lengths are not all the same, which is a trick sometimes used to
spread the power band around a bit. But the short length is what's
odd. The header shouldn't work until it's up near 9000 rpm, and it
doesn't seem to improve as the engine spins faster. There may be some
secondary resonances that they're using. I did use larger diameter
tubing than the Racing Beat, but I didn't go to an extreme size. The
long tubes should give me more power in the medium to high engine
range, which is where I want it. They are almost all exactly the same
length.
The Boig headers don't fit well inside the car. They hit things, they
leak, they rattle and they bang around. I used one on my 1990 for a
short period of time. Even the Racing Beat has a dent in one of the
tubes to clear the steering column. So I decided to move my collector
high up to avoid the clearance problems. This is something that has
been used on other E Production race cars.
The english term for "glow in" is probably "heat treat" or "heat
cycle". I'll see how I can do that. I am concerned about longevity as
well.
But the biggest thing to remember is that I did this to learn. It was
ambitious, but now I'll know if it's better than the Racing Beat. I
have some room to adjust the length of the header (another advantage
of my collector location) so I can do some tuning if that helps. I've
learned a lot of about TIG welding. I don't present this as a lesson
on how to make a header, I'm giving people the chance to look over my
shoulder as I learn. I'll make mistakes. And I'll learn from them.
entry 388 - tags: header | | | 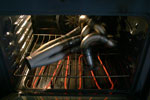 | January 26, 2008 - There was some concern on the German forum about the potential for cracking in the header - and rightfully so.
In an effort to avoid this, I'm heating the header up to 500F for a couple of hours, then I'll let it slowly cool down to room temperature. This should relieve any stresses in the tubing. Will it work? We'll see.
Yes, that's the kitchen stove. Now that Janel's the codriver for the car, she has less cause to complain. She was not overjoyed when I wanted to put car parts in the oven though. I did degrease it first!
entry 389 - tags: header | | | 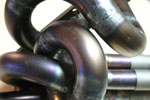 | January 27, 2008 - I've been informed that heat treating usually takes place at 1000+ degrees, not 500.
And I've been told that my thin-walled pipes won't need it. And I've been told that the header will crack if I don't heat treat it, and that I can heat treat it in the oven. So many opinions!
I figure my home oven heat treating won't hurt anything, and maybe it'll help. Those who are concerned about the safety of my domestic arrangements will be glad to know that the header was not stinky. Remember, I did carefully degrease the part first!
The best part? Check out the cool colors! This picture doesn't do full justice to the neet brownish/purple sheen on the pipes.
entry 392 - tags: header | | | 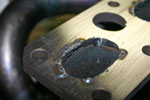 | January 31, 2008 - More header work.
Someday I'll have to move on to something else. But I spent some quality time with the belt sander ensuring the flange is nice and flat. Then I laid a gasket over the flange and did a little porting. In a few spots I needed a bit more material so I added it in with the welder. Now, more sanding then more grinding.
Once that's done, it's time to build the lower half and move on to something else!
In other news, I did install the navigator light provided by Rallylights.com and it will be wired in shortly. I'm also trying to figure out how to put in another door bar on each door. It's not going to make the cockpit any roomier, that's for sure.
entry 393 - tags: header, safety, ergonomics | | | 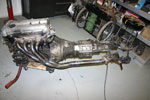 | February 4, 2008 - Time to finish off the header.
Step one is to make a jig. After all, a misalignment here will cause problems all the way down the exhaust system. So I mounted the Racing Beat header up on a spare engine and transmission, then bolted the flange from a stock midpipe to the end of the header. A quick and dirty bracket was welded on to this and bolted to the back of the transmission. Voila, a jig. Flyin' Miata actually has these for all the various Miata models, but nobody could find the 1999-05 one I needed.
entry 395 - tags: header | | | 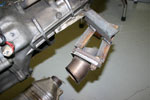 | February 4, 2008 - A junked catalytic converter supplied the flange for the header along with a nice little bend.
It's handy having extra exhaust pieces all over the place. Much of the rest of the header was built from a prototype turbo exhaust for a 2001 Protege5.
entry 396 - tags: header | | | 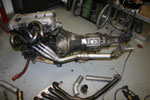 | February 4, 2008 - To do this properly I really should have the engine sitting on a subframe.
But, well, I don't. So I just took the Racing Beat routing as an example and tried to tuck the pipes in close to the transmission. It all went together extremely easily, actually.
I did put a flex joint in the middle of the pipe. I don't usually like to use them, but I figured a bit of flex might be appreciated by the spaghetti up top to decrease the risk of cracking a bit.
entry 397 - tags: header | | | 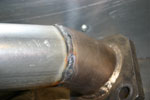 | February 4, 2008 - Another hour or so of playing with pools of molten metal and the header is welded up.
As you can see, my TIG welding has improved quite a bit! This section of the pipe does have the proper curve to it, don't worry. It looks a little kinked in this picture.
So, does it fit in the car? One small problem. That flex joint is in just the perfect place to hang up on the bellhousing as I insert the header into the car. It's a fraction of an inch too large to fit through. By loosening up the nut on one motor mount and sticking a jack under the oil pan, I was able to shift the engine slightly to let it past. Once that's done, it's perfect. Almost like it was meant to be in there!
All that remains to be done is to locate and weld in a bung for the O2 sensor. Then I'll bolt it all up and we'll see if it's airtight. I don't feel like crawling under the car to mark the O2 location tonight so it'll be in a day or two. There's not a huge rush as I can't drive the car until my differential shows up and I can wrest the AFCOs from the car they're in.
entry 398 - tags: header | | | 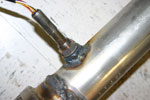 | February 6, 2008 - The final step in the header.
Provided it doesn't crack or cause problems later, of course! I marked the ideal location for the oxygen sensor when it was installed in the car, and then drilled a hole and welded on this fitting. Goofy thing, it was basically a big nut. Well, welding a flat nut on to a curved pipe means lots of filling in. I did an okay job, but I would have preferred to have one of the better-made units that is machined to insert into the hole. It involves less gaping space.
Oh well, it's on now so I can install the unit. I still have to get my hands on the (final) differential, so the rest of the exhaust can't go together until then. The final spec of the shocks was sorted out today - the front body will be 1" shorter with a different upper mount on the production versions to fit the 1999+ cars better - so I should have those back soon. Just in time for the track testing on March 9th, of course.
entry 399 - tags: header | | | 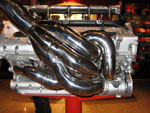 | February 11, 2008 - While on the way to the rally school, we spent a day in Las Vegas.
There's a Ferrari dealership at the Wynn ($10 to get in if you're not already a Ferrari owner, sir) as well as a Ferrari theme shop. Can you say brand dilution? Perhaps selling pencils and kiddie pajamas with the Ferrari logo is not quite in line with the racing heritage. Anyhow...
Right inside the doors on a stand is this Formula 1 V10, for a mere $62,000. I got a big grin on my face when I saw this header. They were on sale for $9500 each side if you wanted them separately. I don't need one, I have my own!
entry 401 - tags: header | | | 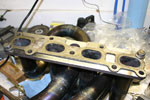 | February 15, 2008 - Before installing the header, I used a die grinder to match the ports to the gasket.
Well, actually, I did this after I installed the header and then removed it again. Can't have too much practice, right?
entry 405 - tags: header | | | 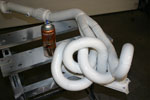 | February 15, 2008 - Before the final installation of the header, I painted it with some high-temperature paint.
This is the same stuff I used on the Seven, and it's staying on there pretty nicely. I thought about going with black to hide the crappy welding, but decided on white. Why white? Because any leaks will show up clearly and it looks like an old-school Formula 1 exhaust that way! Hopefully it won't be too glossy. Now, once it's dry I can bung it in the car, finish installing the differential and the rest of the exhaust and then it'll be good to go! Well, as soon as I get my suspension back it will be.
entry 406 - tags: header | | |  | February 17, 2008 - The header is in and looks very white.
I'm glad to report that it fits perfectly, right down to the angle of the outlet flange and the placement of the O2 sensor. Whew! I haven't fired the car up as I'm still reassembling it, but that's a big step ahead.
Meanwhile, the differential is back in - and this should be the final one. A Torsen with a 4.30 ring and pinion, just like I thought I'd installed almost a year ago. It fought me somewhat and I had to loosen all the bolts on the power plant frame to get everything to line up, but I did prevail. So the car's almost completely assembled now. Hopefully I'll be able to take it out of the garage for the first time in months next week.
entry 408 - tags: header | | | February 19, 2008 - It's alive!
Finally, after being in drydock for months, the car took a trip out of the garage. This means that I've managed to get my hands on the race shocks again (yes), the exhaust system is complete (yes) and I had some time to work on it all (yes).
Initial reactions to driving with the header? Well, it doesn't leak. I didn't have the laptop attached to the computer so I don't know if the engine's asking for more fuel - that's an indication that it's making more power. I'll do that in the next few days. But the car feels good. And it's a bit stinky as that new white paint cures into a light tan.
The suspension feels pretty good, but I got the height wrong when I first installed it. The car's about 1 to 1.5" too low right now. I did install my stiffer springs (450 lb/in front, 300 lb/in rear) at first but almost immediately pulled them out to install the softer 300/225 setup I've been using. While the stiffer setup would be good for a more track-biased car or even an aggressive street car, they're too stiff for the combination of my very light car and the rough roads I need to absorb.
entry 409 - tags: suspension, header | | | 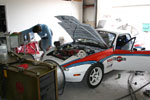 | March 4, 2008 - The moment of truth for the header.
Did all that work actually get me anything? In short, yes! I saw a gain of 15 lb-ft at 3500 rpm and around 10 hp at 5200 rpm. Cue the happy dance.
The car sure sounded different, as you could hear some strong resonances and beats coming from underhood. That's good, the header is all about resonant frequencies.
On the dyno run, you can see the Racing Beat header in blue and the new one in red. Other than a minor loss between 4000-4500 rpm, the new one is a winner right across the board. It didn't unplug the engine above 6000 rpm as I'd hoped, but a big slug of torque across the range is a lot more useful on the Targa.
Dyno chart
Now, the engine still isn't anywhere near its potential. Keep that in mind when looking at the dyno chart. I don't know if my 200 hp at the wheels goal is attainable, but 170 should be possible. The cams are under suspicion, as sister engines to this one have held power a bit longer without giving up the bottom end. I have another couple of options to try and there hasn't been any experimentation with the cam gears yet. Since they typically trade off low end for high end and vice versa, I don't think they're going to solve things overall. Still, it's worth trying.
Jeremy Ferber from Flyin' Miata was the tuning meister, working in temporary conditions as FM is in the middle of a move.
It wasn't all good news, though. It turns out the car has a problem with the wideband O2 sensor, so we couldn't do a whole lot with tuning. Normally, Jeremy has enough experience to tune via injector pulse width against horsepower, but the 2001 injectors I'm using aren't in his mental program. So I'll be doing a little diagnosis to sort that out - we suspect the heater circuit isn't working. The car was also running hotter than it should, so I'll take a look to make sure the thermostat is working properly.
entry 426 - tags: header, engine, dyno | | | 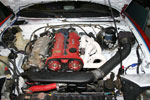 | March 6, 2008 - The intake in place.
Okay, that black plastic/rubber crossover tube isn't really very sexy. But it works, and that's what counts here.
There's a bracket supporting the crossover tube at the short piece of pipe, then another supporting the air filter. It's not an ideal spot for the filter, really, but I'll make a heat shield to protect it - and the brake lines - from the header heat before too long. That flexible hose isn't as tightly stretched as it appears in this picture, by the way.
Speaking of the header, note what happens when you forget to degrease the pipes before painting with high-temp paint. Whoops.
I also sorted out the wideband oxygen sensor problem. It appears to have been a bad heater in the sensor. I popped in another to check it out, and on a test drive I saw a good range of numbers. The old sensor would work fine until exhaust flow got high, then it would just sit at 14.7:1. The new one showed numbers as rich at 10:1 under wide open throttle. Obviously not good for power, but at least I know the sensor's working! I'll let the car autotune itself at the track this weekend. I don't think I'll have time to dyno the car tomorrow.
entry 430 - tags: intake, header, engine | | |  | March 10, 2008 - Time for another test.
After a long tow through some nasty weather (check out that filthy hood!), we made it to Pueblo for the most recent testing session. The goals for this one were primarily to work on the driver/navigator team, although as always suspension tuning was involved.
After a late start due to a car that was stuck on the track with the doors locked and the engine running (!), I took the car out solo in wet (and rapidly drying) conditions. The brakes didn't feel good. A nice solid pedal, yes. But I wasn't getting much feedback. This kept up over the whole day so I'm not sure what's going on or if it was just a matter of a lack of faith on my part. Since I was planning on making some big changes to the pads shortly, I'll look at them more closely later.
The car felt pretty good. The handling balance with the new alignment wasn't right on the first session, it was a bit too biased towards understeer as I'd expected. Not terrible and certainly stable, but I do generally prefer a car that's set up to be a bit on the loose side. The suspension was swallowing up just about everything. Just about?
The final turn has been reconfigured to make it much tighter than before. It will be repaved this summer, but for the time being it's rough. Really rough. There was a deep dip in the pavement right past the apex that was bottoming out the suspension hard. When I crawled under the car to do some sway bar adjustments, I noticed that the left rear spring had marks indicating it had hit coil bind. Ahh, that's not good. The fairly high ride height and the 8" springs were a bad combination. Since I didn't have any way to deal with it, I played with the corner to avoid that hole for the rest of the day. Elsewhere on the track, I was able to drive over berms - even the rough "dragon's teeth" ones - with impunity. So that was working well. Despite a slight understeer in fast sweepers, the car was both faithful and mobile when I was setting up for corners so it's probably a pretty safe setup for the Targa now. It was quick enough to let me pass a Lotus Elise without any difficulty, that's a good sign.
I'm going to try a couple of things to sort out that coil bind. There are a set of 10" springs on the way to replace my 8" ones, as they'll give an extra 1.25" of spring travel and that will avoid the binding. They're a 250 instead of my current 225 so I can make the rear slightly more mobile. I also ordered some 375 lb springs, thinking I could try a 375/300 combination instead of my current 300/225. The stiffer springs not only give an extra 0.5" of spring travel, they'll use a lower perch height for the same ride height so binding should not be a problem. Now, do I want the extra stiffness or do I keep the car fairly soft? I'll have both options available to me.
The header worked perfectly all day, not showing any signs of weakness or cracking. That's good.
entry 431 - tags: testing, suspension, header | | | 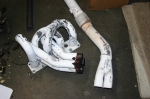 | April 8, 2009 - I did have one problem on the way home from California.
As I pulled in to Reno, I popped my earplugs out and was greeted with a pretty nasty exhaust note and rattling. I figured out pretty quickly what was going on - the collector had somehow come off the primary pipes.
Now, when I was building the header, I had to pull it apart to finish some welding. And I had a really hard time - several prybars and a torch were required. So when it was all assembled again, I only made a small tack weld as a token gesture, figuring it would never come apart on its own.
Well, obviously it held together for the race and a bunch of track testing. But 7 hours at Laguna Seca? Not so much. We tried several field fixes on the way home but to no avail. The rear section of the header settled on to the front subframe maintaining a bit of contact with the tubes but transmitting a nice buzz through the car. No harm done, just a bit of unpleasantness. I've pulled it out now and I'm going to clean it up before reassembling and welding everything!
entry 666 - tags: header | | | 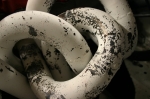 | April 8, 2009 - This is the result of the track.
My white high-temp paint was a little flaky after the race, but not too bad. It simply told me where the hot spots were in the header. However, after the thrashing at Laguna Seca, the paint was bubbled and flaking over all of the primary tubes. Yuk.
So, after the repair is done, I'm going to get it ceramic coated. I shied away from that originally as I didn't want to spend the money and then have it crack. But we know now that cracking is not a concern so it's a good opportunity. Besides, I want the engine bay looking good for the Mitty in a month!
I forgot to mention - Janel and I used the race car to tour Monterey and Carmel after the track day. It's maybe not the perfect vacation vehicle. Maybe once I get the transit headsets put together.
entry 667 - tags: header | | | 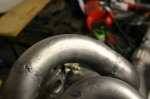 | April 14, 2009 - Bead-blasters are wonderful things!
A few minutes in the box and the header came out nice and clean. Blasting both the collector and the primaries where they slip into the collector made it very easy to put the two parts of the header back together, and a few welds made it a permanent marriage.
I then took it down to the local powdercoater for the ceramic. He can do black easily, but I'd prefer white if possible. That's what the old "bundle of snakes" headers on vintage F1 cars and GT40s looked like. He doesn't do white normally though, as the white lead in the coating makes it brutally expensive to ship because it has to be treated as if it were uranium. He's looking into the costs and I'll decide once that information is in. I really hope I can do white, I'm just not willing to spend another couple of hundred to do that.
I don't think I am, anyhow.
entry 668 - tags: header | | | April 16, 2009 - Good news!
The header will be white. Turns out the latest and greatest formulation of white ceramic is not toxic enough to require expensive shipping. It should be done next week - which, when I think about it, is just about as late as I can get it.
Other than the header and a good scrub-down, the car is ready to go. The trailer's just come back from a checkup (and new spring hangers to correct some alignment problems) so it's almost time for another long trek across the country to Georgia. This is one well-travelled little car.
entry 670 - tags: header | | | 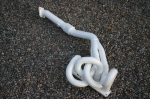 | April 23, 2009 - It's back!
The header now has a beautiful coat of white ceramic, expertly applied for about 1/3 the cost of the big name brands like Swain. As long as it stays looking pretty, I'll be happy.
Of course, the perfectly smooth finish also highlights my ugly welds. But that's okay, they're proven ugly welds.
entry 671 - tags: header | | | 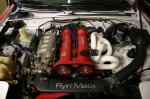 | April 23, 2009 - After a bit of fooling around, the header is back in the car.
There are about three points during feeding the header in past the bellhousing that it just seems impossible. And then, with a bit of wiggling and pushing and leaning of the engine, it slips past. It was a bit hard on the ceramic coat in a couple of spots, but that's okay. I did notice that the breather on the valve cover was a little soggy on the bottom, so maybe the ceramic coat isn't such a bad idea...
entry 672 - tags: header | | | May 6, 2009 - Well, I'm back from the Mitty.
Two long days of driving plus an evening head start each way. No, the car didn't get to run on the track but it did get quite a bit of attention. It never fails to amaze me how many people know the car and want to see it. Very flattering, really.
The ceramic coating on the header looks exactly the same as the cheap white paint did after a half hour of running or so. It may be an application problem, as it's not flaking in the hottest parts first. Still, that was a couple of hundred bucks wasted. Bummer.
I have to say I've had just about enough of long road trips for the time being.
entry 674 - tags: header | | | 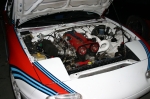 | January 13, 2011 - There is a sad side to the big plans.
That sweet little 2.0 is going to have to come out. It's been a rock-solid engine, giving very little trouble despite what we've asked of it. Ever since Janel discovered how much fun the Targa Miata is to drive, the car's had to do double duty at trackdays. It just goes and goes and goes. I'm going to be truly sorry to see the engine go, but it's for sale to support the transformation. The header is also going to be available along with the rest of the exhaust.
It's a bit like selling a child, but I'm hoping it'll go to a good home where it can roam free and play on fun roads or tracks. Contact me if you're interested in any of the driveline, engine computer or exhaust.
entry 773 - tags: for sale, engine, header | | |
|

 THE DIARY