| MIATA BUILD |
|
|
 | |  | April 19, 2007 - A little gotcha built into the Miata engine.
This is the oil feed for the head. If you put the head gasket on upside down, everything works just fine - other than the fact that you cover up the oil feed. Then you starve your head of oil and it's time to take it all apart again. I've talked to two people recently who have done this. It's an easy mistake to make with expensive consequences - a bad combination.
entry 140 - tags: engine, tips | | | 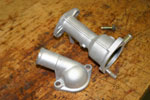 | April 19, 2007 - If you really want to make an engine look beautiful, you need a bead blasting cabinet.
These are well-experienced parts, but a minute in the blaster and they look as good as new. It's great for cleaning old gasket goo off as well.
entry 141 - tags: engine, tips | | | 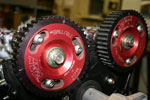 | April 19, 2007 - I'm going to run adjustable cam gears so I can dial in the cams.
These particular cams were designed by a friend who works at Integral Powertrain after also working at Cosworth. I have high hopes for them.
Those who know the Flyin' Miata catalog will notice that these are not FM cam gears. Why not? Because these AEMs were kicking around the shop and needed a new home, and this way we don't need new parts. Besides, these particular cam gears have a long history of competition. They were part of the monstrous Track Dog race car I built a few years back, and also visited Car and Driver as part of the original Superfour Challenge. So it's time they had another outing.
The downside is that they're not marked correctly - the gears are actually in the stock positions now, even though the intake cam appears to be retarded by 5 degrees and the exhaust by 4.
entry 142 - tags: engine | | | 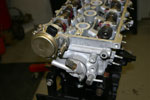 | April 19, 2007 - A cam angle sensor?
Yes indeed. This engine is going to have an interesting mix of components. For the engine management, I'm using a Hydra Nemesis. It's going to use a crank trigger wheel as the primary sensor for engine position. But in order to run sequential injection, it needs a second sensor on the camshaft in order to determine which cylinder is ready to fire. On a stock 1999-05 Miata, this sensor is on the front of the intake cam gear. But then I wouldn't be able to run my adjustable gears. So the venerable cam angle sensor from an early car (a 1990 in this case) will be attached to the back of the exhaust cam.
So the engine has a 2001-05 MBSP and oil pan, a 1999-00 block and head, 1990-93 cam angle sensor, hydraulic lifters from a 1990-97, valve keepers from a 1999-05, oil pressure senders from both a 1990 and a 1995, cams originally designed for a 1994-97, a 1994-97 valve cover, 1994 coils, a 1999-05 starter, 1994-97 alternator...thank you Mazda for leaving us this many options!
entry 143 - tags: interchange, engine | | |  | April 22, 2007 - This odd little doodad is an oil cooler.
It sits under the oil filter and coolant runs through it. I don't really see how effective it can be given the relative temperatures of oil and coolant - unless it's intended to get the oil up to temperature more quickly. Regardless, I'll install it if only to act as a spacer. If I install a real oil cooler running through a thermostat, I need this thing to make sure all the fittings clear various protrusions on the block.
My apologies for the picture quality. I forgot the real camera so this is from a camera phone.
entry 144 - tags: engine, interchange | | | 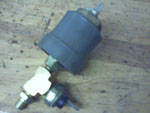 | April 22, 2007 - The 1995-05 Miatas had a "fake" oil pressure gauge that basically just showed that there was at least 7 psi of pressure - that's the little sender here.
The 1990-94 Miatas had a more traditional oil pressure gauge that showed actual oil pressure - that's the big grey sender. I want to run both. A real pressure gauge to tell me how things are going, and a big bright turn the engine off NOW! light.
Another camera phone picture, sorry.
entry 145 - tags: engine, interchange, wiring | | |  | April 22, 2007 - I may not have been busy taking pictures, but I have been busy assembling.
The engine is about 97% complete in this picture, and is even closer in real life. It's not as pretty as in earlier shots, partly because of the camera phone and also because I've been taking shortcuts. Shortcuts, you gasp! Ah, but there is method to my madness.
See, the final engine will have a special valve cover. It's off being powdercoated right now, so I stuck a fairly ugly valve cover in place to protect things. I'm also planning to use individual throttle bodies, so again a junkyard intake manifold was pressed into service. It'll look sexier when I'm done, honest.
Meanwhile, I'm getting close to being able to install the engine. I want to make sure I'm not blocking access to something important first, and I'll spend an evening ensuring the chassis is ready. But it's almost time!
entry 146 - tags: engine | | |  | April 24, 2007 - Time to take the engine from the Flyin' Miata shop to my garage, where the car is being built.
Putting this in the back of my old pickup increases the value of the truck by a factor of 5 at least.
The chassis is almost ready for the engine. I need to plug a few extraneous holes (such as the heater and AC pass-throughs) and then it's time to drop the engine in.
entry 147 - tags: engine, other cars | | |  | April 24, 2007 - A donation from Jason on the Grassroots Motorsports forum - a Sparco navigator footrest.
It reeks of obsession. Not only are the hinge screws countersunk, all of the lightening holes are chamfered and of course there's an engraved Sparco logo on top. Beautifully made for what is really just a metal plate. But it's going to be a good rest for Eric's pretty little feet and it saves me the effort of fabricating one. Thanks Jason!
entry 148 - tags: ergonomics, sponsors | | | 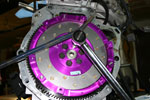 | April 25, 2007 - Time to bolt up the flywheel.
Lots of people have questions about how to keep the crank from turning when tightening the front crank bolt or the flywheel bolts. A well-placed prybar does the trick.
But really, the reason I took this picture was to show off the very cool purple flywheel from Flyin' Miata.
entry 149 - tags: engine | | | 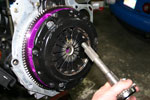 | April 25, 2007 - Most people use a plastic clutch alignment tool to ensure the clutch and pilot bearing are properly aligned.
Bah, that's for sissies. At Flyin' Miata, they use the input shaft from a transmission!
So, the clutch is bolted up and the engine is ready to install. That will hopefully happen tonight and then I'll start the process of firing it up. I want it to make noise this weekend.
entry 150 - tags: engine | | | 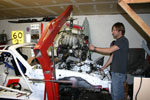 | April 25, 2007 - Brandon from FM dropped by to help me insert the engine.
About 2 minutes later, it was in. It really couldn't have gone any easier. Everything was clean, there's very little in the engine bay and two highly competent professionals were at work. Well, two out of three anyhow.
entry 151 - tags: engine | | |  | April 25, 2007 - And voila!
Engine in the car! Brandon hooked up the wiring while I messed about with fuel filters.
To plug up unused holes on the firewall, I used some foil tape that is apparently so waterproof that you can apply it underwater. I'll let you know if it sticks.
entry 152 - tags: engine | | | 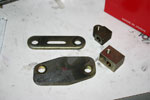 | April 25, 2007 - More evolution of the Miata.
These are two examples of the bracket for the power steering pump. The smaller, lighter version is actually the original. The large, thick version is the "upgraded" later design. What prompted that? I'm really curious about why Mazda decided to double the weight of this part - was there a rash of failures from excessive belt tension?
The two threaded blocks are also from different applications. They're dimensionally the same and interchangeable, but the lower one is significantly heavier. Ahh, Miata trivia.
entry 153 - tags: interchange | | | 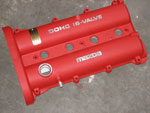 | April 30, 2007 - Testa rossa!
Or whatever the Japanese equivalent is. I decided that this engine deserved a pretty valve cover, so I had it powdercoated red. A few minutes with a scotchbrite pad mounted in a drill and the raised letters perked right up. This is the same sort of treatment Mazda gave to the 2004-05 Mazdaspeed MX-5 turbo car. The difference is that this engine will have more horsepower!
I had to hunt around for a bit for a 1994-97 valve cover to do this to - the 1999-05 covers have recessed letters. The front of the cover is cut for access to the cam gears.
entry 154 - tags: engine, interchange | | |  | April 30, 2007 - Like every engine that comes out of Flyin' Miata, this one has a plaque with the engine builder's name on it.
That's not usually me, but I figured the Targa Miata needed one anyhow. Besides, I'm proud of this.
entry 155 - tags: engine | | | 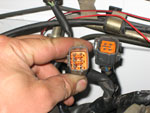 | April 30, 2007 - Enough playing around with pretty valve covers, it's time to get back to work.
The fuel lines are hooked up and the engine bay is gradually being repopulated with wires, hoses and tanks. I made one little error here - the fuel injector harness is for a 1995-97 model car with the "three-wire" coils. But the main wiring harness is from a 1994 model with "four-wire" coils. Not a problem, I can run that way - but first I need to change a plug. Whoops.
Meanwhile, Jeremy at Flyin' Miata has prepared the base map for the ECU. It's pretty impressive, really. I told him I needed a base map for a high-compression 2.0 with 1999-00 injectors, the 1999 intake manifold with VICS, a front crank trigger from a 1996-05 with a cam angle sensor for TDC...and his question was "do you need A/C?"
entry 156 - tags: engine, interchange, tuning | | | 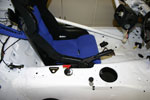 | May 2, 2007 - Part of the fun of building a car like this is deciding where to put all the knobs and switches.
The main cutoff is going to go inside the car somewhere. I was going to put it here on the transmission tunnel, but further experimentation (ie, I pretended to drive the car) showed me that it would be pretty easy to flip open with my elbow. Now that would be an unhappy moment! Now I'm looking at installing it in front of the gear shift. First I need to see if there's clearance underneath.
entry 157 - tags: ergonomics, wiring | | |  | May 2, 2007 - More wiring fun.
I have the fuel injector harness sorted out now. All the connections are crimped with a ratcheting tool for a good solid connection, then mechanically secured with heat-shrink. It's important to do this well, as bad connections can obviously cause a real problem in the heat of competition. The collection of crimp connectors is one I've assembled myself from Del City, with the exception of some less-than-stellar ring terminals. Those are mostly used for grounds so there's less concern about shorting out.
entry 158 - tags: wiring | | | 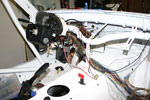 | May 3, 2007 - Ahh, more wiring.
It's the job that never really ends. But I feel as if I'm making some progress, as parts are being hooked up and large sections are being called finished.
The final location for the cut-off switch can be seen here. It should be within easy reach for both occupants, but also difficult to flip accidentally. The location works well for the wiring as well - the main line to the battery runs just underneath.
entry 159 - tags: ergonomics, wiring | | |
|

 THE DIARY