| MIATA BUILD |
|
|
 | |  | April 1, 2013 - Canards!
After fixing the alignment problem, I decided to stick my canards on and see how much difference they made. The answer is: lots. All of a sudden the car had lots of turn-in grip, diving into the corner instead of feeling a bit soft. VERY nice. The front/rear grip was better balanced - in slow corners, the car still pushed a bit but above about 50 mph it was great.
There's one corner on this track that is a long, climbing right turn. I was taking it at full throttle in 4th, accelerating through the whole thing as the car just stuck and stuck and stuck and the track appeared over a crest at the top of the turn. So much fun, and the car showed great balance.
So, big thumbs up to the canards.
During the third session, I was starting to get a bit tired - it had been a hectic day already, with 30 minutes on and 30 minutes off the track, working on the car. Just as I started to think about cutting the session short, the McLaren caught up and I waved him by.
If you ever get the chance to follow an aggressively driven supercar on the track, I recommend it. We were well matched in the corners and I was hugely entertained by the antics of the rear spoiler and the car dancing at the limit. However, once we got on the back straight, the difference between a 400 hp Miata and a 616 hp supercar became quite apparent. The modified Porsche turbo that had been running with the McLaren also powered past me at this point, so I sat back to watch the two of them play. On every straight, they'd move off a bit more. But wow it was fun.
Unfortunately, as we can down through that chicane again, the engine revs suddenly spiked and I lost drive. I tried some other gears to no avail. I'd lost drive. There was no noise, so it wasn't a driveshaft. I was right by the pit entrance so I dove off the track with enough speed to coast through the hot pits, around the corner and back to the trailer.
Looking under the car, the outer CV boot on the driver's halfshaft and the inner CV boot on the passenger's halfshaft are ruptured and threw grease everywhere. So I'm assuming that one CV joint failed with the second one following immediately afterwards thanks to the diff transferring the entire power load over to it. I have a suspicion as to what the cause might be but I'll keep that to myself until I have a chance to confirm that this is exactly what failed. It was an unfortunate end to what was proving to be a very fun and productive day.
entry 1077 - tags: aero, halfshafts, damage, canards, testing | | |  | April 1, 2013 - Now that's a fun bunch of cars to see at a track day.
That Formula B car had a tendency to simply appear out of nowhere and then just vanish into the distance.
Along with the aero, I was testing some new rear brakes on the car. I'm going to have a look at the pads shortly, but they felt great with lots of bite.
entry 1078 - tags: trackday, brakes | | | 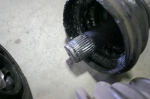 | April 12, 2013 - I found the cause of the axle failure.
The spring clip on the end of the shaft broke, allowing the shaft to pull most of the way out of the CV. The small number of splines remaining just weren't up to the task and ripped apart.
On the other side, one of the CV boots ripped and was slinging grease, but I haven't taken it apart to find out just what's going one. It wasn't ripped last time I was under the car and since it was slinging grease on to the exhaust, I would have been able to smell it if it had been happening for a while. I'm curious as to what I'll find in there.
No matter, I've got a new set of halfshafts in the car now. Not a cheap fix, but an easy one. I did check to make sure I wasn't exceeding the amount of allowable change in length of the shafts due to excessive travel, but it looks as if I'm dead on the correct amount.
entry 1079 - tags: failure, axles | | | 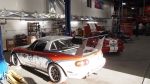 | April 12, 2013 - I've been working on the car a fair bit.
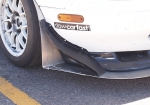
First, I refreshed the shocks by changing the fluid and putting in new seals. They didn't need it, but it's good preventative maintenance. I also fine-tuned the corner weights, did a nut and bolt under the car, changed the oil (7 quarts!) and reset the alignment after the disassembly for the axle change. There's also an obvious change - a new mount for the wing. It's about 5" taller. This location should give more downforce without an increase in drag (or less drag for a given amount of downforce). We'll see how it works out on the local track next weekend. No high speed work, but 75 mph in a sweeper does tell some tales.
I've realized that, with the big change in performance thanks to the engine, tires and aero, the car is becoming needier. I can't just beat on it the way I could when it had the old four cylinder, everything's under much higher stresses and needs more maintenance and more frequent checks. That's why I spent the whole day under the car checking over everything. It's also burning up consumables faster. Nothing like a Corvette, but my tires and brakes don't last the way they used to - never mind the fuel!
It's got two days of hard use at Laguna Seca coming up in a few weeks, and I have to make sure it can run hard the entire time. It failed last year through no fault of my own, but I don't want to give it any excuses!
entry 1080 - tags: aero, suspension | | |  | April 22, 2013 - Short test session.
The new tall wing mounts were wobblier than I liked. Pulling back hard on the wing also showed a bit of bowing in the lower section. I looked at a few ways to fix it and decided to try guy wires. Excellent result, it's stronger both laterally and longitudinally. The lower guy wire points are right where the greatest deformation was when I yanked on the wing, and the whole assembly is solid. The fact that the wing attaches to the uprights with a big plate helps as well.
On Saturday, I took the car out to Grand Junction Motor Speedway to test it out. And I only got in one session. The track was cold and the car was pushing around, but more importantly I could hear a thumping from the rear when accelerating out of left turns. It appears the new axles might have a bad CV joint, I'll dig into it later today. I have to get it fixed by tomorrow night!
entry 1081 - tags: testing, aero, axles | | | 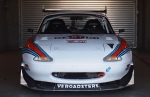 | April 29, 2013 - Time for the big Laguna Seca event.
It was not easy getting here. It turns out that my new axles did not have proper heat treatment, so they failed almost immediately. I decided to upgrade to the stronger G2 setup partly because that's what was on the shelf at Flyin' Miata, and I ran into a series of problems with the new parts. Finally, after working most of the day before I left, I ended up with the used parts from Elvis on the car - rear uprights (including hubs), rear upper control arm and axles. Finally, after all that work, the car was ready for the trailer. Then the long tow began.
Finally, we got to Laguna Seca. My first lap was uneventful, then an alignment cam slipped. Argh. Still, the car felt strong. I went out again and on my second lap, the clutch hydraulics failed. Argh.
Much prodding and poking at the clutch ensued. I got it back again briefly, then it went away. I thought it was a bad clutch master or slave. After working on it all day Saturday, I called Bill Cardell that night and he suggested there might be some debris in the hole between the clutch reservoir and the master. I worked on this the Sunday morning and had a clutch within half an hour! I took it out for some exploratory laps and it was coming and going. I seemed to have about three shifts in rapid succession, then it would go away - which made the front straight and the braking into turn 2 fairly interesting. A bit more bleeding and it came back 100%. Time to go drive.
This car is a beast. I'm certainly not the fastest driver on the track at an event like this, but the car is a great equalizer. With the big engine, I could pass just about anyone as we climbed the big hill up to the Corkscrew. The aero seemed to be working nicely, as the car remained well balanced in the high speed turns as well as the slow ones. I was having a fantastic time working my way through the pack.
Janel finally got a few laps in it after the disappointment of last year and the non-functional Saturday. Her biggest adjustment was to the braking points - the car builds up speed so quickly that you have to brake a lot earlier for the turns. She was starting to get more comfortable, though, and looking forward to her last couple of sessions.
entry 1082 - tags: testing, axles, failure | | | 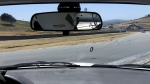 | April 29, 2013 - This is not something you want to see out the windshield.
That's my rear brake rotor. I came down the Corkscrew, hit 4th gear and turned into the fast turn 9. Just before I reached the apex, I heard a bang and the car snapped into a spin at somewhere around 80 mph. My first clue as to what had happened was seeing my right rear wheel rolling along the pavement as we rotated the first time, then we went into the dirt after the second spin. On the dirt, the car lifted a little bit like it was trying to roll, but stayed happy side up as we scrubbed off speed.
A big thumbs up to the track designers - we finished our ride safe and sound without hitting anything but a small drainage ditch. Then it was just a matter of sitting in the car with our helmets on and watching the other cars come around the corner, seemingly aimed directly at us. Finally, all the traffic was cleared and the flatbed showed up.
entry 1083 - tags: crash, failure, laguna seca | | | 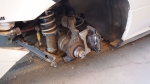 | April 29, 2013 - So, what caused the accident?
Looks as if the rear hub failed, leaving only the brake rotor to hold the wheel in place. Obviously, that's not what it's designed to do so it simply ripped apart. This was an upgraded but used rear hub - taken from Elvis, remember - but I'm going to be taking a very close look at the bearing and specifications to see if it's possible to build something stronger.
This also reinforces my belief that I need to step up my maintenance. Talking to Emilio at 949Racing about his enduro experience, I'm learning more about the difference between a track day car and a racer. Yes, I only use this car for track days but it's highly stressed and those track days stack up. I'll start flushing and cleaning all the hydraulics on a regular schedule instead of just the brakes. Wheel bearings are going to start getting treated like consumables. Although I'm not sure I would have identified this one as a problem, as I had it off the car on Wednesday and it felt fine. The hub's previous history was as a street car that has seen a few track days, but at a much lower stress level than the Targa Miata runs.
entry 1084 - tags: failure, hub | | | 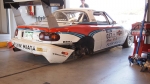 | April 29, 2013 - This is the least amount of damage you can do if you lose a wheel in Turn 9 at Laguna Seca.
The bumper is just out of place. The exhaust got pulled out of shape and took some of the brackets on the body with it so the trunk floor is probably messed up. The skid plate under the diff is deformed and I want to check the subframe carefully. The front wheel is dented and the rear is all scarred up. But it's almost all bolt-on parts. There's one small dent in front of the missing wheel but otherwise is looks like the tub is untouched. Amazing. I got very, very lucky.
The car's back in the trailer (thanks to the help of Emilio and a number of other onlookers) and heading home to Colorado. I'll drag it out there and take a close look at everything underneath.
entry 1085 - tags: failure, crash, laguna seca | | | 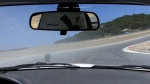 | May 1, 2013 - Crash video.
How quickly did the failure happen? Pretty much instantly. Why did it fail? See the next post. http://youtu.be/3k2u2zaIA3c
entry 1086 - tags: video, crash, laguna | | | 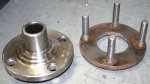 | May 1, 2013 - So, what caused the accident?
The hub came apart, leaving only the brake rotor to hold the wheel on. Of course, that ripped apart almost instantly and the car snapped into a spin.
It turns out that this was a known problem with the V8Roadsters hubs, which led to a redesign several years ago. The new one is 1/2" thick instead of the 3/8" found in the older design. In the fallout from my broken axle last month and some problems found with new parts, I ended up borrowing the hubs from FM's shop car, Elvis. For some reason, Elvis never got the upgraded parts. I'm going to try to figure out how that fell through the cracks. We're also going to contact all of Flyin' Miata's V8 customers and ask them to check their rear hub thickness to make sure there aren't any more out there.
The good news is that we now have proof that the rear caliper brackets on the new FM brake setup are stronger than the rotors!
entry 1087 - tags: failure, hubs | | | 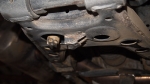 | May 3, 2013 - Let's hear it for rally cars.
Nearly five years ago, I added some small ramps to the bottom of the control arms to protect the lower AFCO adjuster. Last weekend, they did their job. In fact, all of the skid protection worked as designed. The plates just behind the front wheels took a beating, as did the engine skid plate. The differential protection really shows a lot of scarring, but the differential itself is untouched. Almost nothing touched the ground that wasn't designed to touch the ground. The car was built to fail well, and it did.
entry 1088 - tags: damage, crash | | | 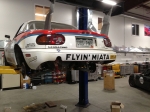 | August 22, 2013 - It's been a long time between updates.
Mostly because it's been a long, long wait for parts. The replacement axles took forever. I took the opportunity to upgrade from the standard axles to the G2 version, which have stronger CV joints and come with the new, beefier hubs. Good thing, too - you'll see why soon.
Elsewhere on the car, I replaced the bent-up muffler, fixed an alignment problem up front and went over a few other things. One bent wheel and one questionable wheel were replaced as well. Since the muffler had burned the rear bumper cover during a dyno run, and then it got all scarred up in the crash, I decided to cut it out further than before. I liked the look better before, but not all the damage.
The car is now back on the ground and self-propelled for the first time in forever.
entry 1089 - tags: repair, crash, axles, exhaust | | | 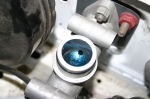 | August 22, 2013 - Remember my clutch problem at Laguna Seca?
Yes, it was way back in April. Well, here's the culprit. There was gunk in the system, clogging up little tiny passages. Since this was a brand new system when it was installed, it's amazing how much has accumulated. So this will become a regular maintenance item on the car in the future.
I cleaned out the reservoir and flushed the system out with brake cleaner. Nice and clean now.
entry 1090 - tags: clutch | | | 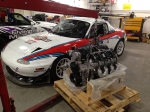 | August 23, 2013 - Time for a big upgrade.
When the car was converted to V8 power, it got a modified L33 engine. The L33 is a 5.3L truck engine with an aluminum block, but really the only things that stayed were the block, crank and rods. This is the recipe for the V8RSpec race series engines. It's a good track engine with a powerband that just keeps delivering more and more up to about 375hp at the rear wheels - but it's never had the bottom end torque I wanted. This is particularly a problem on the rally stage, where you don't always know exactly what a corner exit is going to look like. Driving the car back-to-back with my 5.7 LS1-powered MGB on the street really showed me what I was missing. So I've been eying the newer, larger LS3 engines for a while. I think I'm the only person who's ever felt the car was lacking for torque, though!
A few weeks ago, I got a call from a friend who had an LS3 for sale. It's a crate LS376/480, the same 480 hp engine that we use for a lot of conversions at Flyin' Miata. It had been installed and run just long enough to seat the rings before being pulled. He offered it to me at a killer price, so I jumped on it.
So the Targa Miata is going to get a makeover. Along with the new engine, I'll drop in the matching wiring and controller. No more modified 2002 Firebird parts, I'll be running a GM Performance Parts wiring harness, PCM and fusebox. This will, amongst other things, take the main relay out. Yes, that main relay.
I've got a few other changes planned, but this is the big one. It's going to be fun. Good thing I upgraded those axles.
entry 1091 - tags: engine, power, LS3, L33 | | | 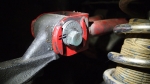 | August 30, 2013 - Prep time.
I've got a track day coming up in a couple of weeks, the last one with the current drivetrain. I'm going through the car to make sure it's in good shape. After the little three wheeled off-road excursion at Mazda Raceway Laguna Seca, I had the alignment checked. Every time that's done, I go over all the alignment cams and make sure they're torqued good and tights. I also mark them so it's easy to reset the alignment should one slip. Easy to do, but saves a bunch of potential hassle.
That tan Monterey sand is EVERYWHERE.
entry 1092 - tags: prep, alignment, suspension | | | 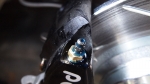 | August 30, 2013 - I've been using a different bleeding technique for the brakes for a while: gravity bleeding.
It's about as simple as it gets, but I've found it to be really effective. It's something I learned from the old Land Rover, as it's got a particularly recalcitrant hydraulic system.
Basically, you just open up the bleeders. In my case, I just let them drool but you can attach a hose. You could open them all up at the same time, but I like to do one at a time so I can watch what's going on. Big bubbles are obvious, but there are a surprising number of little teeny tiny ones that you'd never be able to see if you were using a hose.
It's the same basic idea as pressure bleeding, but without the extra hardware. Some pressure bleeders can actually aerate the fluid slightly which is counterproductive. I've found that I get a much firmer pedal with this technique, which might be the result of that aeration or the fact that I'm getting rid of those miniature invisible bubbles. The brake pedal is like a rock. Plus the only thing I need is a wrench and a few rags to clean up. It's also fairly quick, especially since you don't have to mess around with the pressure bleeder.
It wouldn't be a quick way to flush the system, as you actually end up using very little fluid. But if you're changing out calipers (as I have been doing regularly recently), it's perfect. Just like with any other technique, I finish by starting the car and trying to push the brake pedal through the firewall. You develop a lot more pressure in the system that way, and it's a good way to find leaks that would evade detection during bleeding.
entry 1093 - tags: brakes | | |  | September 11, 2013 - Want to know what the difference between the standard 430 hp LS3 and the 525 hp version is?
You're looking at it. That's an ASA cam from GM Performance Parts along with the appropriate valve springs. We have a car at Flyin' Miata right now with this cam, and it's ridiculously fun. Not just the obvious power, but the throttle response. It's one rorty engine, entertaining in a way that the other versions aren't.
So, while my new engine is out of the car, dropping these parts in was a bit of a no-brainer.
entry 1094 - tags: power, engine, ps3 | | | 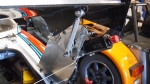 | September 11, 2013 - The latest mad scientist project on the car: active aero.
I've been reading far too many Can-Am books. The rear wing is flipped up under braking by a pair of Miata headlight motors. It's triggered by the brake lights and takes 0.6 seconds to change position.
I'd originally planned to make this work with an expensive Spal linear actuator with a clever three-position controller that gave me a low drag position as well as the air brake, but it was far too slow - 0.5"/sec. The Miata motors are six times faster. I mounted them where I did mostly for simplicity, I didn't want to make any permanent changes to the car for these tests. They're not in an ideal place from an airflow perspective.
It's been suggested that I add a timer circuit to delay the return once I get off the brakes, and I might give that a try. This is just the proof of concept. I've got a track day this weekend, I'm going to bring this with me to see if it works.
Video!
entry 1095 - tags: aero | | |  | September 16, 2013 - Track time!
I was back at High Plains Raceway. I've come to enjoy this track more than I did initially, it's actually pretty fun. The best corner is a long uphill sweeper that has a fairly quick entry. If you do it right, you can keep full throttle most of the way through as you climb to a blind exit with nothing but sky to see.
The car went pretty well. It took me a couple of sessions to work out some little bugs and dial in the handling for the track, then it all came together. I spent some time playing with two CMC-class cars, Camaro/Firebirds with V8 engines. For the first session, I was about the same speed. Then I got faster and started hunting down the Viper that was sharing the track with us. Overall, a pretty good day at the track.
For fun, I attached the GoPro to the front splitter to get some super-low camera angles. A bonus was the sound - it's directly below the intake. This is fun to watch with the sound turned way up. You'll meet the CMC cars in the second lap.
entry 1096 - tags: track, hpr, video | | |
|

 THE DIARY