| MIATA BUILD |
|
|
 | |
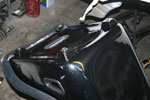 | March 20, 2007 - The next obstacle in the battle against seat height?
These nice little feet. The seats have both side and base mounting options, so we'll use the sides.
entry 94 - tags: ergonomics, seats |
| |
 | March 20, 2007 - The risers at the back of the seat are no longer.
They were actually wooden pegs inside, that was a bit of a surprise. This seems a terrible thing to do to a brand new set of race seats, but Miatas aren't that big and I have a tall torso.
entry 95 - tags: ergonomics, seats |
| |
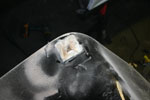
 | March 20, 2007 - The result of all the seat abuse.
The driver's seat is well placed and ready to be bolted down. The codriver's seat is unmodified. There's a drastic height difference.
entry 96 - tags: ergonomics, seats |
| |
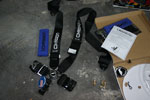 | March 20, 2007 - Along with seats, Corbeau supplied these 3" harnesses and pads.
While the pads might be overkill, I know how bruised my collarbones get after a track day. Perhaps this will help with comfort a bit.
entry 97 - tags: sponsors, safety |
| |
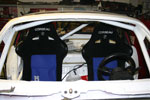
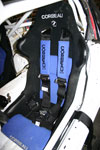 | March 20, 2007 - The end result, being tested with the hardtop on the car.
It's a snug fit, but everything goes nicely in place. I always like to get the ergonomics sorted out early in a build, as an awkward driving position causes all sorts of problems down the road. All that's left to do is build the side brackets for the seats and mount the sub belt.
entry 98 - tags: seats, ergonomics |
| |
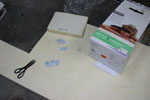 | March 22, 2007 - The memory foam for the seats is here.
It's really odd stuff to work with, in a constant state of slow melt. It's easy enough to cut with a good set of scissors though.
How does it feel? Good. A single 1.5" layer in the bottom cushion to replace the stock hard foam (shown here on top of the memory foam sheet) lets me sink much further into the seat, while giving better comfort than either the stock foam or nothing at all. I'll call that a win.
The co-driver's seat has also been modified to sit a bit lower, so I'm almost done with them. I'm going to trim a little bit of 'glass off the side of the seats to allow them to sit inboard a touch, but first I have to figure out how to disassemble them far enough to do that without hurting the cover.
entry 99 - tags: ergonomics, seats |
| |
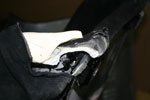 | March 23, 2007 - One last bit of seat modification.
In order to move the seats inboard a little more, I had to cut a chunk of the corner off. Once I had the covers off it was easy enough, although I think the end result will look a little nicer once I get some glue under the upholstery.
With that done, I was able to sort out the final seat location and give myself an excellent driving position. The floor has now been drilled for the mounting points - I was able to use the rear mounts on the seat after all, as the threaded portion is embedded in the fibreglass and not the little leg I cut off. The co-driver's seat will be finished up later.
entry 100 - tags: ergonomics, seats |
| |
 | March 23, 2007 - It's time to start putting some of the wiring in more permanent positions.
This will at least let me sort out some of the more critical bits such as where to mount the Hydra Nemesis ECU and the Coralba C-Giant rally computer. I'll leave it mostly unwrapped until it's all sorted out though.
entry 101 - tags: wiring |
| |
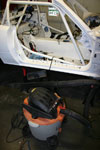 | March 23, 2007 - One tip for doing work like this.
Having a vacuum cleaner in easy reach keeps everything cleaner. Maybe not any tidier, but at least when you've been cutting fibreglass with a angle grinder, drilling holes though floorboards or breaking turn indicator bulbs on the floor (whoops) it's a quick and easy cleanup. The end result is that I don't have to put my greasy clothes on to work on the car!
entry 102 - tags: tips |
| |
 | March 27, 2007 - More driver development.
I've been autocrossing my little Seven for the past few years. But it's time to start concentrating on Miatas again for a while, so I bolted some race tires and a race seat into my girlfriend's supercharged Miata and went hunting.
The event was a Corvette autocross, always a fun group to run with. My coworker Brandon - driving a turbocharged Miata with another 60-80 hp over mine - and I were the only two non-Corvettes at the race.
It took me a few runs to get used to the slower reflexes and lower grip levels of the Miata instead of the Seven, but it started to come back. Lower grip levels not just because of the different car, but also due to cold weather and a dusty parking lot - a good indication of what we can expect in Newfoundland.
It was a good battle between Brandon, myself and a supercharged 2006 Z-06 running on massive V710s. On my last run, I left the braking a millisecond too late on the last corner and understeered badly to the finish line. Brandon didn't make any mistakes and took the fastest time of the day, while the Z-06 ended up just ahead of me.
Lessons for the Targa? The adjustable brake proportioning will be quite useful and of course I'll have to leave some extra room to stop in adverse conditions. I don't have any trouble controlling the car in big slides (after the first run, I did most of my steering with the rear wheels) but sliding off the outside of a corner in the Targa with locked-up brakes is something to avoid.
entry 103 - tags: testing, other cars |
| |
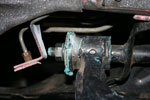
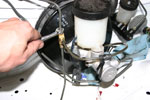 | March 27, 2007 - A mystery solved.
For some reason, the brake master cylinder only had two outlets instead of the usual three - one for the rear and one for each front. It was driving me crazy until a coworker remembered the donor car had ABS. The ABS module took care of the distribution between each side, of course!
Now that's sorted out, I needed a junction to feed both front wheels. Voila! This picture sure makes that lower line look crinkly - I'll smooth that out for aesthetics. The ziptie is to help anchor the lines and cut down on vibration.
It's possible to see what a little dribble of brake fluid, left to sit for a couple of days, did to my fresh white paint. Oh well...
entry 104 - tags: brakes, interchange |
| |
 | March 27, 2007 - It's time to install the suspension.
Why? Mostly because I keep tripping over the parts in the garage! But also because that lets me install the uprights and brakes, giving me the chance to bleed the brake system and check for leaks in the new joints.
I considered seam-welding the subframes, but no.
entry 105 - tags: suspension |
| |
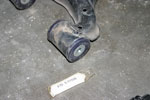 | March 27, 2007 - The control arms are fitted with polyurethane bushings.
This gives finer control over wheel movement than the stock rubber bushings. They need to be well lubricated though, so I'm using this really disgusting sticky grease.
entry 106 - tags: suspension |
| |
 | March 31, 2007 - After assembling one corner of the car, I found there was far more friction in the suspension than I wanted.
Closer inspection showed that the crush tubes in the bushings were not as long as the bushings themselves - not a low-friction situation. Measuring the bushing with the crush tube removed was fine, but the deformation of the polyurethane with the sleeve inserted was enough to cause a problem. So I shaved down the bushings slightly so they were flush with the tubes. I only did a couple by hand, the others were done much more rapidly on the belt sander at work. Why did I do two by hand? Because I forgot the control arm at home.
entry 107 - tags: suspension |
| |
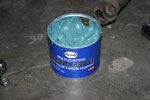 | March 31, 2007 - The really disgusting sticky grease had questionable lubrication properties but excellent gluing properties.
So I decided to use some marine grease instead. Much better!
entry 108 - tags: suspension |
| |
 | March 31, 2007 - Some people make fun of me for using a lot of grease.
I don't know why. But I do know this thing is well lubricated!
entry 109 |
| |
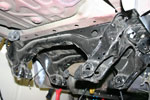
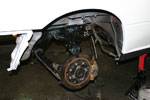 | March 31, 2007 - The rear suspension together, minus the spring/shock assembly.
Because there's no preload in the polyurethane bushings, the suspension is free to droop as far as it wants. This isn't great for the brake line that's currently limiting travel, but it sure makes it easy to work on the suspension.
The rear brakes use 2-piece rotors measuring 11" across, part of a big brake kit from Flyin' Miata. They're lighter than the stock brakes.
entry 110 - tags: suspension, brakes |
| |
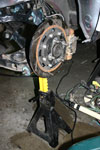
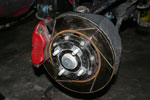 | March 31, 2007 - A similar big brake kit is used on the front.
There's a significant weight advantage and the Wilwood calipers make it really easy to change pads.
Hidden behind the rotor is the 44-tooth sensor for the ABS. If we can find enough technical information, we'll use this as a sensor for the Coralba rally computer. Coralba is not being helpful at all - we know exactly what the ABS signal looks like, but they won't tell us the required signal for the computer. Instead, we're told to buy expensive peripherals and patch them into the car instead of using the sensors that Mazda spent a lot of money developing. I want to just plug this one in, figuring that there's not a lot of variation in hall-effect sensors. Eric's not so sure, probably because he's the one who gets to use the computer! If anyone out there knows what sort of voltage range is acceptable as an input for a C-Giant rally computer, let us know!
entry 111 - tags: brakes, wiring, computer |
| |
 | April 2, 2007 - The suspension is so eager to droop that it was putting stress on the brake lines - so an extra set of jackstands was needed in the rear.
All four corners now have full suspension and brakes. The brakes have been bled, resulting in just two leaks where I had simply screwed fittings in by hand (just 15 minutes before in one case). The pedal feels really good, a promising sign.
Now that there's steering, a seat, brakes and suspension (without shocks), I have a soapbox derby car.
entry 112 - tags: suspension, brakes |
| |
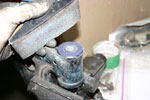
 | April 2, 2007 - Time to pop the diff in.
The stub axles are lubricated with a bit of grease to make sure they'll slide in nicely (which they did). Funny, that green grease is showing up all over the place now.
entry 113 - tags: drivetrain |
| |

 THE DIARY