| MIATA BUILD |
|
|
 | | 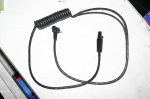 | July 30, 2011 - I've been waiting for this for a while.
It's a cable that will let me plug an iPod or iPhone into the Peltor FMT120 intercom. This cable isn't available in North America, despite the fact that all the resellers of the FMT120 use the same product description that includes this feature. This says something about the size of the Peltor rally intercom market in North America, I suspect. I had to bring this cable in from Demon Tweaks in the UK, which wasn't cheap.
Still, it'll let Janel and I make phone calls using the intercom as well as listen to music on long transits. If you look at the cable as a stereo system, it was a pretty good deal! Less than an iPod interface for our BMW, for example.
Since this thing can't be obtained at reasonable cost in North America, I'm going to reverse-engineer it so anyone can duplicate it - just as I did with the transit headsets a while back.
I've identified the plug that goes into the intercom as a 5-pin mini XLR, aka a Switchcraft TA5FL. Prices vary online, but Rugged Radios has them for under $6. The other end of the cable is the usual 1/8" 4-pole iPhone/iPod connector. The easy way to start would be with an iPhone cable for something else such as a $12 "microphone extension cable" and just replace the plug at the other end. You could also hook up another kind of phone if you know the wiring of the phone connection.
The Apple end works as such: the tip is the left audio out. The first ring is the right audio out, the second ring is the common/ground and the base ring is the microphone. On the Peltor end, the pins are numbered 1-5.
Pin 1: ground (second ring on Apple plug)
Pin 2: ground (second ring on Apple plug)
Pin 3: audio from phone (tip and first ring on Apple plug)
Pin 4: microphone (base on Apple plug)
Pin 5: microphone (base on Apple plug)
Happy soldering!
entry 892 - tags: peltor, intercom | | | 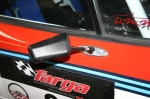 | July 30, 2011 - Oops.
Unfortunately, one of my sexy carbon fiber mirrors was the victim of a trailer unloading mishap. I may still be able to repair it, but for the time being this inexpensive motorcycle mirror (originally installed on the Seven fit the same mount. It's unlikely anyone will notice the difference, and it's not as droopy looking as it appears in this picture.
Actually, the mirror is a functional upgrade. I can work around the car for months without bumping one of them, but I learned from experience during the Targa that every night they'll get accidentally realigned several times from spectators and the service crew. The previous mirror had to be removed to be adjusted and tightened up. This one doesn't. It doesn't weigh much more than the sexy carbon part either.
entry 893 - tags: mirrors | | | 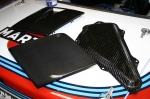 | July 30, 2011 - A number of carbon fiber parts arrived for the car.
After a few previous posts on the intake air temperature, I decided to install a NACA duct in the driver's side headlight. And that's when Jeff Lee at Slick Auto contacted us. Slick Auto makes the carbon rear finish panel sold by Flyin' Miata and does some really nice work. He offered to send a couple of prototypes of his upcoming pre-preg headlight covers. The driver's side has the largest NACA duct he could squeeze into it. Like any real carbon fiber part, they're creepy light. The stock headlight covers are the heaviest panel on the car per square inch, so there's a definite weight savings here as well. A nice functional upgrade, and thanks to Slick Auto for helping out!
The other piece is a fuel pump cover. Nic Huffman donated it to the car after checking on suitability for the rules. It's 300g (about 10.5 oz) lighter than stock. It also looks killer, especially against the bare, white parcel shelf. It's a perfect fit. Nic actually sent this out months and months ago, but I've been too busy working on other aspects of the car to install it before now. My apologies for taking so long, Nic! It's a work of art.
entry 894 - tags: carbon fiber, air intake, NACA, weight loss | | | 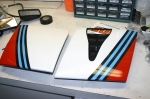 | July 31, 2011 - The headlight covers looked really good in bare carbon.
Well, on their own they did. On the car, they didn't look good because of what they did to the stripes. Besides, I don't like accentuating the pop-up lights. So out came the paint guns.
I originally was going to leave the white sections as bare cf, but that was still a bit too low-rent for my taste. So I went with something more subtle. Check out the stripe that's supposed to be dark blue. I'm pretty happy with how it turned out. The NACA duct, of course, was left bare.
entry 895 - tags: carbon fiber, Martini, weight loss, air intake | | | 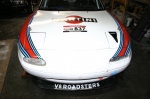 | July 31, 2011 - The headlight covers installed.
I did a pretty good job on the stripes on the passenger's side, but the ones on the driver's side don't have the right curve. I laid them out too quickly, only taking a half hour instead of the weeks it took the first time. Oh well, there are other mistakes I'd like to fix in the livery elsewhere, and I doubt anyone will really notice. Or wouldn't have, until I pointed things out. I guess I shouldn't mention how the stripes arc into the front wheel arch from the door on the driver's side, should I...
Other work on the car included an alignment. Turns out I can now get up to 3.0 degrees of negative camber on my problem corner thanks to the V8Roadsters control arms, and it can be adjusted independently of the caster. I'm currently running about 2.3 degrees, partly because that's where the driver's side came in. The rears have the potential for a lot more camber than they have, and they're really easy to adjust. So I'm going to play a bit and see what the car likes. I might have to drop that rear spring rate down a bit, but we'll see with the tires inflated properly.
Lots of little jobs on the car. After a week of concentrated work, it's time to get it back out of the garage and see how they've all added up.
entry 896 - tags: air intake, Martini, NACA, suspension | | | 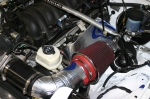 | August 2, 2011 - Tuning time.
I've been driving the car to and from work and starting to get the computer set up better and better. It's not perfect yet, but I'm learning a lot and it shouldn't take much longer to get everything dialed in.
The heat shielding on the transmission tunnel worked extremely well, making the car much more comfortable to drive. It's not as sexy looking as bare metal, but for a minimal weight gain the car is now a happier place to spend 13 hour days.
Because I had some of the stuff left over, I decided to see if it would help at all with the intake temps.
entry 897 - tags: testing, intake, heat | | | 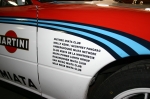 | August 3, 2011 - It's a good sign when the next item on the to-do list is stickers!
It's an important task, though. If it weren't for our supporters and sponsors, we wouldn't be able to make the trip to Newfoundland. I've been trying to find spots to put our sponsor's names and logos where they'll be visible and distinct, but still keep the car looking good. This list is of our patrons, clubs or individuals who have made a sizable contribution towards the team. Thank you, everyone.
entry 898 - tags: Sponsors | | | 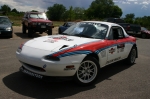 | August 3, 2011 - There's no real reason for this picture.
The car was out for a photo shoot and it just looks cool.
An update on the white wheels. It turns out that powdercoating a set of alloys like this is a bad idea. The heat of the powdercoating process affects the heat treating of the aluminum, weakening them. There are numerous discussions on various forums, but I confirmed by contacting some wheel engineers at the Tire Rack. 949Racing also warns against it.
If I was just running this car on the street, I'd probably continue to use them. But these wheels will take particular abuse in an event that does not allow for weakness or failure.
Emilio at 949Racing has been really good to deal with. He's treating me better than he has any reason to, and he's ensured that I will have full strength wheels for the race despite my blunder. I've always had a lot of respect for both his level of knowledge and the way he does business, and now I have even more. He may be a competitor of Flyin' Miata, but he's the sort of competitor that we like to have. There's a reason I'm running his parts on an FM car.
You have to admit the wheels look good in white, though. This is the set that was painted with a rattle can. These will be repainted along with the new set in proper automotive paint, the same color used on the body of the car. That should ensure it survives the brake dust while the wheels survive the Newfoundland roads. A learning process for me!
entry 899 - tags: wheels, powdercoat, oops | | | 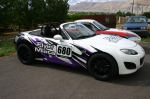 | August 3, 2011 - Nancy in full livery.
Most of the sponsor stickers are on the back half of the car, where we can get more contrast and visibility with the solid black rear instead of trying to fit in the mixed white and purple. We will have to load the car up with an undisclosed number of event stickers as well, so we're leaving room. The one sticker on the front half of the car is the Heifer International logo. They're not a sponsor of the car, but Flyin' Miata is a sponsor of theirs.
Check out the new black C3M wheels wrapped in new Dunlop Star Spec tires in a 245/45-17. Thanks to Tire Rack for donating the wheels and Dunlop for supplying tires. Why a 245 when we've been running a 255 in the past? Because Grassroots Motorsports found that size to be measurably quicker in their testing on a car very much like ours.
Both cars will spend the next two days pounding around the track, showing off their abilities to Flyin' Miata fans. It'll also serve as a good shakedown for them. Neither car is completely in Targa spec yet, but they're close.
entry 900 - tags: Nancy, tires, wheels, sponsors | | | 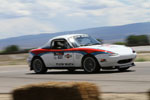 | August 10, 2011 - The FM Summer Camp is the last big event before the race.
It's a chance for us to show both Targa cars off to the very people who made it possible for us to go to the race. In the process, the cars spent two days pounding around the track giving rides. This works as a nice shakedown too!
Nancy, the 2006, did quite well. The car currently has more grip than power, but is nicely adjustable in the corners if you carry some speed in. It's got a good tossable balance. The flat torque curve isn't super-exciting, but it does get the job done nicely.
The Targa car is under-tired on the 140 treadwear Toyo R1Rs. It is quite likely they were overheating with the frequent 6-minute sessions and very hot temperatures, as they did feel best on the initial lap. I played around with pressures to see if I could improve things, but overall the car was just not as well connected to the ground as I'd like. The biggest complaint is the turn-in softness, which was really brought into sharp focus when I jumped into the other V8 car with Nitto NT-01 R-compounds. So, given that I wasn't going to set any lap records, I spent the day provoking the car to see how it would behave under duress. I was putting wheels on berms, braking with the car unbalanced and generally trying to make it misbehave. And the car was being the usual excellent platform and just letting me do whatever I wanted.
The car has a bit too much oversteer. This is partly because I was fooling and using wheelspin to rotate the car, but also because the rear spring rates are currently too high at 450 lbs. I have a set of 400 lb springs on my desk at work, and they're going in the car today. That will let me run a rear sway bar, which gives me a few more options for tuning the car's handling. At the moment, I can choose between just a bit of oversteer and way too much oversteer!
The car wasn't perfect. It ended the first day running on 7 cylinders. It's done this before, and last time I fixed it by reseating the plug wire. This time, it simply looked like weak spark. I suspect the coils on the car are from the 2002 Firebird that donated the heads, so I picked up a new coil for the dead cylinder and dropped it in. Voila, problem solved.
Near the end of the second day, I felt a clunk from the front and my steering wheel changed position. One of the new alignment cams had shifted under hard cornering and braking. The change in camber had also changed the front toe, thus the cockeyed steering wheel. I should have seen this coming - the cam is in the new control arm, which is covered in nice slippery new powdercoat. That's easy to fix and to avoid in the future, and exactly the reason why I test like this. I tried a couple of times to eyeball it back into the appropriate position, but couldn't quite get it right. So I called it a day and parked the car.
Overall, a good weekend. As a shakedown, it worked very well. It's a shame the Targa Miata ended the day parked in the trailer early amidst rumors of breakages, but it was nothing serious so there's no harm done.
Now we're about 3 weeks away from departure, and I still have a big list of things that need to be done. It's time to get cracking.
entry 901 - tags: testing, suspension, Nancy, handling | | |  | August 10, 2011 - Gratuitous track shot.
This angle reminds me of another. But dustier.
Photo by Benjamin Padolsky
entry 902 - tags: testing | | | 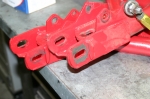 | August 10, 2011 - Time for some work on the car.
I put it up on the lift yesterday and came up with a good to-do list. One of those items was to deal with the slipping alignment cams. The red powdercoat on the new arms - and on the subframe as well - was part of the problem, so I took it off. I also used a file to roughen the back of the washers on the cams and tried to avoid getting any lubricant on them. Between that and some good strong torque, things should be good in the future. But we'll mark the cam locations once the car has been through final setup before the race.
I also swapped in my 400 lb rear springs. I'm looking forward to how it will feel.
entry 903 - tags: alignment, suspension | | | 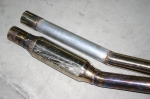 | August 10, 2011 - One of the biggest concerns with the car is ground clearance.
I'm running a higher ride height and stiffer springs than before (the race setup last time was 375/300, this year is 550/400) which will help, but the V8 exhaust system does hang down more than the four-cylinder setup did. One of my solutions is to delete the resonators. It's a bit of a shame as I really don't want to make this car any louder inside, but they're the lowest point of the car and this gives me a significant improvement in clearance. As you can see, I've already damaged one!
The catalytic converters have a similar problem, but they're required by the regulations. The good thing is that they're a metallic core, so they won't shatter on impact like a typical ceramic setup. Still, I'm doing what I can to tuck them up a bit and protect them.
Between front and rear suspension work as well as this exhaust modification, there were bits and pieces all over the shop today!
entry 904 - tags: exhaust, ground clearance | | | 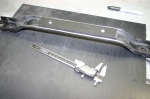 | August 10, 2011 - One of the ways I'll be dealing with the rough roads was picked up from the Stillen team in 2009.
I'm using UHMW (ultra high molecular weight) plastic pieces as sliders. If the car does ground out, it'll take the brunt of the hit instead of abrading metal. Here, I've put a piece in the middle of a stock cross brace that I'll later weld to the rear subframe bracing. It'll not only protect the exhaust and differential, but will stiffen the rear control arm mounting points. Everybody wins!
entry 905 - tags: UHMW, skid plates, undercar protection | | | 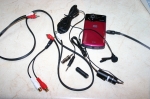 | August 13, 2011 - I finally have everything I need for the in-car video system.
It's taken a long time to get to this point! In 2008, I had an old Canon camera that recorded on to DV tapes. It took pretty good video when it was working. But I did lose the video from a few stages as it started to inexorably zoom in and eventually lose focus. The other problem was the soundtrack - it was ambient noise only, and you simply couldn't hear Janel unless it was a relatively slow stage.
This year, I've got the new intercom with an audio out. That'll feed in to one channel on the camera. An in-car microphone will feed in to the other side, so we'll have the choice of playing the ambient noise, Janel's instructions or both blended together. This means a collection of adapters. I managed to find the only Radio Shack employee left in the world who knows his way around the stacks of bits and pieces in the back instead of just trying to sell me a cellphone, and he provided the last couple of parts I needed to adapt the microphone output to my various patch cables.
The camera itself is a Kodak Zi8. It's a "Flip style" camera, with the added bonus of being able to record to SD cards. I can also power it off the car's power, so this means we never run out of recording time due to space or battery. Excellent. It's got an audio input, which is pretty unusual in this type of camera. And I've even seen in-car video footage from a rally car, proving that it gives a good picture and does everything it's supposed to. Woohoo! The real test will come in a couple of weeks when I return to the track for the last time, but so far so good.
entry 906 - tags: video | | | 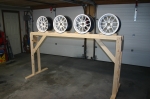 | August 14, 2011 - I have lots of important work to do on the car, but I'm back to painting wheels again.
It would have been a lot easier if I'd just stuck with an off-the-shelf color, but the car looks much better with white. Besides, it's easier to inspect the wheels for damage this way!
So, after trying rattlecan paint from the auto parts store and powdercoating, I'm back to doing things right. That means real automotive paint and clearcoat. First, I had to clean the set of rattlebombed wheels of all the brake dust, rubber and debris from several track days. Simple Green, scotchbrite pads and a session in the bead blaster followed by a wipe-down with wax remover and they're ready to shoot.
I spent 45 minutes building this wheel rack out of a half-dozen 2x4s. It might seem like overkill, but it means I have the wheels at eye level so they'll be much easier to paint. Plus I can do both sides at the same time and, since they're supported by the barrel I don't have to worry about the paint on the rims getting damaged. Well worth the $12 investment in materials. I'll do this set of wheels first, then follow up with the second set later.
Tomorrow I'll be back to work on the car itself!
entry 907 - tags: wheels, paint | | |  | August 14, 2011 - Emilio from 949Racing is very concerned about sub-standard wheels getting out.
Because my powdercoated wheels were weakened, he asked me to render them unusable so there's no chance they'd end up on a car. I respect that. He suggested a 1/2" hole drilled in the barrel as well as a nice dent on the rim so nobody would be tempted to put them back in service, along with ensuring they went straight to the metal recycler. I had a different plan.
Just how strong are a set of good wheels? I've seen reviews of aftermarket wheels in a German magazine that included destructive testing, so I figured I'd take the opportunity for a bit of non-instrumented destructive testing myself. Besides, it's a lot more fun to use a sledgehammer than a drill. It's much harder to wreak this level of destruction on a set of 6ULs than you'd expect, even those with a heat treating problem. They're tough. We were all surprised at how hard we had to hit the lip in order to dent it, and knocking the center out requires quite a bit of determination. Emilio, it's fair to say these aren't going to get rescued.
For those who want more details on the actual problem: as part of the T6 heat-treating process, these wheels are aged at 350F for about 18 hours. Powdercoating takes the wheels up to 400F for 30 minutes, which can "over-age" the alloy and make it more brittle. I've heard - first-hand - of a German NC owner that had the stock wheels powdercoated and they cracked on him.
There actually is a 15x8 on the market that comes in white: the new Konig Wide Open. The weight is about the same as the 949Racing 6UL as well. I chose the 6UL over the Konig because of a proven track record - the 6UL is a well-known wheel that should take the abuse of the Targa, and Emilio stands behind his products. It's meant a lot of extra work on my part to make them white, but I think it's worth it.
entry 908 - tags: wheels | | | 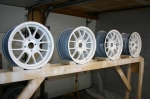 | August 15, 2011 - Now that's how you're supposed to finish wheels.
Four coats of 1990-93 Miata white - which is actually almost pure white paint - finished with three coats of clearcoat. A nice smooth, hard finish that looks good and should shrug off brake dust. The special rack worked perfectly, making it easy for me to lay down a good coat without having to gyrate around. With the wheels at eye level, I could easily see how well the coverage was going down. Excellent.
entry 909 - tags: wheels | | |  | August 17, 2011 - Time for some impact protection.
The car has a few vulnerable areas such as the now-removed resonators. The metallic cats are also a potential problem spot, and they are required. I've actually grounded them out already doing some testing to discover exactly this sort of problem. So I welded a piece of 1x2" tube to the bottom of the frame rails and bolted a 1/2" piece of UHMW plastic to that. This means the slippery plastic will hit the ground just before the cats do, and avoid any damage. I also made a couple of extra skids just in case.
Yes, it will be a potential problem if the road is uneven. But that's something I'll have to keep in mind. Just like driving off-road, high spots should be run under the wheels instead of straddled.
After the picture was taken, it was all painted flat black.
entry 910 - tags: skid plates | | |  | August 17, 2011 - I also want to protect the oil pan.
It's welded aluminum instead of cast, so it's more likely to dent than to crack if I hit it. Still, there's no benefit to beating up the pan so I've put together this critter.
Made of 3/16" (I think) aluminum, it was an opportunity to practice my aluminum welding. I don't do this very often, but it usually comes back pretty quickly.
entry 911 - tags: skid plates | | |
|

 THE DIARY