| MIATA BUILD |
|
|
 | |  | July 12, 2011 - The original hood prop wouldn't fit the engine bay anymore.
But I have one of the old Flyin' Miata shock tower braces in my "stuff for the Targa Miata" pile, and we used to offer a hood prop that mounted to those. So I installed it. Voila, problem solved! And an increase in front end rigidity, too. There are some who don't think a shock tower brace does anything on a Miata, but you can see the distance between the towers change as you lift the car up! That's even true on my caged, seam-welded car. Regardless, even if it didn't do anything, it does make an excellent hood prop mount.
entry 873 - tags: stiffening | | | 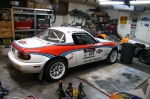 | July 13, 2011 - Check out the race wheels!
It's a pretty cool looking car with the crazy Toyo R1-R tread pattern and the white wheels. The ride height is set fairly tall as well, to give me room to deal with the roads. Right now, it's at 13.5" front and 14" rear. Current spring rates are 550 front and 450 rear. That's a fairly high rear spring rate, but this car has always needed more rear spring than usual for some reason. It could be the way it gets used! Normally, I'd use a 375 or so to match those fronts. There's a V8 customer car at FM with that exact setup and it's a sweetheart.
On the road, the suspension feels pretty good. The car hasn't been aligned since the ride height increase and a changed lower control arm, so I've not gone far. But it does seem to have the right suppleness I need. One thing I've learned about the AFCOs since the 2008 race is that they love stiff springs. It's almost as if they ride better with the heavy springs than they do with the light ones as you move into the higher damping settings. I'm looking forward to running this car at speed.
I've also moved it to my home garage for a while. I find it easier to work on the car at home instead of staying late at work. That's the theory, anyhow. I've got a good list of jobs to do on the car. Little stuff, but it still needs to be done and it all adds up.
Driving the Targa Miata and the LS1-powered MGB back to back also illustrates that I need to spend more time tuning the Miata's engine. It doesn't feel anywhere near as strong as that MG does, despite a similar weight on the two cars.
entry 874 - tags: suspension, wheels, tires | | | 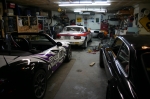 | July 16, 2011 - How's this for a cool garage?
The two Targa cars, the Seven and the LS1-powered MGB. My garage currently has a very high power/weight ratio.
entry 875 - tags: cool cars | | |  | July 16, 2011 - Can you fit a 225/45-15 tire in the trunk of a Miata?
Yes, with the help of a big enough hammer. While I am allowed to carry a space-saver (and I might), I realized that if we did have to change a tire I'd have no place to put it. Since the trunklid is held on by pins, leaving the trunk partly open wasn't really an option. So I stopped for hammer time.
entry 876 - tags: spare | | | 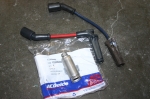 | July 17, 2011 - When I first got the car running, I was short of time and didn't have a set of GM plug wires.
So I picked up a set from NAPA that were designed for the engine. No problem there, except for the fact that a couple of the wires were in contact with the headers. As you can see on the blue wire, that's not good. I first came across this at the track day at High Plains, and worked around it with some ziptie guy wires. But something needed to be done.
The factory wires I picked up are a better option in two ways. First, they have this nice 90 degree bend so they're tucked in close to the block. Second, I also picked up the metal heat shields that come on these engines from the factory. The NAPA wires can also accept the shields. Between the bend and the shields, they fit much better than before.
Interestingly, a crate LS3 engine comes with the heat yields but has a straight wire. Go figure.
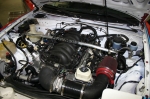
entry 877 - tags: plug wires | | | 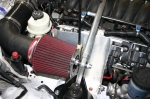 | July 17, 2011 - One problem the car has is very high intake air temperatures.
I've looked at various ways to try and pull cool air into the intake, but most of them involve more surgery than I want to do right now. There's a lot to do before Targa and not much time! So I decided to do the best I could with what I have.
Step one was this heat shield. It isolates the filter from the headers, hopefully cutting down the heat transfer a bit. It actually has a bit of history to is, it was part of my transmission tunnel cover on the Seven when I first built the car. It does cut the filter off from the hot headers pretty nicely.
entry 878 - tags: heat, intake | | | 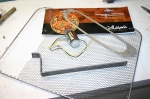 | July 17, 2011 - Now that the heat shield is in place, I need to find a way to get cold(er) air in to that area of the engine bay.
The classic way to do that on a Miata is through the turn indicator opening. I've been collecting parts to make something like this for a while, and here's what I used: an LED light for a motorcycle, a multiple-purpose grill topper, a piece of 3/4" steel strap and a stainless plate in the shape of a Miata turn indicator.
entry 879 - tags: tsi, intake, heat | | |  | July 17, 2011 - The final product.
The light is quite visible when lit, but hidden when off. I drilled some holes in the 3/4" strap to allow a bit more air through, and the mesh is simply folded around the stainless steel plate. It only took a few minutes to put together. You can buy a setup that looks a lot like this from KG Works for an eye-watering amount of money, but this should work just as nicely. In previous testing, I've seen similar setups drop intake temperatures significantly. We'll see how it does here.
I only did one side until I determine how it works. I may or may not do the other.
entry 880 - tags: tsi, heat, intake | | | 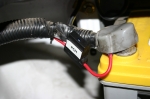 | July 19, 2011 - Lots of little jobs on the car.
One of them is running a constant power supply to the engine computer. I have a kill switch that I use to cut all power to the car when it's sitting, partly to make it easier to work on and partly to ensure no current draw. Well, the GM computer forgets how to make the engine idle every time it loses power, leading to a cranky engine on restart. So I've run a single wire from the battery to the computer in order to keep its memory. It's a very small draw, not enough to tickle the big Optima battery.
I also spent some time tuning the car this morning. Or more accurately, I spent some time learning the ins and outs of the tuning techniques. I'll make some changes to the computer program tonight. Overall, the car's pretty happy and I've been underestimating the amount of power on tap. I think the very well developed chassis is handling the power so well that it's disguising just how potent the car is.
The intake temperatures were better, but still could be lower. I tried popping one headlight up by a few inches and the temperatures dropped significantly at speed - down to maybe 10F over ambient. So it looks as if a bit more ducting would be beneficial.
entry 881 - tags: wiring, tuning | | | 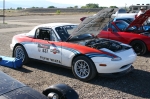 | July 24, 2011 - Track day test!
The car isn't quite in the final Targa spec, but it's pretty close. Specifically, this is the first time I've taken it on track on the Toyo R1R tires. I was also interested in the effect of the springs. The engine is healthy but not fully tuned up yet.
The current spring setup: 550 front and 450 rear. I'm homing in on my desired rates, using what I have for testing before I order in a set that's a different rate. The rears are the question here, that's a lot of rear rate for those front springs. I may end up running a 375 or 400 back there. But this car has always preferred more rear spring rate than other Miatas. The alignment was also low on front camber, and the solution for that is back at Flyin' Miata. It'll be installed on Tuesday. Still, some testing is better than none!
On the first session, the car was very, very loose. All over the place. I pulled in to check the rear sway bar after about 2 laps and discovered I'd left it on the stiffest setting. Oops. So I removed it and headed out again.
Better. The balance of the car was improved on the long sweeper. It was pretty obvious that the tires were having a real problem putting the power down, and I could easily light them up coming out of corners. Overall, I found I had a little bit of turn-in understeer followed by as much oversteer as I ordered. Coming in under braking, the car was also moving the back end around nicely. But that corner exit oversteer was pretty wild.
Now, this track is tighter than any stage on the event, and trying to transfer all that power in second gear coming off a tight corner is asking a lot. I spent some time working on just how much power I could lay down, and it's easy to modulate. But I do need to try and get a bit more traction. It's possible that the high ambient temperatures and very hot track surface were overheating the tires, and I'm going to have to go back and play with tire pressures once I've got the last couple of pieces in place.
On a couple of sessions, I did rather forget myself and left quite a bit of rubber on the track. I won't be able to drive like that through the race or I'll have no tires left after three days! Still, it's good to know that the car is just as forgiving and easy to toss around as before. The suspension feels good over the road at low and high speed and deals well with berms on the track. I was able to control the oversteer well - when I hung the tail out, I could easily keep it there and just modulate the slide. So the platform is pretty good. Still, I'll try it again with some small changes to alignment and spring rates and play with pressures a bit more.
Janel did come out for a few laps. From the navigator's seat, she asked why the tires felt so squishy - there's definitely more of a slip angle on these R1Rs than there was on the RA1. After she'd been behind the wheel, she felt a lot more comfortable with the car's behavior and she trusts it again. She hasn't been in the car since driving it at Laguna Seca last April, and she just wanted reassurance that she could put her faith in it as she had before.
Other than the tires, the car did pretty well. It was very hot inside, so I'm going to spend a bit more time on heat shielding. Granted, it was 100F outside as well so hot was to be expected. No cooling problems at all, unlike some of the other cars there. I'm still sorting out the brakes, the rears don't seem to be working fully although braking into corners had the rear dancing. Based on the amount of brake dust accumulating on the wheels, the fronts are doing all the work. I'll start working on that this week.
entry 882 - tags: testing, suspension | | | 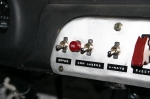 | July 25, 2011 - Lots of little work on the car.
This oil light, for example. It's bigger and brighter than the old one, which didn't survive the disassembly process. The Revlight has been recalibrated for the new engine's redline. There's a power jack mounted in the car now so I can easily plug in things like laptops and phone chargers should the need arise. I'm working my way through a long list of things to do.
I did find out that my tire pressures were too high on the weekend. It turns out the R1R really doesn't need much pressure, and a number of people suggested dropping them to around 27 psi cold or so. I had them at 31 based on some feedback from an autocrossing friend, but his narrower tires may have been a factor. Regardless, I'll be back at the track doing some pressure testing in the next little while.
entry 883 - tags: tires, instruments, ergonomics | | | 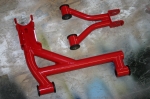 | July 25, 2011 - Time for some camber.
With the current ride height, it's hard to get much negative camber in the suspension. Almost none in one corner, actually. I've tried a couple of different control arms, but it was time for more dramatic measures. V8Roadsters stepped up with a half set of their tubular control arms: a pair of front lowers and rear uppers. These particular arms have an extra camber adjuster built in, allowing me to cant the wheels in as much as I like. One really cool thing about them (other than the bright red color, of course) is that the new camber adjustment is independent of toe and caster. The front toe is affected a bit, but that's easy to adjust. So I'll be able to play with my setup in pit lane without having to worry about interrelated settings.
The only downside? I used to tie the car down via a big hole in the front lower control arms before. I can't do that anymore!
entry 884 - tags: alignment, suspension, control arms | | | 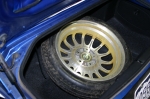 | July 27, 2011 - Work is continuing on both team cars.
When we first looked at Nancy, the 2006 Grand Touring car, we thought there wouldn't be much to do. But there are a raft of details: mount the safety triangles, first aid kit, fire extinguisher, intercom, Terratrip and seats for example. Brandon, the crew chief for the team, has been combing through the regulations to make sure we have an easy time at scrutineering.
We also had to find a spare tire for the car. The 2006 and later Miatas come with a patch-and-inflate setup, which is fine for street cars but not so good for competition. You can buy an expensive spare tire setup from Mazda, or you can find one of the spares from a 1993-95 RX7. They're a sexy little alloy and are actually popular with the RX7 drag racing crowd as front wheels. A quick work with a bracket and it's ready to go.
On the Targa Miata, work continues. More details later!
entry 885 - tags: Nancy, spare | | |  | July 27, 2011 - There's a bit of tolerance in both bushings and in the car.
The bushings are made to within approximately 0.010". The polyurethane is also made slightly oversize in order to provide some extra longevity as the material wears. But for a race car designed to deal with rough surfaces, I needed the smoothest operation possible. So I measured each bracket on the car and shaved down the bushing to match. It was actually fairly surprising how much difference there was between the different factory brackets on the car.
It didn't take much, but it made the difference between a set of control arms that moved easily versus some with a bit of stiction. I'll pay for it down the road when the bushings wear prematurely, but that's acceptable.
entry 886 - tags: suspension | | | 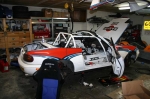 | July 29, 2011 - One of the fun parts about race cars is how quickly they come apart.
It doesn't take much to make them look pretty comprehensively disassembled. Today was a day to do a lot of general fixes to the car, as it's going to be taking a lot of people for rides during the Flyin' Miata Summer Camp starting in less than a week.
The roof is off and the seats are out so I can put some extra bracing in to the back of the seats. While those are out, I have a number of small other jobs to do. For example, Janel's sub belt was a few inches too long, and that can only be adjusted with the seat out.
entry 887 - tags: interior | | | 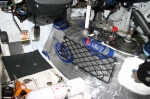 | July 29, 2011 - Here's some of the other work done today.
I covered the transmission tunnel with Thermo-tec "Cool-it". This may not be necessary for Newfoundland, but as I found last week the tunnel gets very hot on the track in 100F temperatures. It'll make the car more comfortable.
I also put new grip tape under the pedals. I used skateboard tape, as it's both much less expensive and much more effective than the stuff you buy at Home Depot. It's about $2.50 a square foot! There's a new pedal extension on the gas pedal. The previous MOMO pedal cover was too wide for the new transmission tunnel. Not quite visible in this picture is a horn button - when I switched to the removable wheel, I lost my previous setup.
entry 888 - tags: ergonomics, heat shielding, pedals | | | 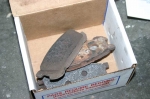 | July 29, 2011 - The car's been showing signs of weaker rear braking of late, so I figured it was time to try some new pads.
And just in time - Carbotech says these pads can be used down to 3.9mm, and I'm at about 5. We'll see how the new ones do. The car's a lot harder on brakes than it used to be for some reason.
entry 889 - tags: brakes | | |  | July 29, 2011 - The second set of wheels are here.
This set was powdercoated, compared to the paint I used last time. The wheel in the foreground is one of the painted ones, and after that track day last weekend I could not get the brake dust off. So the paint experiment was a failure then. I've used the same Duplicolor wheel paint with great success in the past, but there were two things different this time. First, I didn't clearcoat it. And second, I've only used black before. The powdercoated wheels look great, so that's what I'll do with the first set when it comes time to change tires.
entry 890 - tags: wheels | | | 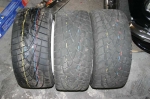 | July 29, 2011 - I've been reading up on the Toyo R1R tire a bit.
Apparently the reason they were so greasy last week was that I had the pressure too high. They like surprisingly low pressures. I started at 31 cold last week, but next time I'll drop it down to 27 and work from there. It's a bit of a challenge trying to anticipate how much the tire pressures will rise over the course of a stage versus a 5 minute track test, but it'll give me somewhere to start.
It's interesting looking at the different wear on the front and rear tires (middle and right positions in the photo). The front is showing some scalloping while the rears just look overheated. This particular set is being abused heavily so I can determine how these tires work and last.
entry 891 - tags: tires | | | 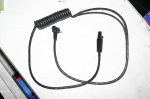 | July 30, 2011 - I've been waiting for this for a while.
It's a cable that will let me plug an iPod or iPhone into the Peltor FMT120 intercom. This cable isn't available in North America, despite the fact that all the resellers of the FMT120 use the same product description that includes this feature. This says something about the size of the Peltor rally intercom market in North America, I suspect. I had to bring this cable in from Demon Tweaks in the UK, which wasn't cheap.
Still, it'll let Janel and I make phone calls using the intercom as well as listen to music on long transits. If you look at the cable as a stereo system, it was a pretty good deal! Less than an iPod interface for our BMW, for example.
Since this thing can't be obtained at reasonable cost in North America, I'm going to reverse-engineer it so anyone can duplicate it - just as I did with the transit headsets a while back.
I've identified the plug that goes into the intercom as a 5-pin mini XLR, aka a Switchcraft TA5FL. Prices vary online, but Rugged Radios has them for under $6. The other end of the cable is the usual 1/8" 4-pole iPhone/iPod connector. The easy way to start would be with an iPhone cable for something else such as a $12 "microphone extension cable" and just replace the plug at the other end. You could also hook up another kind of phone if you know the wiring of the phone connection.
The Apple end works as such: the tip is the left audio out. The first ring is the right audio out, the second ring is the common/ground and the base ring is the microphone. On the Peltor end, the pins are numbered 1-5.
Pin 1: ground (second ring on Apple plug)
Pin 2: ground (second ring on Apple plug)
Pin 3: audio from phone (tip and first ring on Apple plug)
Pin 4: microphone (base on Apple plug)
Pin 5: microphone (base on Apple plug)
Happy soldering!
entry 892 - tags: peltor, intercom | | |
|

 THE DIARY