| MIATA BUILD |
|
|
 | |
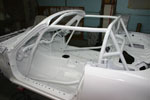 | February 19, 2007 - While looking at the pictures of the painting, I realized I hadn't put up any shots of the overall car with the final coat.
It's a very white car. I have a few factory "Crystal White" body parts to compare it with and this one is much brighter. Are the old (repainted) parts the wrong color, or did the paint shop give me something a little extra spicy? It's supposed to be the standard color.
There's one good way to tell - I have a factory white 1991 hardtop that's in as-new condition. I'll have to see how it matches the car.
entry 66 - tags: paint |
| |
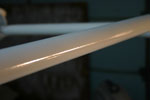 | February 19, 2007 - The best paint finish on the car is on the roll bar.
This is probably because I had my little detail gun set up better than the larger panel gun at first, so the tight areas got a better primer coat. Or it could be a reflection of how much time I spent on each section! Regardless of my talk earlier, the paint on the fenders isn't all that much worse than some other paint jobs that I've paid for.
For those who are wondering, the materials for the paint job came out to about $230. This includes a gallon of reducer (which is, umm, untouched), solvent for cleanup (lots left), the mask (read up on isocyanates to freak yourself out), lint-free towels, 2 quarts of paint (half gone) along with hardener and a quart of primer (all gone) with its hardener. I think that's about it. The guns were a couple of inexpensive Harbor Freight units that had received good reviews. The compressor was a 60 gallon 3.2hp Porter Cable that can move about 14 scfm at 40 psi and is completely unfazed by the amount of air used for the painting.
entry 67 - tags: paint |
| |
 | February 19, 2007 - If you paint with HVLP, this is the overspray you can expect.
That's from the engine bay and I think it's mostly primer from when I was trying to figure out how to lay the stuff down. I used the engine bay as my primary practice area.
entry 68 - tags: paint |
| |
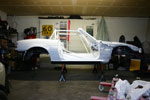 | February 19, 2007 - The car is back in the "assembly bay" (ie, the back of the garage) and is ready to start going back together.
It's going to be a bit of a shame bolting old parts onto the blinding white chassis (I did mention it was white, right?) but we're not doing a full Pebble Beach restoration here. If there's dust on top of the fuel tank, so be it.
entry 69 |
| |
 | February 20, 2007 - Time for assembly!
I started by installing the brake and fuel lines. A big reason for this is because they're a really big pile of tubes and I've been tripping over them for months. Time to get them out of the way! The gas tank is also installed.
The fact that someone else stripped the car down might make things a little difficult, although the biggest problem so far has been dealing with lines that were bent while off the car.
This is the sort of work that's really fun, because you see the car coming together in a big hurry. It's also where I can get sucked into what I'm doing and accidentally work until the wee small hours of the morning.
entry 70 - tags: brakes |
| |
 | February 20, 2007 - Assembly continues.
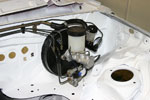
And here's where things start to get interesting. The brake booster and master cylinder are from a Miata with the larger "Sport" brakes. They should give a firmer pedal and are well suited to our big brake setup. The proportioning valve is obviously mounted in a different place on our 1995 as opposed to the 2005 that donated the master so we'll have to deal with that. Actually, it's not a proportioning valve at all as this particular car used the ABS instead. This sort of interchange is fun.
We'll have our own cockpit-adjustable proportioning valve which will involve bending and running some new brake lines anyhow.
entry 71 - tags: interchange, brakes |
| |
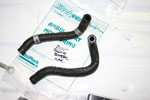 | February 20, 2007 - Another bit of interchange information - one we weren't expecting.
It turns out that when the brake booster was changed in 2001, so was the vacuum nipple. And possibly the location of the brake fluid reservoir. So there are two different shapes of hose to join the hard vacuum line that runs across the firewall (visible in the previous picture) to the booster. It's possible to make the early one (top) fit, but the later one is much happier and gives more clearance.
Upon inspection, it appears the new design has less restriction in the hard pipe going into the booster. It's not drastic, but the Mazda engineers felt it was important.
entry 72 - tags: interchange, brakes |
| |
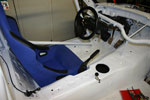
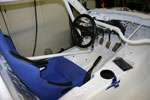 | February 20, 2007 - Time to test-fit the cockpit!
The seat isn't the FX1 Pro that we'll be using, but an older Forza. But it lets us try things out while we wait. The pedals are the ones that were on our chassis originally, and have big MOMO pads on them. The one on the clutch pedal is in the way if I want to use a dead pedal, but the gas and brake ones should come in handy for heel-toe. The doodad taped to the transmission tunnel is the proportioning valve, as I'm trying to find a good place put it where it's out of the way, easy to plumb and accessible from the driver's seat.
entry 73 - tags: seats, ergonomics, brakes |
| |
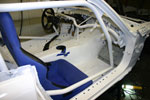 | February 20, 2007 - The co-driver's cell.
A panel from a 1991 Miata should fit in to give a nice solid foot rest. The seat is jammed in place pretty nicely - it's possible we'll have to do a little trimming. The passenger's side is slightly narrower than the driver's side, and the door bar ended up a touch more inboard than for the driver.
entry 74 - tags: ergonomics, seats |
| |
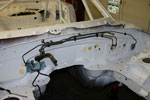
 | February 20, 2007 - The fuel and brake lines in place.
They're well protected by the armored frame rail. The lowest of these lines is the rear brake line - it will be rerouted along the top of the transmission tunnel for the proportioning valve.
entry 75 - tags: brakes, stiffness |
| |
 | February 20, 2007 - The part that nobody looks forward to.
Before assembly carries on much further, I have to install the wiring. I also have to trim it down so we don't bother carrying around the extra weight of stereo and electric window wiring.
entry 76 - tags: wiring, weight loss |
| |
 | February 21, 2007 - A few more things are bolted on.
The front subframe (from a 2003) and steering rack are in, along with the headlights and some of the mechanism for the wipers. It would be really nice to drop some weight off those headlights as they're really beefy. I think the steel covers for the lights are the heaviest body panels in the whole car! Maybe later.
entry 77 - tags: weight loss, interchange |
| |
 | February 21, 2007 - Another interchange discovery.
The power steering reservoir from the 2003 sits in a different place than the 1994, and interferes with the headlight. Not a problem, I'll grab a 1994 reservoir tomorrow.
There's some irony in this. Our car was originally an R package. One of the defining features of the R was the manual steering, and we're installing power. There's no way I'm driving the Targa with manual steering. The later steering rack that we're using is a better setup anyhow with a much more solid mount.
entry 78 - tags: interchange |
| |
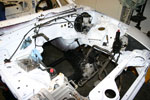
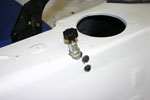
 | February 22, 2007 - The current state of the cockpit.
I'm spending a lot of time poking and prodding at ergonomics right right now. Why? Because it's easiest to change things at this point, although I really won't know for sure until the real seats get here. But really, it's fun.
Note the gas cap release in the usual place. It weighs next to nothing and means I don't have to figure out a way to make it work otherwise. The factory dead pedal is in place and the MOMO pad has been taken off the clutch pedal. The one on the gas pedal might get shifted over a bit, it's a bit close.
entry 79 - tags: ergonomics |
| |
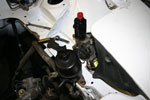
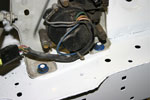
 | February 22, 2007 - The final positioning of the brake proportioning valve.
I can't take credit for this, Josh Castaldi emailed me with pictures of his own setup. I'll have to buy some touch-up paint due to a bit of paint damage, but it's very well placed to be out of the way and easily accessible. The brake lines stay in the transmission tunnel and a minimum of alteration is required. Very nice!
entry 80 - tags: ergonomics, brakes |
| |
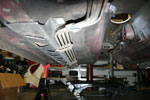
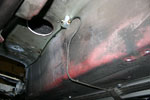 | February 25, 2007 - The rear brake plumbing from under the car.
A new line was run from the master cylinder to the valve, then the stock line was cut, reshaped and reflared to meet up with the back of the valve. The rear line still needs some work to anchor it down, but I'm pretty happy with how it turned out.
entry 81 - tags: brakes |
| |
 | February 25, 2007 - The 6' (180 cm) length of new line wasn't long enough to reach from the valve to the master cylinder, and it's quite difficult to find brake line on a roll in this town.
So a short extension was used. Just to keep things interesting, the female fitting is from an old Land Rover. I had to use at least one part from that car!
entry 82 - tags: brakes, interchange |
| |
 | February 25, 2007 - It doesn't take much to keep me entertained.
Since I'm scavenging parts from a variety of cars, I have fasteners with a bunch of different colors of paint. Why not use them for some nice little accents? These nuts originally held the hood on a Mariner Blue Miata, but they look really good attaching our headlight mechanisms to the car!
entry 83 |
| |
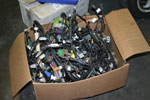
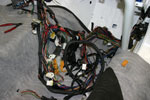 | February 25, 2007 - I swore I wasn't going to do this.
But it bugs me to know of all the airbag wiring in the car, and when I came across the rear window defroster and the power antenna connectors I just couldn't help myself. It's sticky work with miles of masking tape involved, but it's also really good to know that a number of useless wires are gone. That not only lightens the car, but makes troubleshooting easier.
The airbag harness is the thick section that's still wrapped up in black loom. It's all out of the car now, and the only other system that is affected is the horn. That's easy to put back.
entry 84 - tags: wiring, weight loss |
| |
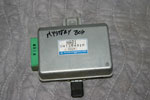 | February 25, 2007 - Mystery box.
I've commented before on the importance of labeling everything as you work on a car.
Edit: Aha! It's the cruise control brain!
entry 85 - tags: wiring, tips |
| |

 THE DIARY