| MIATA BUILD |
|
|
 | | 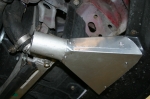 | June 6, 2012 - In order to provide a good supply of cold air for the brakes, I built a couple of ducts to mate up to the front air dam.
It was a fairly easy job using some thin sheet aluminum, a piece of 2" exhaust pipe and some rivets. A bit of foil tape took care of sealing inside. Aircraft SCAT hose took care of the air transfer duties.
How well does it all work? Difficult to say. Laguna Seca was too wet to put any real heat into the brakes, and the car was parked once the weather cleared up.
entry 1043 - tags: brakes | | |  | June 15, 2012 - Check it out - the Racing The Rock poster!
It's going to print shortly. The website for the "minor motion picture" is also starting to take shape at RacingTheRock.com.
Adam's been putting a huge amount of time - and no small amount of money - into this project. I'm really looking forward to seeing the final result. The premiere at the FM Summer Camp will be quite an experience!
entry 1044 - tags: poster, video | | | 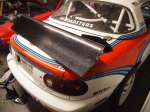 | July 11, 2012 - A new toy showed up.
I've been thinking about doing some more aero investigation. There are a number of things that could be addressed, such as a smoother underbody. I've already made a few steps in that direction of course. But I've also been toying with the idea of a wing. There's no question that they work.
I've been working with a metal fabricator around the idea of building my own wing from scratch. I also have an HPM wing that was previously used in World Challenge racing. But there's a particular option that's available right now that kept drawing me back.
Back when NASCAR introduced the Car of Tomorrow, the cars had a wing on the back. This was fine (well, not according to the traditionalists, but let's ignore them) until it was discovered that they'd generate lift when the cars starting going backwards at high speed, which is something that NASCARs do. So all the Car of Tomorrow wings were torn off and replaced with spoilers. Where did they go? Where old race parts go, into the used market. You can buy a nicely designed carbon fiber wing with interchangeable end plates for under $500. New, they were over $3000.
It's a big boy. Not something for a car that's low on power. But it should be fairly effective. The biggest challenge is going to be figuring out how to mount it - the hood pins on the trunk are in just the wrong place. But I'll think of something. I've got a few ideas. I'm also going to do some research to figure out where the best place to put it will be.
The wing investigation won't happen right away, though. The Flyin' Miata Summer Camp is coming up in three weeks, and I'm going to revert the car back to Targa specification for the Racing The Rock premiere. I also have three days to give joy rides at the local track, that should help burn up the R1R tires! Once that's all done, I'll go back to track spec.
entry 1045 - tags: aero, wing, summer camp | | | 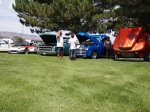 | July 19, 2012 - I took the car to a local car show on Saturday to see if I could drum up a bit of interest in the upcoming premiere for Racing The Rock.
Hint - it's on August 3rd at the Avalon Theater in Grand Junction. Anyhow, it wasn't much of a success. I had the only imported car there. Well, technically the new Camaros being shown off by the dealer are imported from Canada, but don't try to tell anyone that.
Still, it was a nice day to spend hanging out in the grass, and there was a guy there with a very cool home-built off-road buggy that I spent some time examining.
entry 1046 - tags: show | | |  | July 19, 2012 - Suspension time!
In preparation for the upcoming Flyin' Miata Summer Camp, I pulled the track springs off and installed the Targa setup. During the event, I'm going to spend three days giving rides on the local track. I've decided to fit the R1R tires to the car for this, mostly because I have a stack of 10 of them left over from the race and development and I don't want to burn up my track tires doing joy rides! There's not much point in loading up those poor R1R tires with a full track suspension and I figured people might enjoy feeling how the car was set up for the rally. I'll be using the same ride height as well, although I've changed the sway bar settings to give me a handling balance that's more suitable to the tight little track.
After the summer camp, it'll be mutation time. I've been thinking about how to mount the wing and I think I have a really good setup figured out.
entry 1047 - tags: suspension | | | 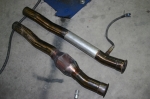 | July 20, 2012 - I've had enough with hot transmission tunnels.
The exhaust heat was actually enough to melt the heat shielding on the tunnel. So I decided to delete the catalytic converters. They're the source of most of the concentrated heat right beside our legs.
Now, it says in the Open Class regulations that the car has to run cats if it came with cats. In the OE location, too. Obviously, the latter isn't really possible due to the engine swap. But I overheard that at least one of the other Open Class cars was in Open because they had removed theirs. Racing gossip, of course. But I decided to ask.
The answer was "run them if you can, but we know you build legal cars so we'll understand if it can't be done for heat and packaging reasons". I've always been very careful about sticking to the regulations, and I'm glad to see it's been noticed. Then again, I'm probably the only person who's ever required about the minimum required length of the tow rope...
Anyhow, I cut the cats out of the car and replaced them with pieces of straight pipe. I discovered while doing this that one of my cats had actually been damaged at some point. Quite a while ago from the looks of the battered core that came out of it. Interesting.
With the cats gone, the car is noticeably louder. It has more ground clearance, too. It's too early to tell if it's going to be cooler, but taking that broken cat out of the exhaust can only be a good thing.
entry 1048 - tags: exhaust, cats | | | 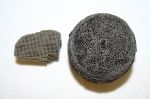 | July 20, 2012 - Here's what the core of the cat looked like once I got it out.
That's a piece of broken ceramic core cat on the left. The round one is a metallic core cat, which is probably why it simply bent and banged up instead of shattering. It's a pretty compressed little unit, though - it's about 1.5" smaller in diameter than it was originally! It's just about small enough now to slip into the 2.5" pipe. I'm thinking it just kept on getting banged around inside the housing and eventually got smaller. Good failure mode I suppose, it didn't clog anything the way a ceramic one can.
The housing had an impact mark on the bottom. Not that bad compared to some of the other stuff under there and it probably pre-dated the skid plates, but the cat had taken a hit.
entry 1049 - tags: exhaust, cats | | |  | August 7, 2012 - Summer Camp track time!
The Summer Camp is where the car made its first tentative laps of the track and is usually the last test before the Targa. Not this year, of course. But it's always a bit of a milestone.
This year, there were three back-to-back days and I was to be giving rides all day, every day. That's at least 150 laps if all went according to plan. Because of the upcoming movie premiere, I had reverted the car to full Targa spec, right down to the tires and the tall ride height.
Okay, that wasn't a great plan. The weather was hot, the usual 95F sunshine we get in Grand Junction in August. After two laps, the rear tires simply turned to slime followed quickly by the fronts. Even if I tried to drive very conservatively, I'd only get two and a half laps before the rear started to behave like it was on castors. It actually wasn't that much fun to drive. The car was also having trouble staying cool. Every car was, actually - even a stock Z06 and the other V8 Miatas.
Then, just as I came in to the difficult braking zone, I heard a clunk and the steering wheel shifted. I'd had the car aligned the week before and hadn't put a wrench on every single bolt, and one of them had moved. Just like last year! Luckily, I had marked the cams so it was a simple matter of putting the bolt back in to position and torquing it hard. All the others were nice and tight. I let the car cool for a bit too, it was getting pretty warm under there to do suspension work.
For the next day, I put my undercar ducting on, swapped in the RA1 tires and dropped the car by 5 turns on the spring perches. Much better. The car was fun again, and reasonably quick even though I wasn't going for fast times. Average lap times were in the low 1:04 to high 1:03 times, which is as fast as anyone was going. The improved front airflow seemed to have solved the cooling problem too, as the car was happier all day while all the others continued to wilt in the heat.
On Friday, I went out for my first session and the car felt great. We came in to the pits and I popped off the steering wheel and laid it on top of the instrument cluster, as normal. It slipped off, so I lifted it a bit higher and put it back on - and when I did so, the padded rim of the wheel bumped against the windshield. It wasn't that hard, so I was shocked when I looked up and saw the big star in the glass. It wasn't safe to drive like that so my day was over. What a goofy problem!
A local glass company had the windshield in stock, so I scooted over there and had it installed. I was back at the track a few hours later, but decided not to push my luck as the adhesive was still curing. It's the third time I've had a new windshield put in this car, and I have yet to actually break it in a traditional manner. In sympathy, Nancy decided to take a rock later in the day and also cracked the glass.
So that was the end of the Summer Camp track time. Greasy tires, hot engine, broken glass and slipped alignment cams. But also some nice clean, quick runs and I tried a couple of things that may come in handy later. So it was not a complete waste. But it sure was frustrating.
entry 1050 - tags: testing, tires, suspension, glass | | |  | August 7, 2012 - The big premiere for Racing the Rock was on Friday night.
We'd been doing publicity all week, with various team members and Adam visiting pretty much every media outlet in town. We rented the historic Avalon theater in Grand Junction and invited everyone to come out and see the show. For almost everyone there, it was the first time they'd seen it - even for most of those who were on screen!
We started by introducing everyone, then finally let it roll. It starts off with a black screen as you hear Janel and I discuss the upcoming stage, then the screen bursts in to life as we launch into it. It got my heart going right from the start. Adam did a phenomenal job of editing the thing, teasing some great story arcs out of Brandon and Zach trying to gel as a team as they also came to grips with Grand Touring, and about our run for the top of Open. I got right into it, trying to push the accelerator down as I watched the in-car shots. Even Janel learned some things, such as just how bad the visibility was the second time we went through Carbonear. It's funny, too - a montage of the classic GoPro starting shot of people squinting at the camera display had everyone laughing pretty hard.
After the film, we all trooped down to the front for a Q&A session about the movie and the race. Good questions for everyone, and the feedback was very good. Everyone loved the show. Adam looked very relieved.
DVDs of the film can be found at Flyin' Miata. If you're a car fan, a Miata fan or specifically a Targa Miata fan - I think you'll really enjoy it.
Photo by Ben Padolski.
entry 1051 - tags: movie | | | 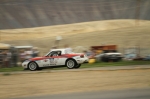 | August 9, 2012 - I've been going through the pictures from the Summer Camp.
It's always interesting to see how the cars look when caught in the middle of doing something. I can see what other drivers are doing, how the suspensions are working and generally if the cars are in shape. This particular picture caught my eye - as you can imagine, that's maximum braking. There are a number of others that show the front compressed but not many that look quite this dramatic. I'm not sure if this was on Wednesday (slippery tires, tall ride height) or Thursday (stickier tires, lower height).
The car is fitted with 550 lb springs in the front, so you can see just how much weight transfer there is. It's not fully compressed in the front based on the remaining ground clearance, so the wheels can still deal with some pavement imperfections. Despite the tall stance of the rear, the car always felt stable like this. Some of the other pictures are rapid-fire shots of the car going over berms, so it's great to be able to see just how it deals with the impacts while loaded up. It's almost slow motion video.
On one of the other cars (not a Miata), you can see the front wheels going into positive camber on a couple of corners. Obviously a problem, we'll have to deal with that. And I want to take a good look at the data for how I'm entering some of the corners, there's one where I seem to have a different line from a particularly quick driver. Always something to learn!
entry 1052 - tags: testing, suspension | | |  | August 14, 2012 - There was a big V8 Miata meet at the Summer Camp.
Zach took this shot and posted it to Autoblog. 4500 hp spread amongst 11 V8 Miatas. There are also are two more V8s to be hiding under covers in the back. Zach also covered the rest of the Summer Camp and captured yours truly blathering on about V8 Miatas. It happens a lot.
Autoblog also posted about the DVD. So did Hooniverse.
entry 1053 - tags: movie, summer camp | | | 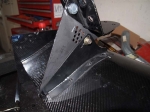 | August 16, 2012 - Time to start playing with the big wing I picked up a few months ago.
The method of adjustment is actually pretty cool - by choosing your combination of holes, you can get surprisingly fine adjustments yet they are perfectly repeatable. Once you know what a certain hole is, you don't need to measure the angle of the wing. Much easier than turnbuckles.
entry 1054 - tags: aero, wing | | | 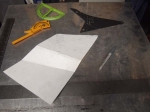 | August 16, 2012 - The mounts are going to be interesting to build.
I'm patterning them (partially) after the ones used on Porsche GT3 cars, as my wing mounting points are 1.75" closer together than my chosen mounting spots on the body. To make things even more interesting, they need to twist about 9 mm from front to back.
First, some cardboard templates before I commit to aluminum.
entry 1055 - tags: aero, wing | | | 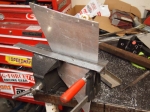 | August 18, 2012 - Some of the high-dollar equipment I used to make the uprights.
I don't have a sheet metal brake at home, so I had to improvise. Two short pieces of angle iron, a vise and a C-clamp combined with some muscle did the job. My workbench is made of heavy steel and bolted to the concrete floor of the garage - people ask why. It's so I can romp on it when doing things like this!
entry 1056 - tags: aero, wing | | | 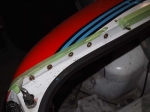 | August 18, 2012 - The uprights are attached to the car with rivnuts.
I chose this location for the mounting points for several reasons. The usual trunk lid mounted setup wasn't compatible with my stripped-out trunk lid, and I'm not completely convinced that this is the ideal place to put 100+ lbs of load anyhow. I also couldn't attach to the trunk lid even if I wanted to because of the pins.
This vertical lip is a great option. It's very strong, and my 1/8" thick aluminum uprights fit nicely in between the trunk lid and the body. They're also more watertight than having holes in the trunk lid, and if I remove the uprights there's no visible sign of the wing. I'm pretty happy with it.
entry 1057 - tags: aero, wing | | | 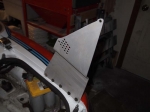 | August 18, 2012 - Here's one of the finished uprights in place.
I'll put up some more pictures of them in the daylight later. You can see all the holes for the adjustment system as well as the double bend that moves the mounting points inboard and also twists the upright. Did you ever notice that the trunk opening for the Miata doesn't have parallel sides? I hadn't.
You can see the specific shape of the mount between the holes - that's copied right off the steel NASCAR mount, and is needed to allow the maximum angle position. It appears there's about 16 degrees of adjustment in this wing, by the way.
Once I was done with all the shaping, I threw the uprights in the bead blaster to give them a nice finish.
entry 1058 - tags: aero, wing | | | 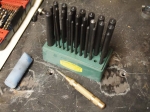 | August 18, 2012 - I didn't use any special tools to build these uprights.
Well, other than the bead blaster at the end. The aluminum was cut with a battery-powered jig saw and final shaping was done with a hand file and a belt sander. Holes were all hand-drilled, and you've already seen the exotic brake setup. Three of the most useful tools are shown here.
The transfer punches allow you to transfer the center point of a hole to a new piece of metal. You simply put the appropriately sized punch in the hole and whack it with a hammer. Voila. I got these from Harbor Freight, although you can spend a lot of money elsewhere if you want.
The gold punch is spring loaded. I used it to emphasize the dimples from the transfer punches. There were something like 60 holes involved in this project, and every single one of them lined up. Also Harbor Freight.
The blue stick is wax. Spreading this on the blade of the jig saw kept it from loading up with aluminum and helped it cut smoothly. I'd read about this somewhere, but never tried it. It works really well. I used ski wax because that's what I have in my garage.
entry 1059 - tags: aero, wing, tools | | | 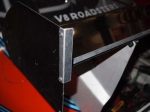 | August 18, 2012 - An interesting touch on the wing.
The left end plate had this cute little Gurney flap on it. The NASCAR cars are always turning left, of course. I suspect the airflow was a bit sideways in the middle of those long corners, and the flap made everything just a tiny bit more efficient with a bit of side force. Some of the end plates available for these wings are actually little aerofoils.
The flap along the back of the wing wasn't there when I got the wing. There was a slot for it, though, and a piece of Home Depot aluminum angle slipped right in. It's locked in to place with the end plates.
entry 1060 - tags: aero, wing | | | 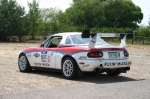 | August 21, 2012 - First road test with the wing.
Not really much of a test, but I can confirm that the wing is properly anchored and stable at 80 mph with no movement of the assembly. That's about all I can do on the road, really. But this is also the first time I've seen the car out of the garage with the wing on it. With the front splitter, it looks as if it was supposed to be this way from the start. What a mean looking car.
entry 1061 - tags: wing, aero | | | 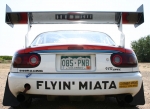 | August 21, 2012 - Gratuitously dramatic wing photo.
I'm really happy with how the mounts turned out. They won't work with a normally hinged trunk, but otherwise they're just what I wanted. The placement of the wing is not based on lots of aero testing, but is simply hung up in the air. I'll do some further testing later to check air turbulence and direction. The mounts will make that easier.
entry 1062 - tags: aero, wing | | |
|

 THE DIARY