| MIATA BUILD |
|
|
 | | 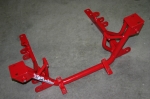 | February 14, 2011 - The V8 Roadsters front subframe is here - and it's a beautiful thing.
We also received the differential mount. More V8 Roadsters parts are coming, but the subframe will allow us to double-check our transmission tunnel modifications and move forward with the work.
entry 793 - tags: subframe, V8 conversion | | | 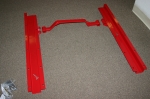 | February 25, 2011 - The frame rails have arrived.
That cross bar will support the T5 transmission. As an added bonus, these rails will help protect the bottom of the car and provide an excellent jacking location.
entry 795 - tags: stiffness, conversion | | | 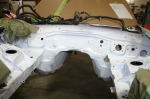 | March 31, 2011 - That's a much nicer engine bay!
Not a concours job, but it'll do the job. I'm now out of the original bucket of white paint, so I'll get a quart mixed up to keep on hand for future touch-ups.
entry 802 - tags: paint, conversion | | | 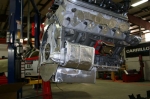 | April 19, 2011 - Everything's here.
It's time to start the build. And just in time - the car's supposed to be in Atlanta for the Mitty vintage races. It has to be on the trailer in a week. Can it be done?
Maybe. Between the long period of disassembly, the fact that it's a built engine from a different source than FM's usual crate motor and the different transmission, I've found a lot of little items that have been overlooked. Some are simple to fix, such as the missing motor mount bolts. Some are a bit more complex, such as the remote oil filter mount that was forgotten. Still, if all goes according to plan the engine will be in the car tomorrow.
entry 804 - tags: conversion, V8 | | |  | April 19, 2011 - Even though the engine block has been hot-dipped, I ran a tap down the mounting holes in the block.
It made a big difference to how easily the bolts went in. A tap and die kit should be part of every mechanic's tool set.
entry 805 - tags: conversion | | |  | April 19, 2011 - In order to fit the engine in the Miata's small engine bay, you have to use just the right accessory drive.
GM is thoughtful enough to make several options available as kits, including clear instructions on how to mount it along with well sorted and labeled fasteners. It's a pleasure to work with parts like this.
Of course, there was one little problem. The engine has a non-standard damper with a smaller diameter crank pulley. So the included serpentine belt is too long. This is the sort of thing I ran in to all day, and that's what will keep the car from running at the Mitty.
entry 806 - tags: conversion, accessories | | |  | April 19, 2011 - The bellhousing to attach the T5 transmission to the LS engine is a beautiful piece.
That's a special release bearing being test-fit in there at the moment.
entry 807 - tags: conversion, transmission, bellhousing | | | 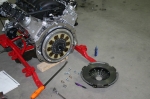 | April 21, 2011 - That's one cool looking clutch.
It's not an ideal street setup, but it should hold really really well.
entry 808 - tags: conversion | | | 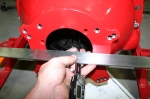 | April 21, 2011 - The release bearing needs to be set up with the correct clearance.
To do this, I installed the bellhousing without the bearing and measured the distance from the mounting surface to the fingers on the pressure plate. Then I pulled the bellhousing off again, installed the release bearing in the housing and made the same measurement. Using some teflon spacers, I set up the bearing with 0.100" clearance to the fingers. Voila! Time to move on.
entry 809 - tags: conversion, clutch, release bearing | | | 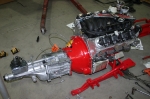 | April 21, 2011 - Ta-daaah!
The drivetrain is ready to install! This is the first T5 V8 car built at Flyin' Miata, and the new transmission caused a number of small problems that had to be resolved. Nothing major, just things like mismatched bolt lengths and different hydraulic plumbing, but it meant I spent most of the day dealing with them.
entry 810 - tags: conversion | | | 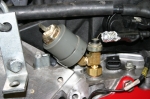 | April 21, 2011 - As with the original engine, I'm going to run both an oil pressure gauge and a warning light.
A 1990-94 Miata provided the sender for the former and a 1995-05 Miata provided the switch for the latter. Packing them both into the tight space at the back of the intake manifold was a bit of a challenge, but with the right collection of pieces they tuck in nicely!
entry 811 - tags: conversion, gauges | | | 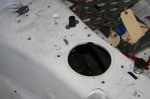 | April 21, 2011 - Time to install the drivetrain!
Unfortunately, I hit a snag immediately. The shifter on the T5 transmission is about 3.5" further forward than stock. Easy enough to solve with a hole and a cover plate.
While speaking with Steve at V8Roadsters about this - just to make sure it's normal and not the result of having the incorrect transmission! - he strongly recommended going to a Pro5.0 shifter instead of the stock setup. Steve's been quite helpful answering questions related to this T5 setup.
entry 812 - tags: conversion, transmission, shifter | | | 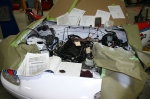 | April 21, 2011 - A change in plans.
The plan was to get the car up and running and giving rides at the Mitty vintage races in a week and a half. We got started on assembly late because it took longer than it should have to collect all the parts. At this point, we could thrash on the car and get it running in time - but we'd have to take it all apart again to do it right. Remember, this car needs to be reliable like an anvil. Most toy Miatas only have to survive 20 minutes on the track, and if something goes wrong they'll miss a couple of sessions. A Targa car has to be able to take abuse for a solid week.
So we made the decision not to bring the car to the Mitty. I'd rather build the car once, and build it properly, instead of hacking it together just to meet a deadline. The new goal is to take it to High Plains Raceway for shakedown testing on June 4th. That should not be a problem.
entry 813 - tags: conversion, schedule, testing | | | 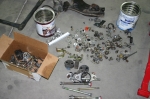 | April 22, 2011 - Here's one of the reasons I was having so much trouble getting any progress made on the car.
When I disassemble a car, I bag all the fasteners and label the bag. Driveshaft bolts go in a bag, front suspension bolts go in a bag, etc. I didn't take the car apart this time. The person who did simply dumped all the fasteners in various coffee cans and boxes. I spent a ridiculous amount of time sifting through them trying to find the one special bolt used to attach the main power feed to the cut-off switch, for example. I never did find the ones for the steering rack.
It takes just a little bit longer to do it right, but it saves so much time overall!
entry 814 - tags: conversion | | | 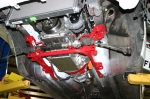 | May 12, 2011 - Tadahh!
Visible progress is being made. With a 3.5" hole drilled in the transmission tunnel, I was able to drop the engine into place. Actually, I put the engine under the car and lowered the car on top of it - while the original build of the car was done on jackstands in my garage, it's a real treat to have access to a lift for the rebuild.
There's a ratchet strap holding the transmission in place, looped over the roll cage and through the shifter hole.
entry 815 - tags: conversion | | | 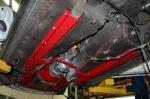 | May 12, 2011 - With the transmission in place, I was able to locate the frame rails and bolt them in to place.
The mount for the T5 transmission has no adjustability built in, so I wasn't able to do this earlier as can be done with the T56 transmissions.
I did run into a small problem with the transmission crossmember - the bushings on the crossmember were too wide for the brackets. Some grinding ensued, resulting in hot pink urethane dust. Very entertaining.
As per Bill's suggestion, I tack-welded the bolts for the subframe to the floor. This means the rails can be easily removed without the need to pull the seats or to have someone hold the top of the bolts. That's a good thing, as one of the rails needs to be removed in order to pull the transmission.
entry 816 - tags: conversion, transmission | | | 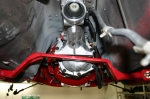 | May 12, 2011 - Here's a problem.
The T5 has an angled rear mount. The red crossmember is correct - but the transmission itself is rotated about 5 degrees counter clockwise. The bellhousing isn't made quite right.
Since I'm aiming to have the car running, broken in and shaken down by a trackday on June 4th, I don't have time to mess around with this. So the T5 is coming out of the car and a T56 is going in place. That's a well proven and engineered solution and we have almost all the parts on hand at Flyin' Miata.
The required frame rails and transmission crossmember are being shipped out today from V8 Roadsters and should be here on Tuesday. I was planning to spend the weekend working on the car, but I think I have enough to keep me busy.
Frankly, I'm a bit relieved. While this transmission is used in the V8R Spec cars, the torque ratings for a T5 are lower than the torque output of this engine. Even a modified T5z is questionable, although the light weight of the Miata helps. The T56, on the other hand, has no question marks around it. I'll be happy to test the T5 later, but I don't think the months before the Targa are the right time.
Most of the delays in the build of this car have involved waiting for parts for the T5 conversion as well. It's been frustrating to put it mildly. But we're back on track, so it's time to get moving ahead!
entry 817 - tags: conversion, t5 | | | 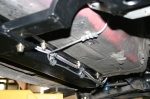 | May 25, 2011 - To take a break from wiring, I decided to run the fuel and brake lines.
It didn't take long really, but it feels good to have that done. They're anchored with rivnuts embedded in the frame rails, making it easy to remove them if required. Not the frame rails so much, the rivnuts fasten them to the car's frame at the same time!
entry 835 - tags: conversion | | | 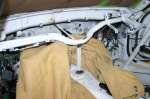 | May 25, 2011 - Long-time followers might remember that I added some custom bracing to my dash support when I built the car.
Well, it had to be cut out when the dash was removed. So I welded it back in! It makes for a very solid steering column mount. The factory adds a big beefy vertical brace but nothing to the firewall.
entry 836 - tags: conversion | | | 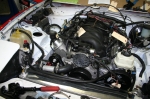 | May 25, 2011 - The wiring continues.
I'm getting pretty close, now it's just a matter of identifying the last few wires, replacing a couple of missing connectors and running the wires to the alternator. Then I'll finish anchoring the harnesses in place (I've done a bunch of work in that area already) and start running some current through the car.
I'm pushing to get the car running for a track day on June 4th. I'll have to take a couple of shortcuts such as temporarily hard-wiring the fans, but it's looking very promising.
entry 837 - tags: conversion, wiring | | | 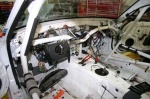 | May 27, 2011 - The wiring is getting close!
It doesn't look like a lot of progress, of course. But wiring a car like this is a series of small jobs - hooking up the reverse lockout solenoid, tracing the oil pressure sensor wire through the harness, etc. But it's close!
entry 838 - tags: wiring, conversion | | | 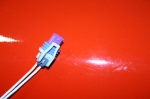 | May 27, 2011 - One of the cool things about GM is that just about anything with a part number can be ordered.
Case in point: this plug for the engine coolant temperature sensor. I don't know why it was removed from the harness by a roving parts scavenger, but a call to the local dealer yielded a replacement on the shelf. Try that with a random Mazda connector!
entry 840 - tags: wiring, conversion | | | 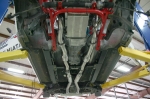 | May 27, 2011 - In preparation for the first noise from the car, I've loosely installed the exhaust system.
I'll have to take it out again after the driveshaft arrives on Tuesday, but it was just too pretty to leave on the floor. Besides, this way I can plug in the O2 sensors.
entry 842 - tags: exhaust, conversion | | | 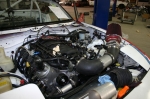 | May 27, 2011 - It's alive!
Obviously, the intake system is temporary. But it makes noise!
First, I unplugged the engine computer (PCM in GM-speak) and powered up the electrical system. I then cranked the engine until I had oil pressure. This took a long time because the pump had to fill the oil cooler as well as the completely dry engine. It probably only took about 30 seconds total of intermittent cranking, but it seemed like forever. Finally, the gauge jumped up.
I pressurized the fuel system and checked for leaks. Then it was time to take a deep breath and hit the key. The car tried to stumble into life, but it wasn't happy about it and was acting like it had very low fuel pressure.
I realized I couldn't hear the fuel pump priming when I turned on the key. Checking out the wiring looked good, and hot-wiring the pump woke the engine up on 6 cylinders. I'm guessing the VATS anti-theft program got turned back on in the PCM so it won't run the pump. I'll turn that off again soon, but in the meantime I can run with the pump hotwired.
The exhaust system isn't bolted together and I have no cooling fan wiring yet - but it runs!
entry 844 - tags: conversion | | | 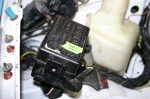 | May 29, 2011 - More wiring!
I could do it faster, but I'm trying to build a car that will survive a week of stressful days without failing - and if it does, it should fail gracefully and be easy to debug. This means a lot of time looking at how I'm going to do something, seeing if there's a better way besides the initial obvious solution. Sometimes yes, sometimes no.
I wired up the fans yesterday, for example. I needed a good power supply for the second one, as I've learned in the past that these particular fans can pull over 20A each on startup. The usual way is to run a wire with an inline fuse. But there's a spot in the factory fusebox that isn't used on my car - it's for the ABS system. It also happens to be right beside the fuse for the main fan. So I removed the fusebox and pulled the appropriate connector off the bottom. Turns out the wire I needed simply wasn't there, but there was a spot in the connector plug for a spade connector. I pulled one out of an unusued plug and slotted it into place. Now I had a factory-designed 30A power source! I ran that down to a new relay which is triggered off the main fan. It worked out pretty slick. I even used the same wiring colors used by the main fan so that I know that yellow is a fan power wire, for example.
I also identified a fan override wire that will let me kick on the fans manually without waiting for the engine to get up to temp. I have an idea for that one, we'll see if it works out.
I also wired up the driver's side O2 sensor which needed extended wires and tightened up all the exhaust system connections. The car sounds pretty good. The PCM hasn't figured out how to idle yet so the car won't stay running without a bit of attention to the throttle pedal, but that's normal for the GM computer when it's lost power.
The new shocks ands the driveshaft should both arrive on Tuesday, and it's my goal to have the car ready for them when they arrive. It's looking promising.
entry 845 - tags: Wiring, conversion | | | 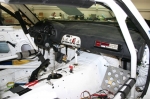 | May 31, 2011 - Visible progress!
I decided the wiring was in good enough shape to install the dash. The harness is still pretty accessible, but it's more awkward of course. It was quite a wrestling match trying to get the dash back in, it's the first time I've tried that while there was a windshield in the car.
The navigator's footrest is in, the defrost system is hooked up, the switches are wired - it's getting closer. There's no functioning speedometer in the car at the moment but with the rally computer that's not a big problem. I'll address that later.
I did realize that my current fan wiring does have a vulnerability - the right fan is completely dependent on the left fan for a trigger. If something goes wrong with the left one, I'll lose both. I know how to wire this so that both fans are independent, but I'll deal with that later.
entry 846 - tags: interior, conversion, wiring | | | 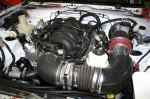 | May 31, 2011 - The engine bay is looking a bit better!
I was able to sort out an intake system that allows the use of both the hood and the driver's headlight - hopefully. It's not ideal, but it'll do for a start. I've also cleaned up and anchored the wiring. Other than a lack of a hood prop, this is pretty much ready to go.
entry 847 - tags: engine bay, conversion | | | 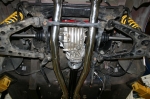 | June 1, 2011 - The installation of the V8 is going to require the reworking of a few things.
When I first built the car, I installed the rear subframe brace from a 2003. This not only stiffened up the rear of the car, it also provided protection. That wasn't just theoretical, inspection after the race showed how much abuse it had soaked up. Granted, I had some other problems that were causing this, but still.
In order to make room for the V8 exhaust, I had to go to the less beefy version of the brace used from 1999-02. The two forward cross braces are gone because the exhaust pipes hang too low - and that means they're going to be susceptible to damage. I've got some ideas, but it's one of the things I'll have to address.
entry 850 - tags: exhaust, conversion | | | 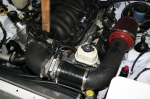 | June 6, 2011 - A few days of very hard work and no updates.
So let's catch up, shall we?
First, the new intake. This has been a bit of a challenge because the throttle body is 4" and the MAF is 3.5". On the rest of the cars built at FM, we've used a 4" MAF. So I've had to play with a couple of different tubing sizes. The previous iteration dropped down to 3.5" then back up again, but there's no reason for that and it put a big 4" tube in the tightest spot. So I stopped by a muffler shop for a tight 90 degree mandrel bend of 3.5" tubing and assembled this setup.
Yes, the filter is right above the left header. I'll work on that later. Right now, the focus is getting the car to the track on Saturday.
entry 853 - tags: intake, conversion | | | 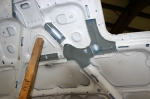 | June 6, 2011 - Unfortunately, even my "low profile" intake wouldn't fit under the hood.
Then I discovered that, even with no intake at all, the hood wouldn't close. I spotted the power steering reservoir as a problem. But removing that didn't solve it either - the throttle body hit the hood!
After checking with Tyler, the fabricator who builds the V8 cars at FM, I found out this was normal. Some of the hood structure would have to be removed. So I proceeded to make copious amounts of noise. And finally, the hood closed.
entry 854 - tags: hood, intake, conversion | | | 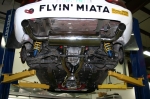 | June 6, 2011 - Lots of final details in the last day before going to the track.
Including some more test driving, and a problem is appearing. The car's running oddly, with a lot of hesitation at times. After some poking around with the wiring, I finally got the OBD-II port to work and discovered that neither of the O2 sensors are providing a real signal. They're flatlined at 0.455v. Turns out, that's the same reading you get if the sensors are disconnected.
Some more poking around at wiring and all the connections appear to be good. Bill and I are doing a bunch of research to see what normal O2 wiring readings should be, we're seeing some things that don't quite make sense. For example, it seems the GM computer feeds around 5v down the "high signal" line and 0.455v less down the "low signal" line. Is that right? I'm still trying to determine yes or no.
entry 855 - tags: wiring, conversion | | | 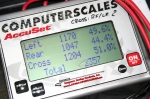 | June 6, 2011 - Before dropping the car to the ground for the last time, I decided to check the weight.
I'd been hoping for about 2300 lbs wet. Well, not quite. It's closer to 2400 by the time a full load of fuel is taken into account - I was only at around 1/4 tank. Assuming there's room for another 8 gallons of fuel in the car, that's about 50 lbs and it'll all land on the rear wheels. That brings the fore/aft weight distribution to 54:46. By the time I've loaded in a spare and the tools in the trunk, I think the final balance should be pretty good. It's interesting to note that the first time I weighed the car in the initial form, it had a 53.8% front weight bias. But by the time it went into the trailer for the race with a spare tire and tools and the like, that had changed to 50.2% front. So I'm not that far off.
The reason I was hoping it would be 2300 lbs is that I was assuming a 200 lb weight gain over the 2100 lb naturally aspirated form. But when I think back, I think it was closer to 2200 in race weight. There will be a few more changes, but probably nothing drastic.
entry 856 - tags: weight, conversion | | | 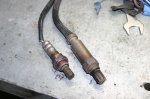 | June 8, 2011 - Progress.
The O2 sensors have now reported for duty. It's quite possible that one of them was incorrectly diagnosed as wrong, thanks to some confusion on my part between Bank 2 Sensor 1 and Bank 1 Sensor 2 in my logging program. Possible, but not certain! Regardless, I can read them both happily now.
Unfortunately, that hasn't solved the problem. The sensors are displaying what I can feel - the car is going lean for 15-20 seconds, then rich for 15-20 seconds. One interesting thing is that the car still isn't going into closed loop as far as I can tell. I haven't spotted the problem in the datalogs yet, but I'll get there.
entry 858 - tags: conversion | | | 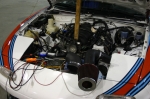 | June 9, 2011 - A-ha!
Bill and I spent some time on the car last night, and determined that the injector duty cycle is changing when the car goes rich. That means it's not a mechanical problem such as a fuel pump, but bad instructions from the engine computer. We also discovered that unplugging the MAF makes the car go rich, which points towards a real problem with the programming.
After discussing this with Steve from V8Roadsters, it seems that our computer was reflashed for the wrong type of MAF. Unplugging it forces the computer to go back to the static tables, but they're set up for sea level and not 5000' of altitude so they're too rich. To add to the fun, the computer was given a custom operating system so our copy of HP Tuners will no longer communicate with it.
I've been put in touch with the programmer who set this thing up, and hopefully we'll have an answer soon. I've got another track day scheduled for Saturday, and I'd love to have the car on the track in full health. I'm not confident it'll be sorted in that time, but at least we know where the problem is!
entry 859 - tags: conversion, programming | | |
|

 THE DIARY