| MIATA BUILD |
|
|
 | | 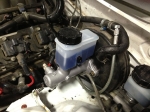 | October 2, 2013 - The master cylinder failed at the last track day.
It was an old salvage part that had been pushed hard - but I took it as an opportunity to upgrade. The previous setup used a 15/16" master cylinder from a Mazdaspeed. The Mazda 929 used a 1" master, and it bolts right on. Well, once you've reshaped the brake lines it does.
The result is a bit more braking effort and a firmer pedal. I figured I'd give it a try, so I installed a brand new 1" part. I took the opportunity to clean up the routing a little bit as well. The pedal is definitely firm, we'll see how it works at the track this weekend.
entry 1098 - tags: brakes, interchange | | | 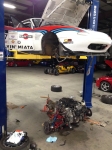 | October 8, 2013 - And out it comes.
The L33-based 5.3 has done excellent work in this car, but it's done. A 6.2 LS3 with a big cam is going to be in charge now. There's nothing wrong with the 5.3, it just doesn't have the low-end grunt of the big motor. I'm going to take this down time to sort out a bunch of other little things on the car. You know, while I'm in there...
entry 1099 - tags: engine, 6.2 | | | 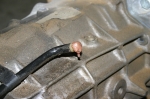 | October 10, 2013 - How hot did the transmission tunnel get?
Hot enough to melt this plastic check valve. This valve is supposed to prevent the buildup of pressure inside the trans with heat. It's obviously not able to do the job anymore, which would explain why the transmission had a tendency to leak from various seals. This will obviously get replaced.
In completely unrelated news, the exhaust system was sent off to Swain for ceramic coating today.
entry 1100 - tags: transmission, heat | | | 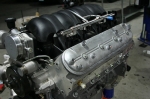 | October 17, 2013 - Did you know the LS engines have really nice valve covers underneath all those coils?
I was thinking of relocating the coils to where they wouldn't see so much heat and vibration, and the look of these is only reinforcing that.
The old engine has been stripped of all (or most) of the parts that I need, and the new LS3 is partially torn down in preparation to receive them. I'll be doing a cam swap in this next week, which is why the coils are off.
entry 1101 - tags: engine, 6.2 | | | 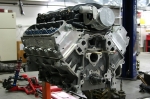 | October 24, 2013 - Cam swap time!
Working on this engine is almost like unwrapping a Christmas present - I'm discovering all sorts of new things. It's fun seeing how all the parts work together. You can look at diagrams and read about how the valvetrain works, but it's something else to actually peer down the cam bore and see the lifters tucked away. After so many years of Miata, Miata, Miata, seeing different solutions is interesting. It's also been a long time since I personally built an engine, I miss it.
The new "ASA" cam is now in place, with the timing chain back on and the front of the motor all buttoned up. All that remains is to flip the fuel rail over so the inlet is on the Miata-friendly side, change out the valve springs and install the new oil pan. Then I can start looking at putting everything back in the car.
By the way, the two dowels were supposed to help hold the lifters in place. I can't see how, I think that was a poor tech tip I found online. But they didn't do any harm.
entry 1102 - tags: engine, 6.2, cam | | | 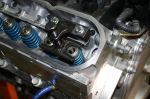 | October 28, 2013 - Time to upgrade the valve springs.
As you may recall, I'm converting an LS376/480 crate engine into an LS376/525. According to GM Performance, the differences are the ASA cam and "higher rate" valve springs. So I called GMPP and got the part number for the new springs: 12586484.
Looking for these springs, I've found they've been superseded by spring 12625033. Fair enough, JEGS even sells the cam and springs as a kit so I picked one up. This handy little Comp Cams tool lets me swap out the springs easily without pulling the heads off.
entry 1103 - tags: engine, 6.2, cam | | | 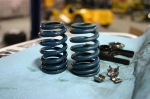 | October 28, 2013 - Curious.
The new valve springs look exactly like the old ones. I checked further, and the 12625033 is the standard spring on an LS3. So I was swapping these out for nothing.
The older 12586484 part number was an LS6 spring, and they were typically yellow. Interestingly, they also have the exact same spring rates as the current LS3 spring, with the only difference being a max lift of 0.570" instead of 0.550".
Just for fun, I peeked under the valve covers of a true LS367/525 engine and what did I see? Blue springs.
Busted! GM doesn't actually change the springs on these engines anymore. Even if they did, the rates aren't any different. The max lift isn't an issue, as the 0.525" max lift is the same as that found on the 480 hp "hot cam".
So I wasted some time and money, but I learned something. Isn't that how it always goes?
entry 1104 - tags: engine, 6.2, cam, valve springs | | | 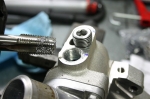 | November 6, 2013 - More preparation of the new engine.
The water pump has a couple of fittings for the heater. That's not needed here. When I installed the previous engine, I'd just installed rubber caps. These had a tendency to degrade over time, unfortunately. I never had one fail, but it was only a matter of time.
This time, I pulled off the fittings, tapped the holes and installed steel plugs. No failures here! If I ever decide to retrofit a heater, I can just screw in some brass nipples.
entry 1105 - tags: engine, 6.2 | | | 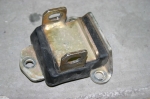 | November 6, 2013 - More preventative maintenance.
These motor mounts see a lot of abuse, both from a rambunctious engine and heat. Mine were in pretty good shape, but I figured it was much easier to change them now than later. I'm taking other steps to help them last longer - you'll see more of that later.
entry 1106 - tags: engine, 6.2 | | | 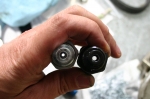 | November 6, 2013 - Another tweak.
The steering effort is pretty good on this car, but I've been wondering how it would feel with a bit less assist. This restrictor (on the left) will drop the pressure in the system a bit. Let's see how it works.
I've got one for my LS1-powered MG as well, as the NA steering rack in that car wants less pressure than the NB rack in the Targa Miata.
entry 1107 - tags: steering | | | 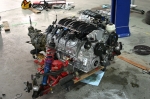 | November 6, 2013 - After a bunch of little individual jobs, adventures and solved problems, the engine is almost ready to install.
There's a new LS7 clutch and flywheel inside the transmission bellhousing. The oil pan came off again to check some clearances for another installation, then went back on. The new motor mounts are in, plus of course the cam and valve springs. I found a little squeak from where the rear cover had been just barely touching the crankshaft, and that's been sorted. The intake manifold insulation has been removed for hood clearance, and the fuel rail is flipped around to put the inlet where I want it. My dual oil pressure sensors are in place. A little bit of interference between the steering rack and the oil pan has been clearanced. We're almost there.
The only thing left is to reinstall the balancer, and for that I needed a special tool. The LS engines have been made by the millions over the last 16 years, but it's still a new and exotic engine according to most parts stores and tool manufacturers. It's almost impossible to find a balancer installation tool that is compatible. I had to build my own out of materials from McMaster Carr!
entry 1108 - tags: engine, 6.2 | | | 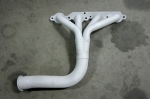 | November 11, 2013 - This should take care of the heat problems I've been experiencing.
The headers and the first part of the exhaust system have been given a Swain "White Lightning" ceramic coating. It's a big step up from the locally applied "ceramic" I had done years ago. That particular coat lasted about as well as my high-temp paint job did. This is much thicker and stronger.
entry 1109 - tags: engine, 6.2, ceramic, exhaust | | | 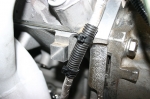 | November 11, 2013 - Future failure avoidance.
Prior to installing the engine, I spent a fair bit of time going over the wiring harness and ensuring it was well restrained but accessible. In a couple of spots, I was unable to avoid wires making contact with the block. In those places, I made sure the wires were protected. They're not quite in contact, but with all the vibration to come they need something.
entry 1110 - tags: engine, 6.2, wiring | | | 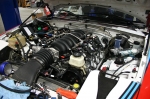 | November 13, 2013 - And the engine is in!
This makes it sound a lot quicker than it really was, but after a bunch of fiddling about and checking I have it installed. And now comes the fun part - the wiring.
entry 1111 - tags: engine, 6.2 | | | 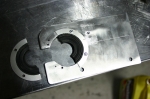 | November 13, 2013 - Because the Targa Miata has a stripped out interior and no HVAC system, I've got some space that's not usually available on the street cars.
I've decided to mount the engine computer to the interior side of the firewall so it'll stay a bit cooler than being underhood. This means I have to pass some significant cables and connectors through the firewall. I don't have any wire grommets that size.
This panel is the answer. It has a clip on the backside to lock the bottom into place and the top is bolted down - it's upside down here. The wires are all centered in the grommet before the second half is riveted in place.
entry 1112 - tags: engine, 6.2, wiring | | | 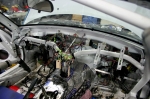 | November 13, 2013 - Wiring fun!
This poor car has been through a lot. I stripped out the harness when I built it, and modified it for my purposes. When the original V8 conversion was done, the engine wiring came from a 2002 Firebird - but had already been installed in another Miata. Then I kept modifying and tweaking things, changing the harness around further. Wires for electric windows, cameras, dataloggers, extra sensors, goofy rear wings and the like. It's a bit of a mess.
With the new engine, I'm installing a standalone engine computer and wiring harness. I'm taking this opportunity to revisit all the wiring in the car, removing the leftover bits from the four cylinder build and that junkyard GM stuff. This under-dash harness will be greatly simplified, and the whole thing should be much more robust when I'm done.
It sure looks horrific when it's unwrapped and spread out! The junkyard GM parts are still wired in, and the new GM wires are also looped around like snakes in this shot. Fun stuff.
entry 1113 - tags: engine, 6.2, wiring | | | 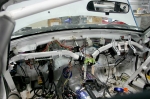 | November 25, 2013 - Progress!
After hours of tracing wires, the harness is getting slimmer and more robust. It's pretty entertaining seeing the convoluted path taken by some of these. I've removed several big connectors and just streamlined the harness overall. The Coralba rally computer and Peltor intercom wiring is better now. It'll be a lot easier to maintain this setup. It still looks a bit frightening because the harness is unwrapped, but it will be all tied up and secured before the dash cover goes back on.
entry 1114 - tags: engine, 6.2, wiring | | | 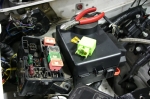 | November 25, 2013 - Here's the real progress.
That's the Miata fusebox in stripped-down mode. What's missing? The main relay! Yes, the relay that failed and cost us the win at Targa Newfoundland. It gives me much glee to pull this little sucker out.
It's been replaced by the new GM Performance Parts wiring harness, with wiring that's built to run a big hefty V8 with eight hungry high-energy coils. The Miata relay was designed to handle a quarter of that.
As you can see, a number of other fuses and relays are also missing from the stock fuse box as they're simply not needed any more.
entry 1115 - tags: engine, 6.2, wiring | | | 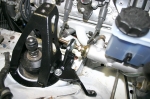 | November 27, 2013 - Paco Motorsports is a new sponsor of the Targa car, and here are a few goodies that are being installed.
The master cylinder brace (available from Flyin' Miata) is a simple bolt-in, and it makes a pretty dramatic difference to the amount of flex in the braking system.
You can also see the base for the new shock tower brace. It's no coincidence that this is compatible with the master cylinder brace. It's a step up from the one I've been using for the past few years, both in terms of strength and with improved access to the shock adjustment knob. I like it.
There are some new prototype parts from Paco on the way
entry 1116 - tags: brakes, bracing, paco motorsports | | |  | December 10, 2013 - Farewell, Gander.
The Targa Newfoundland organizers have announced the biggest change to the route in the event's history. The rally will no longer head for the Gander region. This means the loss of many of my favorite stages: Leading Tickles, Port Blandford, Bobby's Cove, Pleasantview - and of course, Gander.
Leading Tickles (which is known by different names depending on how long the stage is in a given year, and which direction you're going) is a rockship blast through the woods on a curvy road with patches on patches. You have to be on top of your game, and if you're in a well set up car with good suspension it's magic. It also has consequences, this is the stage that took out the factory MINI in 2008 in a high speed crash that left car parts all over the woods. Oh, it also has the best stage name in the event.
Bobby's Cove wasn't super-challenging, it was just smooth and very fast. That's the stage where I passed a 30 km/h speed limit sign doing 179 km/h, always a favorite moment.
Gander, of course, is one of the famous stages. It's 5 minutes of mayhem, a flurry of identical left-right-left corners as you rampage through a fairly nondescript subdivision. It was ferociously difficult to finish without penalties, and always a highlight of the race for fans and competitors. Even just standing by the road and hearing the half-dozen cars currently on course roaring away out of sight behind the houses was entertainment.
As a result of these changes, the event is now more compact, with slightly shorter transit times. That's nice, but it will be a shame to lose what was arguably my favorite day of the race. The time schedule has also been tightened up, with registration and odometer check on the same day as the prologue and the awards gala on Friday night after the last day of racing. The first change means less time to deal with potential scrutineering problems and less time for the navigators to work on their books, the latter means Friday will be a very, very long day.
Take a few minutes to honor a couple of the greats.
Leading Tickles 2011
Gander 2008
The photo is from Gander in 2011, taken by Zach Bowman.
entry 1117 - tags: news, route, gander, pleasantview, bobbys cove, leading tickles | | |
|

 THE DIARY